26 September 2012

It's Underwear Time Again!

With the new daily-wear under  things out of the way, I decided I wanted new *lingerie* as well.  Specifically, a night-rail (nightgown).  I saw this one from Realm of Venus (scroll down to "camicia") on Pinterest, and I HAD to have one. :)

So I went to the fabric store looking for cotton batiste.  I love cotton batiste - the weight, the hand, the translucence, the floaty way it moves - it's just lovely stuff, and I never get to use it for anything.   I couldn't find it, although I did find a good substitute.  It's a cotton/poly blend (I typed "cotton pony blend" there at first, LOL), and it's the same weight, weave, and hand; and while it was a bit stiff in the store, it washed up nice and soft.  I'm not about to wear polyester under a bunch of other clothes, but for a nightie, it'll do just fine.  Especially since it was 60% off and I got the whole piece for $10.  :o)

So, the "pattern" I used, which is actually not a pattern, is the same pattern I've been using for this type of chemise/nightrail since I was 17.  It's easy enough to just eyeball without measuring, it's fast, and on fabrics with a 2-way straight grain, you can just rip the pieces instead of cutting, which saves a bunch of prep time. (Note: I'm not claiming period-icity for this pattern at all.  It's not researched. It's something someone showed me a million years ago, and it's easy, and I love using it.  That's all).


For the body, I use the full width of my fabric - usually a 45" fabric.  It's already folded vertically, so I cut down the fold and voila: a front and back.  The length is from 2" below my collarbone, to the floor.

For the sleeve, I measure from my collarbone (with arm extended) to the second knuckle of my fingers.  Note: in the picture here, the sleeve-rectangle on her arm is shown with the fabric piece folded in half lengthwise (see below).


Next I fold the sleeves in half lengthwise, and then lay them flat over the body pieces, perpendicular to them, and overlapping at the corners.  (The overlap can be as deep, or not, as you want. For a drawstrung or elastic neckline, I don't overlap much. For this nightrail project, since I put a flat, stationary neckline band on it, I overlapped a lot to make sure the neckline would hang exactly where I wanted it to).

I cut straight across the angle.  The new edges are the seams which will connect the sleeves to the body.


Side seams are next.

I honestly don't know if it was fashionable in period to seam the sides of nightgowns all the way to the hem, or to leave them open at the bottom for a bit of leg (and ease of movement);  but I will tell you that I love wearing these so much, I wear them in mundane life as nightgowns (and to bop around the house in when I'm home alone), and *I* like to be able to kick my leg out when I curl up on the couch.


The easiest neckline solution is to hem the entire way around the neckline (careful around the corners) and drawstring (or elastic) the whole thing.

I like to gather the whole raw neck edge, and stitch it to some sort of seam binding - bias tape, a ribbon, or, in this case, a 1" wide flat neckline that I sewed and folded like a large bias tape, folded at the corners for a nice 90º mitred-looking angle.


The finished product looks something like this.


Or, if you prefer...


Not bad for $10, yeah?   Actually, this only took 3.5 yards.  I bought 5 yards for $10.  I haven't decided yet what to do with the extra. Maybe veil stuff.

If you look closely, you'll notice that 
a.  the sleeve/shoulders aren't gathered - they're sewn into the neckline flat.  This was because the overlap on the sleeve/body pieces was pretty deep.

b.  This stuff is sheer enough that you can see my sports bra through it.  This is after Kress and I played with angle and lighting so that it wouldn't be too sheer for the internet.  It's really sheer.

c.  I'm grinning like an idiot because Kress was cracking me up while taking the picture.

d.  Evie totally photobombed me again.


.


24 September 2012

Teal Gown, Navy Bliaut, and Coronation

Remember the bad pictures of the bliaut?

And the original plan, which called for a teal gown for underneath it?


Yes, that is the WRONG belt for this outfit.
It's all I have right now.  :( 


The under-layer, which itself is also a stand-alone gown:


These were all taken at Coronation over the past weekend, by the way.  

Bonus pic of me sitting around waiting for court to start.  


Coronation was pretty dang cool.   The hall could have been a bit more adequately air-conditioned, but it was decorated very nicely, the coronation ceremony was outstandingly done, and the King's Champion tournament was really cool and fun to watch.

Now I just need to finish the red half-sleeves I've been working on, and make myself some white tippets...

WANT. 


.

11 September 2012

Whoops!

I packed my camera to War of Ages, right?  Never once took it out of my bag.  I completely forgot to take pictures at all.

But it looks like someone from Facebook got me in the background of a shot during evening court:


Sorry about the demon-eyes.  I had major lens flare going on and I tried to correct it, but, well, there you go. 

I'll have better pics of this dress, if not in the next few days, from this event, then certainly in two weeks after coronation.  This is the teal linen I've been working on, with a pair of sleeves I made looooong ago.  

On a sort-of-related note, I love the site in Seguin, Texas, where War of Ages was held.  I've been there many times, but never camped over until this weekend, and now I love it even more.  Except for the mosquitoes.  And the fire ants.  And giant flying roaches.  And scorpions.  And spiders as big as my hand.  I mean, this *is* Texas and everything, but the bugs at this site were OUT of hand.  I'm covered with bites from the knees down, the cleavage up, and all over both arms.  AAAUUUUGH.  

.

10 September 2012

Nope.

Oh, dear.  The new tent didn't work out as I'd hoped.


What worked: 

  • It's cute
  • It's small
  • It's easy to put up - so easy a caveman could do it one person can do it alone
  • It held up really well in some fairly high winds (nothing horribly scary, but a front blew through, and nearly flattened our neighbor's tent while doing no damage to our tent at all!)
  • I was right about the height estimate in the picture above - the door is actually an inch or two taller than me, so the height on the tent was great. 
  • It does indeed pass the "ten foot rule" - across the field, in amongst all the actual period tents, it blended right in.  

What did totally and spectacularly NOT work: 
  • First of all, this tent is not as big as advertised.  I didn't measure the height; but the floor was supposed to be 12x12', according to the website - which I assumed meant a 12' diameter circle, since the floor is practically round (hexagonal, actually).   It's not either of those things.  My queen-sized air mattress is 5x6.5', just like a queen-sized regular mattress.  We managed to wedge it in between the center pole and one of the walls, sideways, meaning that from the center pole to one wall was less than five feet (the mattress was actually pushing the wall out several inches), making the diameter of the tent floor less than ten feet.  NOT COOL.  
  • The side walls are nearly two feet high, which was great for storage, but with such a small floor, it meant that only one person at a time could stand up, and only directly in the center, without bending over or performing various acrobatics to get around each other - more often than one, Kress and I took turns changing in the tent, or one of us would lay on the bed while the other one changed.  
  • Also because of this, the amount of stooping and bending to negotiate the storage around the perimeter of the circle and the slant of the tent walls being so low around the sides meant that I threw my back out this weekend.  So THAT was awesome.  I can barely move.  
  • What color is that tent in the picture above?  White, with a dark gray floor?   Nope.  It's gray with a darker gray floor.  Wasn't expecting that one.  The website didn't say what color the tent was, so, silly me, I figured it would be what it looked like in the picture. 
  • There could definitely be more ventilation in this thing.  We're headed into Fall and then Winter, so it's not a huge deal, but I could definitely not camp in this in the Summer. 


All of that said,  I still think this would be a fantastic tent for one person, for small, weekend events.  In fact, a friend of mine recently bought this same tent, and she used it for the first time this past weekend, too, and loved it.  So when I go to events by myself this season, if I do, I'll be taking it.  But for Kress and I, we absolutely cannot camp in this thing together again.  We're back to kicking around ideas for making our own pavilion, and have decided that once we get that done, we'll use this pointy tent as an arming pavilion for him.  For now, though, we'll be using our big blue Coleman again. 


Meanwhile, we used our EZ Up as a shaded common area for our household throughout the weekend, and it worked out really well.  We have a couple of card tables that we shove together and drape with a tapestry which is long enough to hide non-period things shoved underneath the tables (cases of bottled water, coolers), and everyone either has period-looking chairs or cloth drop-covers for their nylon camp chairs.  It actually looked pretty decent!   I can't wait to get a nice cover made for that EZ Up to make it look better, though.  :) 


.

07 September 2012

Things That Are Teal

Natalie Portman's gown from the movie
"The Other Boleyn Girl"

St. Dorothy, 1505-1510


This lovely, albeit bloodstained, gown,
which is more blue, but, go with me on this

And finally...

my latest creation, which I have not yet had time to photograph on me

hints are good, though, right?  


I'm off to the Battle of Hastings for the weekend!  More on this, and pictures from the event, next week.


.

05 September 2012

Finished Company Uniform + Jewelry

the plan
ta-da!


The Caerleon uniform - draft #1 -  is complete and ready to wear.  Yay!   One day I'll make a "real" uniform outfit;  for now this is just a pair of sleeves over a plain black dress.  I don't have my full headgear on in this pic, because I also wanted to show you the jewelry I made to go with this dress - you know, the set I lost and couldn't photograph last week when I did the jewelry posts?  

Derp. 


Here it is.  Pearls and citrine teardrops on gold chain.   This was actually the reason I started wearing a gold nose ring, LOL.  Usually I wear silver.  I've always intended to go get an invisible one for SCA purposes, but I haven't found one that I really like yet.  

Yellow-gold snood from Etsy barely visible under veil, there.   

I'm hoping next week I'll have some pics of me with the full headgear situation, of Vasilii, and of our new tent, from War of Ages, which is in just four days.  SQUEE!!  


.


04 September 2012

Under There!

Yesterday I showed you my crotchless gaucho panties (I'm sorry, I love saying that, lol).  Today it's all about the boobs.

By now you've all seen this:

15th century longline bra
found at Schloss Lengberg

And possibly something along the lines of this:

from the Wenceslas Bible


As I said yesterday, I'm not really up for a full chemise under my dresses, especially since I feel like I need to wear braies or shorts of something pant-like under there.  Ever since I started seeing these "bras" and bust-supporting chemises, I've been fascinated with them, and with the idea of adapting something similar for my own uses.

What I really love is the idea of not having to wear a self-supporting cotehardie.  Don't get me wrong, they're awfully convenient; but it means that I can either wear cotehardies, or I can wear something looser, but wear a modern bra underneath it.  And we all know exactly how comfy modern bras are.  Especially for those of us blessed by a bit extra frame size, girth, or just extra boobage.


Enter the supportive chemise!  Hallelujah!!!  I can wear a cotehardie I can BREATHE in!*   I can wear my bliaut without a cote or modern bra underneath!  I can wear looser, earlier-period stuff and not wear a modern bra or just walk around sagging all day!  BOOB SWEAT!  

Except that I still don't want a full extra layer.  Solution #1 was the gaucho panties from yesterday.  Solution #2 is a Medieval Sports Bra: 


Technically this top should have a pleated skirt hanging from it, and yes, I do plan on making some full chemises like this in the future, but for now, until it cools off, I'll be rocking this ensemble under my clothes. ONE underlayer, ONE overlayer. Period. (Joke! Ha!)  

I started with my basic cotehardie pattern with the straight shoulder seams.   I cut the bust a bit long, like I did with the faux-hardie, and then adjusted the armholes in and the shoulders up a bit to fit the pattern better (I'm a growing girl!)  The entire thing is cut on the bias, so it's nearly as stretchy as a modern sports bra, but since it's linen and not spandex, it's much softer against the skin, and breathes MUCH better.  

You'll notice it gaps badly in the front.  This is because I put hooks and eyes up the front, inside the front edge.  I didn't want to have to bother with lacing myself in and out of this, and then also lacing up a dress - getting dressed in a tent already takes long enough, you know?  Thankfully, it doesn't show under a cotehardie or my bliaut.  And it's so FAST to take off and put on.  Only way it could be faster is if I put a zipper in it, hehe....and don't think I didn't think about it. 

Overall:  YAY!   As with the gaucho panties, the sports bra will get its first test run this coming weekend at the first even of the season.  I'm so excited!!! I can has Friday yet?


* my cotes are actually really comfy, but when my asthma's acting up?  Psh. FORGET IT. 


03 September 2012

Under Where?

You all know how I love my Medieval underwear.   You've seen my oh-so-stylish braies, and my faux-hardie crop top underlayer.   Lots of you have also seen the news story running around the internet lately about the "bras" found in Austria "recently" (actually found in 2008, but the story's been circulating the last couple of months like wildfire amongst reenactment communities online;  and if you haven't seen this article on supportive undergarments and chemises, you should).

For my part, I'm still firmly attached to my idea of NOT wearing five thousand layers of clothing in central Texas, sorry.  Braies, a chemise, a dress, and possibly a surcote or some other top layer, is just too much; and since I'm a firm believer in NOT starting small brush fires with thigh friction, I prefer to have some form of pants on under my dresses.   I did the yoga pants/bike shorts thing before I made my short braies, but the waistbands on those things are just too tight, and leave big "pantylines" showing under my dresses.  No thank you.

I've also realized that I really, really need a second skirt underneath my gowns to help with fullness and flow...and so that I still have my legs covered if I need to hike up my dress for working or walking in wet grass. All of my cotehardies are self-supporting and lined through the bust if not the entire bodice; so a full chemise underneath isn't technically necessary - and again, there's that whole extra-layer thing.

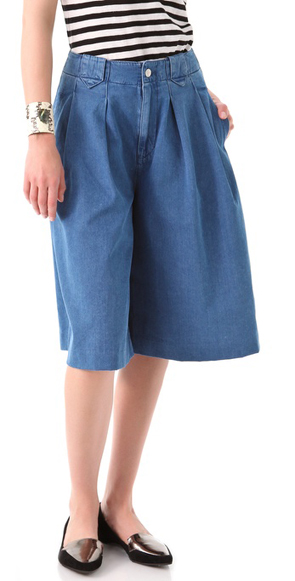
So I decided to combine braies, full-length chemise, and one of my fashion nemeses from my childhood:  the dreaded culottes: 


*horror movie sound effects*REET REET REET*


HOWEVER...


I'd been trying to figure out what to call these, and my BFF hit it right on the head:  MY CROTCHLESS GAUCHO PANTIES - LET ME SHOW YOU THEM...


They're...
  • long enough and wide enough to fulfill the "skirt" job of filling out and effectively lining my gowns
  • keeping my thighs from rubbing together and attracting hordes of thousands of crickets
  • lightweight enough not to be an issue in the heat (lighter weight than my first pair of braies)
  • soft and minimal enough in the waist-band not to em-bulk-en my waist under my gowns (I made that word up)

Oh, and they're also..

  • elastic-waisted, because I HAVE HAD IT with trying to undo the Gordian clusterf** that my drawstring-waisted braies always manage to get themselves into
  • crotchless, because (a) dealing with pull-down pant-things under a giant skirt in a port-a-potty?  Hell no!  and also (b) there IS actually evidence of crotchless underpants for men and women from hundreds of years ago, because they knew what they were doing back then.  I've heard.  I tried to find a link for you, but, well, YOU trying googling crotchless anything and see what happens.  
I have noticed, through trying them on with different outfits, that I should have made the legs wider.  They fill out my skirts nicely, but not quite enough; and when I stick my leg out, it's obvious I basically have pants on. The first event of the season is this coming weekend, though, so I'll try them out there and decide afterward.

More underwear tomorrow!

.

01 September 2012

More Accessories

Remember waaaaay back November of last year, when I was going to do this for Candlemas 2012, and the project shat itself and failed in every possible way?

Well, not in every way - the green linen gown part actually worked really well, just not the sleeve fabric, the timing, the accessories, or the entire look as a whole.  SIGH.

Well, the pomegranate fabric rides again, as it turns out.  In two ways.  The first of which is a pouch I cut out waaaay back in like January of this year, and have been embroidering off and on all year long (because I keep losing the pieces, because I'm THAT organized).


My progress so far:

All I'm doing is outlining the print that's already there.  I thought it would be a nice serious embroidery project for a beginner - lots of work, but only a few, simple stitches, on a paint-by-numbers sort of background.  Good practice.

It's certainly working, too.  Since I keep losing the pieces and not working on them for a few weeks (or months) at a time, I can really see the difference between my early work and my recent work.

The front and back are interchangeable at this point.  Just trying to decide which I like better.  I think this one for the front.


I have to say, I understand now why I misunderstood the color of this fabric when I ordered it from the website.  It looked off-white with a red/pink design on the screen, but when I got it, it was decidedly a wheaty yellow in person, and I could NOT figure out why it was such a huge difference.  Can't people take good photos?!

Holy CRAP this stuff is hard to photograph and color-correct, though!  If I get the reds right, the background looks white.  If I get the background right, the reds look either dull and dark, or over-saturated and in-your-face, depending on the lighting!


I learned how to do French Knots this week!!!  :D

This is a good shot of the three different reds I'm using so far:  a dark Mulberry, a medium Pomegranate-y color, and a bright Strawberry color.  I love the depth.

There's going to be green, and possibly some gold, in the design, too, by the time I'm done with it.


This loopy business, which is basically just a variety of chain stitch, is just about my favorite part so far.  I love the way it looks and feels.  And it's period!  I'm trying to keep all my stitches as period as possible.

The French Knots are stretching that a bit, but they're pretty, so :P


Those chain loops were often used to fill in blocks of color in period embroidery.  It was usually more nicely done than I've accomplished, though, LOL.  I'm new.

This is a great example of why it's bad that I keep losing this projects and finding it again.  I did this to the one single leaf on the "back" of the pouch;  turns out there are TWO of them on the "front", and now I either have to do it all over again - twice! - or unpick this one and try something else.  Yeesh.


This is probably the closest these pictures get to the true colors in the fabric and thread.

I love these little flowers so much. :)


Some of the color variation, and some finished and unfinished parts.

This X or cross fill inside the centers of these opening buds - while lopsidedly and inexpertly executed - were inspired by this easy, period, all-over fill stitch that I found via Pinterest.  I really wish I had made the Xs smaller and more numerous.  Considering taking them out and doing them over...except I've done *five* of these buds, which are 2" across each!

I'm not really in a hurry to finish this, because it's a GREAT project to sit around doing at events when I need some handsbusy.   But when it's done, it'll be a belt pouch.  I have a red linen lining for it, some red tassels and gold beads to affix to the bottom corners and center point, but that's about as far as I've gotten.

And, dangnabbit, for such a self-proclaimed hater of embroidery, this is REALLY FUN!  And it has me wanting to make a second one when this is done, on plain white fabric, with my own design.  Because I'm insane.

.