Showing posts with label ribbon. Show all posts

24 May 2025

Regency: Marianne Dashwood’s Enormous Hat

 I love Sense & Sensibility - the book, as well as both the 1995 and 2008 adaptations.  Last post, I showed you the new dress I made which was sort of inspired by a color worn by Elinor (Hattie Morahan) in the 2008 miniseries. 

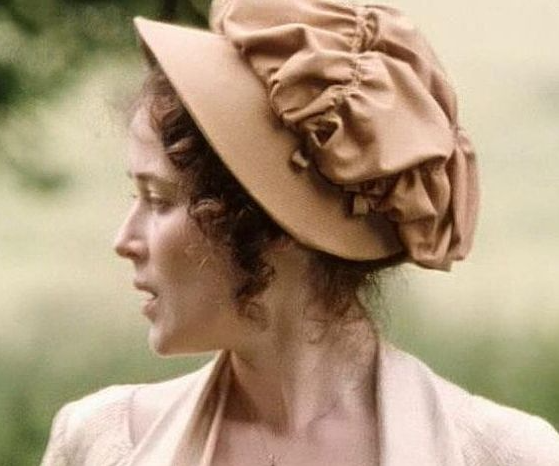
This time I have made a GIGANTIC HAT like the one Marianne (Kate Winslet) wears in the 1995 movie. I love Regency hats, although most of them look pretty silly on me (some of them are just silly in general, let’s admit it), but I just HAD to have Marianne’s big hat, silly or not. 


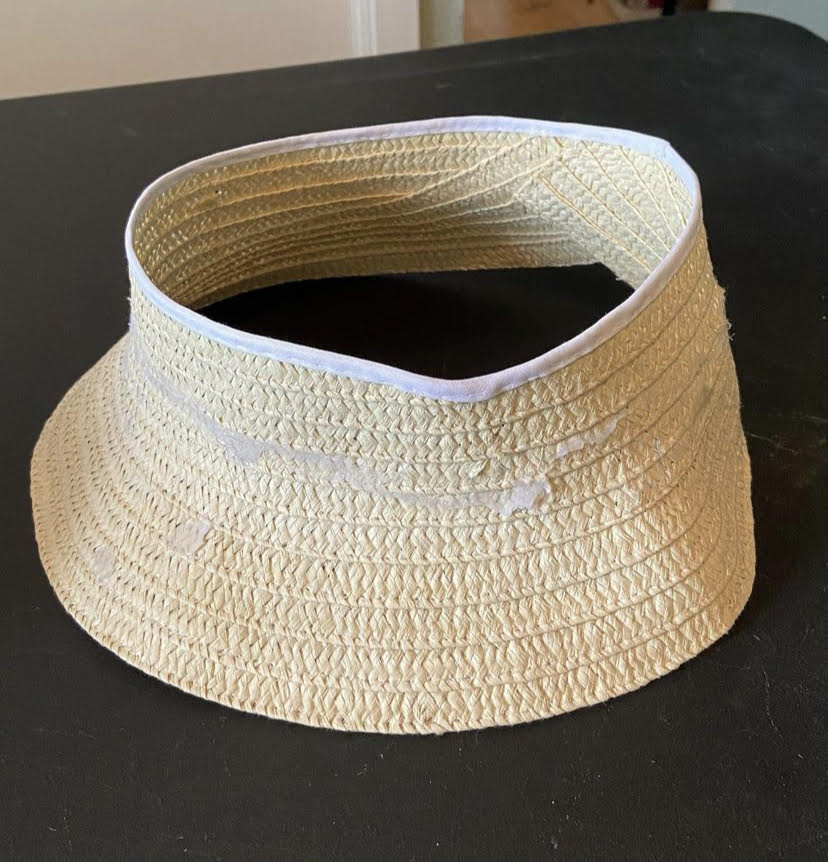
I ordered a big floppy sun hat from Amazon to start with. Reader, it arrived crumpled up in a little tiny bag and it was so wrinkled and crushed! I steamed it flat again and reshaped it on a foam head to get it back into shape; then used my steamer to bend the brim in the front and back, securing the edges with a bit of thread to hold the brim in place while it dried. 


Since most of my Regency wardrobe is done in blues and greens, I changed the color scheme a bit from the inspiration pic: I used a powder blue fringe-edged ribbon for the band and ties, and natural brown ostrich feathers for decoration. 

The feathers are stitched and glued in place; I steamed them a bit to help curl them so that they would flop over the brim like Marianne’s feathers do. The steam ended up not doing much, so I ran the spines (I don’t know the correct terminology) through my fingernails tightly, like you do with curling package ribbon and scissors, and then made them nice and curly. 

Now, I don’t know if Marianne’s hat also has flowers on it, or just feathers, but I opted for both. The flower is just WAY too big, but this whole hat is just ridiculous, and I love the way the deep purple color looks with the blue ribbon and brown feathers. 


Tada! I LOVE this hat. It’s just so HUGE and fabulous!  Now I need to get myself a big hatbox to keep it in. Oh no, more shopping, lol. 

23 April 2024

SCA: Sprucing Up An Old Viking Coat

before
A before picture: 

This is an old gray coat that I made approximately one billion years ago.  The outer shell is a "linen weave"cotton canvas; the lining and the blue edge banding are linen.  Once upon a time it was covered with inappropriate decorative embroidery and really, really ugly faux-fur trim - all of which I removed, and the end result is as you see here. 


Over the weekend I wove a whole lot of new trim - originally to use on my male viking tunic, but, when I saw all the colors together, I decided the trim would look MUCH better on this coat. So I wove about two more yards so I'd have enough - a total of 9y - and grabbed some 1/2" red silk ribbon from my ribbon box which I had been saving for a rainy day. 

Here's what the coat looks like now: 


The red silk ribbon only goes along the lower hem, and the sleeves cuffs.  I didn't have enough to use for the entire border around the front opening and neckline; but I think it looks neat on just the hem and sleeves. Gives it a little pop of color without being overwhelming, I think. 


The weave is the "Oseberg Narrow Band" design (12L1), to which I added some extra width in the blue background, and a red and navy border stripe on the edges.  


I'm super happy with the way this came out!  I still need to do something about the lack of trim on my male tunic; but now I have TWO coats (the green one got new trim last month) that I can wear in the colder months.  


Of course, now I still don't have trim to put on my male tunic - I guess that's what's next! 


07 January 2024

SCA: Candlemas 2024: Green 1490s Italian - the Accessories

A week ago I posted about the 1490s Florentine outfit I made for Candlemas in February - today’s post is about all the accessories that went into the outfit: 


Hair/Headgear

I’ll talk about my hair first, since it was a lot of fun - I used fake hair for the first time ever for this outfit! It was given to me by a friend several months ago, and I finally fixed it up and wore some of it for this outfit. It was really neat - it’s been two years since I cut all my hair off in order to grow out my gray (and I’m growing it back as fast as I can!) - and it felt soooo good to at least have the feel and weight of long hair again. I miss my hair! 

Anyway, I clipped two long silvery-gray extensions into my hair, then braided it all into a single braid down my back. The front of my hair was parted in the middle and smoothed down over my ears, and I curled the bits that were too short to be included in the braid. I wrapped the braid in gold ribbon, wider at the top and end to hide the elastic bands which contained the braid, with thin gold ribbon spiraled around the length of the braid. 

My inspiration for the hairstyle and headgear were from several paintings, like these: 


La Bella Principessa, Leonardo DaVinci


fragment from a painting of Lodovica
Tuornabuoni, Domenico Ghirlandaio

La Belle Feronniere, DaVinci


I created a reta - a netted skullcap like you see in the first two paintings - using a base of cotton needlepoint mesh canvas.   Once I had the shape figured out, I sewed/knotted the mesh pieces together, and then spray-painted the piece gold, which stiffened the mesh so that it held its shape better. Then I sewed gold metallic braided trim over the seam to hide it, and around the edges, and then attached a long gold ribbon to the corners to tie under my chin. 


Over the top of it all is a feronniere - mine is a long thin black velvet ribbon, onto which I threaded three gold beads spaced out along the front. 

The whole look goes something like this: 


The hair needs work - I like the false hairpiece, but my own hair in the front/side is very flyaway and frizzy looking.  Gotta figure out what to do about that.  


Jewelry

The necklace that I made to wear with this outfit is one of those kits where you press an acrylic cabochon (over a picture or flower petals or what-have-you) into the [pewter] setting - I’ve used these kits for Regency jewelry in the past. For this pendant, I painted the back of the cab with blueish iridescent nail polish, and the effect is sort of labradorite-ish, and I love the way it looks, and the way the color looks with the green and aqua/gold colors in the outfit.  


The pendant is hung on am 16" gold chain; and worn with a second much longer chain which is tucked into the neckline of my gamurra

I opted not to wear earrings with this outfit, since my hair covers my ears anyway. 


Purse

I wanted a new purse/pouch to go with this outfit, since my other SCA pouches are all blue and red. I used scraps of the sleeve fabric, cut into orange-wedge-shaped pieces, and lined the bag with some spare blue cotton sheeting I had lying around.  I couched a thin gold cord along each seam line on the outside, added a little fabric-covered button to the bottom to hide the joint between all the seams, and laced the top with a gold satin ribbon.  


Tada! I did a practice run on the whole costume today - doing my hair and getting completely dressed took me about forty minutes! SHEESH. I need a lady’s maid.  Everything is finally finished, though, and now I just have to sit back and wait until the event.  In three weeks.  I guess I'll go crochet something, hehe.  


06 December 2022

Regency: A Green Linen Capote Hat

Before the SCA took over my life at the beginning of October, I was working on a new hat for my Regency costumes.  It started out silly, which I'll tell you about, but first, here's the finished hat: 


First, in July, I bought a blank hat form from Etsy (Austentation) and trimmed it up in blue fabric/ribbon and LOTS of hot glue.  First mistake.  I hated it - it was overly frilly and girly, and I felt like a blue version of Strawberry Shortcake when I put it on.  NOPE.  I took it apart and removed all the hot glue from the straw with my iron and a scrap of fabric.  


just...no.  


What I wanted was something more subtle and graceful - like this ruched capote worn by Jennifer Ehle in the BBC Pride & Prejudice miniseries from 1995: 


The crown of the straw hat was too tall for that ruched soft fabric crown, so I cut part of it off and wrapped the edge in a bit of cotton bias tape to keep it from unravelling: 


(please excuse the hot glue, I removed it)


Next I created a mock-up of the fabric cover for the brim, and an 18" circle crown piece with some spare cotton sheeting I had on hand.  Once I got the fit right across the brim, I took apart the mock-up and used it as a pattern to cut out the pieces in a dark green linen (which I dyed; the linen used to be a light blue).  The linen was a bit limp for this application, and a good deal heavier than the blue fabric had been, and it sagged in places in an unattractive way, I ended up using the gray cotton mock-up pieces as a lining, to give the linen some stiffness: 


This time I sewed the pieces onto the hat with plain cotton sewing thread, rather than gluing them in place - it made the pieces lay flatter and more smoothly, and I should have done it in the first place, really, but I was too excited and in a rush with the blue. Oops.  I used a pad stitch to baste the brim cover in place around the base of the crown; and whip-stitched the turned edge of the crown piece to the brim cover, then pressed the crown piece outward over the stitching.


At first, I didn't like how it came out.  The fit around the edge of the brim was too loose, didn't look clean and smooth at all.  Also, the crown was too small, and wasn't fluffy enough.  I ended up taking the hat completely apart, re-stitching the brim edge so that it fit better, and cutting a new 22" circle for the crown so it would be large enough.  After altering the fabric pieces, I tacked on a green poly satin ribbon to the sides for ties:


I'm really happy with it now; it looks great, fits perfectly, and is a lot more understated than the frilly blue thing I first made.  The only thing is that now the crown is TOO big, and because of the limpness of the linen, it hangs in weird ways around the back of my head.  The hat still needs a lining to protect my hair;  I think when I do that, I'll stuff the crown of the hat with a bit of tulle or something to keep it poofed up a bit more so that it'll stay in place and not sag.  

I plan to wear this hat with my white Ikea dress and the green velour spencer jacket I made in 2021, if I ever get another chance to wear either:


So what's next?  I got some fabulous, FREE fabric the other day, and I'm working on a new Spencer jacket.  More soon!  


02 August 2022

Regency: Pink D’Orsay Flats

 So, I needed shoes to go with all this Regency stuff - and no, since you asked, I don’t have anywhere to wear any of this, I just wanted it.  But I needed shoes. I didn’t want to wear plain flats, and I can’t  afford to just go out and buy something appropriate. 

What I did have, though, is a pair of dusty-pink microfiber D’Orsay flats that I bought at WalMart several years ago that I wasn’t wearing anymore.  They were seriously dirty and scuffed: the first thing I did was to clean them up with rubbing alcohol and brush the nap smooth, then glue the tips of the toes back to the sole of the shoe where they had started to come apart. 

My inspiration for the next steps was this excerpt from the self-portrait of Adele Romany, painted in 1799. 


After cleaning, I used hot glue to place four small ribbon loops onto each shoe: one at the front toe, one at the back heel, and two on the sides. I threaded my ribbon through the loops and tied it around my feet.  One of the reasons I never wore these shoes was that they would fall off when I walked - now they stayed on AND they would work with my Regency wardrobe.  The modern microfiber bugs me a little, but I’m not too worried about it; I can always imagine they’re velvet. 


My dog Daisy and my cat Darcy were both interested in the shoes as I was walking around taking pictures: 


07 February 2021

A New Hedeby Bag

 Are you tired of my Hedeby bags yet?  I'm not.  I used the scraps from my Agave Viking dress to make this new bag:  


I used the silk ribbon scraps from that agave dress to decorate the top of the front of this bag.  The inside has pockets on both sides this time.  

The handles came from this bag


I just never really fell in love with this bag;  I think I could make it MUCH nicer by using some olive wood handles and a red cord to string it up with.  But until I do that, this one's out of commission - and I used the walnut handles on the the new agave bag.  It just balances the colors better there.  


Meanwhile, I love the new bag, with its silk ribbon trim.  The strap is a whipcord I wove from green cotton yarn.  The handle attachment and the stitching around the edges are embroidery flosss, DMC 501 teal.  I like the color scheme on this one way better than the old one.  

30 January 2021

Getting Back To the SCA For A Moment...

 In May of last year, when I made that new Viking coat, I fell head over heels in love with the fabric I used for the outside of the coat.  It's "Agave" linen from Fabric-Store.com. I just couldn't get enough of it.  But it went out of stock, for 7 months I couldn't find it again.  Finally they got it back in stock, about a month ago, and I ordered 4 yards to make a new Viking apron dress.    


I got that dress on there all kinds of sideways,
didn't I?  Slow down, me.  

It's the same as all my other apron dresses recently:  three panels, long looped straps, long hem.  FS' linen is so nice to work with, and I love wearing it.  I adore this color - that makes sewing it even nicer.  The new machine helps, hehe.  

This time, to trim out the top of the dress, I did something new.  I didn't have any more sari bits to use, and I couldn't find a woven trim I liked that would set off the color of this linen.  So I ordered some 1-1/4" silk ribbon from Burnley & Trowbridge., in apple and teal.  I was worried about the colors being right - it's SO hard to gauge colors over the internet - but I'm really pleased with them, and with the way they look on the dress.  Plus, this stuff is SO soft, I keep dropping it because I can barely feel it in my hands!  I'd admired this ribbon look (and/or strips of silk cloth) for years when I saw it on other people, but I'd never tried it myself until now.  


It looks all frumply because of the way everything 
hangs on the dummy.  I really need to fix it! 


So that's my new apron dress.  I can't wait to wear it - and all the other Viking stuff I've made over the past year out of COVID-induced boredom.  (Click the "Viking" tag below to see it all).  I've basically re-made my entire wardrob while we've been sequestered at home this past year.  From what I understand, we *might* begin to have in-person events as early as this summer - I imagine that depends on how this whole vaccine thing goes.  I'm so excited!  I miss the SCA and my friends so much!  

In that vein, I did something else:  I ordered an adjustable garment rack from Amazon to hang all my clothes on in my tent.  No more getting dressed out of plastic boxes and bending over the whole time I'm getting dressed, hurting my back!  I only hope it fits in my tent with my mattress and all my stuff.  I may set up the tent in the backyard over the weekend and give it a try.  


Nice rack!


See you soon.  


22 November 2020

...And Now For Something Completely Different

So, here's something a bit out of the ordinary:  I made myself a Regency-era (Empire) gown.  I had six yards of sage green crushed Dupioni silk on hand that I had had for years, and  I was saving it for "something special", but that something never came around - what was I saving it for then?  I decided to have fun with it. 

And so I give you:


At first I thought I'd get a Simplicity pattern and just start sewing; but I had too many questions about the fashions themselves - first and foremost, was that Simplicity pattern even accurate?  A LOT of reading and study happened next.  Long story short, I finally ended up ordering the Morning Dress pattern from Reconstructing History, and got to work. 


I adore these buttons!


The pattern went together pretty easily once I figured out some snags I had along the way.   But once I got it sorted the dress came together just like it was supposed to.  I made three mock-ups of the bodice, and two finished bodices,  to get the fit right.  

I also made a Regency-style chemise, and a pair of stays to wear beneath the dress.  The fashion in the early-mid Regency period was to let it all hang out - no corset, no stays, nothing.  Of course, larger women (me) and larger-busted women (me again) did opt to wear stays to keep everything in place.  The chemise is made of handkerchief-weight white cotton;  the stays are made of cotton calico with bias tape binding and hand-stitched lacing eyelets.  


Credit where credit is due: 

A dear friend gave me a big gift card for my birthday this year, which I used to purchase a new cutting table (hooray, no more cutting out on the floor!) and all the notions and supplies I needed for this dress.  I had the fabric already, but without that birthday present this outfit wouldn't have happened.  Thanks, Friend!  


What's Next? 

Sadly, I don't have anywhere to wear this outfit - I'm not involved with JASNA or any local Regency groups (there aren't any local Regency groups), and Halloween didn't happen this year.  This was purely an exercise in branching out and learning something new.  It'll hang in the closet forever, I suppose.  Even if it does, I plan to keep learning and keep adding to the ensemble - it needs a Spencer jacket and a hat!  Those are "one of these days" projects, I think. 

For now, though, my next project is going to be a [modern] winter coat for me.  I've always wanted to make one, and I've found the perfect pattern for it.  It'll take me a while to collect all the components I'll need for the coat, though, so I probably won't have the blog post about it for you for a couple of months.  In the meantime, there are always masks to make.   


31 October 2019

Black Apron Dress: Another Makeover

After making over the blue apron dress, I decided to tackle my black one next.  This just happened to be my apron dress with the most work to take out:


I hated all of the embroidery - I felt like I did a good job at the time, based on my meager skill level five years ago, but now all I can see are the flaws, and it all looks so amateurish now.  The vine motif around the top of the dress (next to the ribbon)  is period but is inappropriate for an apron dress.  The other vine motif on the straps isn't even Scandinavian, it's English, and 13th century to boot.

The blue ribbon around the top of the dress IS a correct Viking device, but it's executed incorrectly and badly.  There were two blue ribbons around the bottom of the dress, too; and the side seams were also all embroidered.

I took all that work out.  All of it - I made the dress completely naked.  I didn't track the hours it took me to remove it all,  but I spent somewhere around 5 evenings carefully picking out all the stitching so as not to damage the fabric. Probably about 20 hours. 


To replace the embroidery across the top, I opted for a trick we know the Vikings did use in their embellishment of the tops of apron dresses:  stitching a strip of imported cloth, often silk, as trim around the top of the dress.  In this case, my "silk trim" is a soft rayon strip cut from an old sarong. I considered layering it with a silk ribbon underneath or something like that, but I really just loved the way the sarong fabric looked with the black on its own.  I fully intend to replace this strip with real silk if any real silk ever happens to me.

I also took apart the long, flat straps and made them into looped straps instead, which is correct for an apron dress based on loops we've found attached to brooches.  I also like they way they function better:  they're easier to use, and once they're affixed to the dress, don't require any adjustment. My straps came out a bit thicker than I wanted them, but that's okay - they look just fine and they work great. 


There:  all finished.  The new design is simpler, but I like it much better than all that ridiculous embroidery I had going on before.  I love that this dress is full length - I prefer a long apron dress. 

And I really love the green and black (the color shows better in the previous picture, sorry).  That came out better than I'd pictured.  I have a ton of the green rayon sarong scraps left, too - I may use them to line a new Hedeby bag I've been thinking about making.


What's Next?

I may play with the bag I just mentioned a bit;  I'm also working on some new cuffs for my Viking coat and a new underdress.

28 October 2019

A Makeover: Blue Split-Front Apron Dress

.


In 2015 when I was in the process of spiffing up my entire Viking wardrobe, I created this dress:


Isn't it neat?  It's wrong in so many ways. I did a really good job based on my knowledge at the time;  it's just that that knowledge was incomplete, and based mostly on what I saw other people doing instead of on actual solid research.  And so we had this dress:  split down the front, which is incorrect for the accepted understanding of how apron dresses work; the wrong type of straps - flat straps, not loops; embroidered to the eyeteeth, and apron dresses weren't covered in decorative embroidery; and with a front trim band and skirt guarding in a contrasting color, which was an idea I copied from someone but has no basis in historical anything.  

So, I decided to tear this dress apart and make it over completely into something that is actually correct and which I can wear to events without looking like a bad example.  So, to start with,  I removed all the embroidery, the straps, and the orange trim. 

I also removed both of the remaining blue front panels - they were too narrow to simply sew closed into a single front piece - it made the dress way too small, and it would have placed a seam directly down the front of the dress, which would have looked horrible.  I needed to create a whole new front panel to insert into the dress. Thankfully, Fabric-store.com still sells the same exact color (Bluebonnet), so I was able to order a single yard so that I could make a new front panel. 

Once I'd closed the dress with the new front panel, I also cut a new top facing to replace the one I'd removed in the front.   Then I removed the embroidery from the flat straps and took them apart, and made two new loop straps out of them, as well as front loops.  After that all I had left to do construction-wise was to hem the whole dress, since I'd removed the skirt guarding from the bottom, leaving a raw edge.  


To finish the dress, instead of all that incorrect embroidery I opted for a trick we know the Vikings used on their apron dresses:  I stitched a length of blue ribbon around the top of the dress.  In period this would be a strip of silk fabric or ribbon, or a tablet-woven band. 

In my case, it's a rayon faux-silk seam binding ribbon, and it looks perfect at the top of the dress.  It's almost exactly the color of the fabric, just a bit darker.  It is awfully plain, especially since it's supposed to be simulating "fine imported silk";  I may replace it with something a little fancier at some point in the future if I come across anything that will work. For now, I like it just fine.  

So there's a piece of fantasy made over into something with a little more fact woven in.  The best part is that now I have a "new" dress I can wear, for only about $11 (the cost of a new front panel).  I needed an extra outfit to wear to BAM in a few weeks, and this goes a long way to fixing that hole in my wardrobe.  


What's Next? 

Now that this dress is fixed, the question is, do I launch into a quest to re-do all of my apron dresses to make them more correct, or do I leave the rest alone?  I hate to take out all the work on the orange and brown dresses just yet - I did a really great job on both of them and I love the way they look.  My black dress, however, is covered with some very amateurish needle work and is glaringly incorrect, so I think I will make that one over next. 


18 November 2014

Unf$cking My Ribbons Box

NOT OKAY:


Every. Single. Time. I opened this box I vowed to "one day" take the time to sit down and iron out this mess and wrap it up somehow so that this wouldn't happen again.  This is just stupid.


My friend says to me, "You laid all that out in a house full of cats?!"   The steam-hiss of the iron scares them away, hehe.


Muuuuch better.  It's a slapdash system, but it gave me the opportunity to try some diferent methods of organizing ribbons - usually I wrap them around my fingers and make little bows out of them, which I did for the looooong pieces.  My scrapbooking and art-journaling friends gave me the idea of wrapping smallish bits around the handle of an old spoon (they do it with washi tape).  My favorite, though, was wrapping the velvet ribbon around empty thread spools.  I'd really like all of my ribbon and trim to be done that way.  

All of this, by the way, was because I couldn't find the ribbon I wanted for a necklace.  And no, I never found it.  Maybe it's in one of the four boxes of ribbon, tape, and trim that I haven't gone through yet.  :-/ 

"supervisor"


.