Showing posts with label hand sewing. Show all posts

11 July 2025

SCA: Side Quest: Sprezzatura Viking Outfit

While I waited for the mail to bring me the final piece of my big hand sewing project, I started something on the side to keep me busy: 


So, in my SCA household, (La Compagnie della Sprezzatura), we each have a set of clothing in our preferred style in the company colors, with or without appliquéd device, that we all wear together on certain days. Lots of styles, but the same colors - it’s a neat effect. 


This is our company heraldry - I don’t know the correct heraldic terms for it, but it’s yellow and blue with a chalice and white (silver?) star floating above it.  I made a table runner after this device  in 2023: 


This outfit is mostly machine-sewn, which was kind of fun after all the hand sewing I’ve been doing the past several months.  I did hem both pieces by hand, and finished the neckline of the yellow dress and applied all of the trim pieces by hand.

The yellow dress was a lightweight “chambray” linen, meaning it had a yellow warp and a white weft. I overdyed the whole thing with yellow to cover up the white threads. It’s not exactly the shade of yellow I was hoping for, but I got this stuff on clearance for $12/yard, which is unreasonably cheap for 100% linen, so I’m happy with it as is I think. 

The blue dress is a medium-weight linen (about 9oz I guess?) which was given to me by a friend as a thank-you gift for helping them with a project. The teal trim on the top is scrap sari silk, and the zigzag tablet woven band is one I made last year and had in my stash (cotton crochet thread).  

I don’t plan on doing any appliqué on this outfit with the company heraldry - the colors are going to have to suffice.  I know a lot of people like to put big fancy appliqués on viking clothing, but it isn’t documentably period for this type of outfit — and neither is this vivid ultramarine blue or bright-ass yellow, I know, but we all pick our battles, LOL. 

So now I have a Sprezzatura outfit, hooray! I’m all set for our next “uniform” day, whenever that is (probably November). 


08 July 2025

SCA: Green Norse Tunic Dress


I finally finished my big Norse clothing project, with the completion of this green wool tunic dress.  The fabric is a lightweight (6oz) plain weave wool; the blue trim at the neck and sleeve cuffs is silk from sari scraps bought from Etsy; the entire thing is hand sewn with silk thread. 


I backstitched all the seams with the tiniest stitches I could manage, including on these side gores. 


Armpit gussets which I didn’t mitre for some reason? I don’t know why I did this thing with the corner squares, but it’s done and that’s that. I hate armpit gussets SO MUCH, but I LOVE flat-felling seams. Is that weird? 


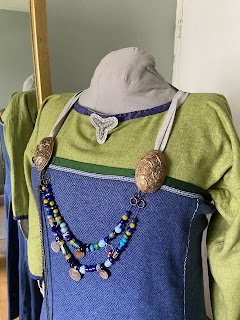
This dress is meant to go underneath the blue diamond wool smokkr that I posted about in May. The entire outfit is all hand stitched and as historically accurate as I could make it with the knowledge that I currently possess.  This whole outfit will go into Kingdom Arts & Sciences in September…as soon as I finish writing my documentation! 

Here’s a sneak preview of the entire outfit: 


Tada! 


I started a “side quest” project while I was waiting for the blue silk to come in the mail. Then I had to stop THAT project and wait for the mail, so I got a couple of other little things done in the meantime.  Show you soon! 


18 February 2025

SCA: Male Viking Tunic Replacement

 I finally made myself a new tunic to go with my male Norse outfit. The last one had seen better days: it started out life as a dress, which I altered, dyed, and finally cut off to make into a tunic. Then it got dyed again, and I switched out the trim on it twice, and I don’t even know how many repairs to this thing I had done. This is what it looked like in November: 


I decided I hated the woven trim, and I was in the process of measuring for new trim when I discovered that the back right shoulder seam had blown out - and the seam allowances inside were utterly shredded, so it wouldn’t be an easy repair. When I found two more destroyed seams in it, I decided to scrap the whole tunic and just replace it. It was time. 

Here is the new one: 


Simpler, and a better color, I think. The tunic is linen, the woven trim is cotton. I seamed this together on the machine, and then felled all the seam allowances and did the finishing/hemming by hand. I cut the side gores much narrower than the ones on the old tunic - they were wider because it used to be a dress - and it hangs better now that there’s not too much fabric. 

While I love the trim I wove for this tunic (Ladoga 2b), I’m not wild about the way the neckline came out. It’s…I don’t know, I just don’t like it much. Maybe it just needs jewelry. 


But all in all, I like the new tunic, I LOVE the color, and I like the fact that my male outfit is complete again -  I can wear it to Gulf Wars next month. Woohoo!  


Now to make myself a new serk…

09 February 2025

SCA: Laurels’ Prize Tourney

This weekend was Laurels’ Prize Tourney. It is not a tournament, nor is there any prize - that’s just what it’s called. What it is is a chance to show off your work and sit down with laurels and with other artisans who are interested in the same things and talk about it together. It’s a huge geek fest, and the time I went several years ago was SO much fun. 

This weekend’s event was no different. I met so many new people, and had so much fun talking about stuff I love to do, and about so much more. I learned new things, found new rabbit-holes to head down when I get some free time, and a new appreciation for where I’m at in my work and how far I have yet to go. 


I brought what I’m calling my “Vikings Are Still Cool” display - a little bit of some of the things I do which are Norse-garb-related.  I brought my red hand-sewn dress from Candlemas, the Oseberg loom that I built last year, a whole bunch of tablet weaving stuff, some of the Hedeby bags I love to make, some other sewing items, and some of the jewelry and glass beads that I’ve made. 

Some friends and I drove up together and rented an AirBNB for the weekend, rather than paying for a more expensive hotel room to share.  It was a great little house - I’d never been to an AirBNB before, so it was a new experience for me. 


What’s Next? 

The next SCA event for me is going to be Gulf Wars in March - a weeklong war between two kingdoms, hosted by a third kingdom and attended by several. 

Before then I’ve got to make myself a new serk and a new male tunic; and I’ve got to get started on my A&S project for Bjornsborg in April, as well. And I’ve taken on a weaving commission that I hope to have done in a couple of weeks, too. 

I also have a new regency dress that I’m hoping to get done somewhere in there - it’s high time I had a black mourning gown, I think. 

Lots of things! More on all that soon. 

16 December 2024

SCA: The Hand-Sewn Viking Project, Part II: Red Apron Dress

 I decided to make myself a hand-sewn Norse “apron dress” to go with the white serk I made by hand back in August. There was a whole grand plan there in the beginning; but I kind of made the serk and then dropped the idea for a while. I don’t know why it’s red -  99% of my SCA wardrobe is in shades of blue, but for some reason I just needed a red one this time. I never wear red..?

Anyway, the fabric is linen, and all the weaving and decorative bits are in 8/2 cotton weaving thread. Aside from the material choices, this dress is as close to period as I can get it with my current knowledge, from the patterning to the stitches used to the decoration. 


Tablet woven trim 
and a red and yellow “Hedeby braid” over the seams

The Hedeby braid - diagram and close up photo of it in situ 

The Hedeby dress fragment - the braid is positioned over the seam on the left side of the piece 

I used a backstitch for the seams, finished the seam allowances with a whip stitch, and used the herringbone “Osenstitch” (Inga Hagg’s term) for the hem

A silk ribbon folded over the top edge of the dress, with tablet woven trim based on the Oseberg “narrow band” design

I made the dress ankle length this time, to see how a longer dress feels to wear - I like it much better than the calf-length apron dresses I normally make; I feel like it’s much more flattering. I also made the straps and loops verrrrry thin this time, just because I like a thinner strap. The whole project took me a little over a week to make, about 28 hours total, I think. 

I’m super pleased with the way this came out, and I plan to wear it at Candlemas in February. That’s a long time to wait! 

*

Meanwhile, I have some A&S stuff to get cracking on for the new year, and I have another hand-sewn dress in the planning and scheming stages. More soon! 

23 August 2024

SCA: The Hand-Sewn Viking Project, Part II

The second part of my hand sewn Viking outfit project is the smokkr, or apron dress: 


I searched high and low for the right wool, learned a lot about fabrics I almost never use - and then I learned that it was going to be prohibitively expensive to use the wool I wanted for this dress.  So I ended up using a wool "stuff" fabric I had in my stash instead: it's a lightweight diagonal twill, and very smooth, almost like a suiting but not as slick or thin.  On the suggestion of a friend, I ran it through my washer and dryer a couple of times to felt the fabric a bit, which made it thicker and softer, and got rid of the little bit of sheen it started out with.  It’s not perfect, but it’s just fine for this project, which is basically a test-run for a more serious version of this dress that I might make next year. 

Anyway, the pattern for this  dress is the basic three-panel-and-three-gore pattern that the entire SCA uses, which, as near as I can tell, the pattern we use was designed by Carolyn Priest-Dorman (SCA name M. Thora Sharptooth, East Kingdom) in 1993 as a 9th-century Danish apron dress.  FWIU the pattern is based on a combination of viking artwork and on archeologists’ renderings of proposed designs for the garment which were based on grave evidence. 


I went a step further and created a pleated front for this dress, in the style of pieces found at sites like Køstrup and Kaupang.   The exact method the original owners of these garments used to pleat the fabric is not known; I had never pleated anything before so I used the simplest method I found, which was to baste the fabric, draw it together, and then whipstitch over the pleats to hold them in place.  It’s a little uneven, but I think not bad for a first try. 


I finished the top of the dress in two ways. Firstly, because I forgot to hem the top of the dress before I pleated the front, I ended up using a binding strip made of herringbone linen scraps that I had in my stash, which I dyed green.  I then applied a thin tablet woven band to the top edge of the dress between the two brooch loops over the bust. There is evidently some confusion over exactly how this was accomplished on the original Køstrup dress; the band was either suspended between the loops or it was attached to a vegetable diver fabric backing which has since rotted away leaving only the wool band in place. I opted to attach my band to the loops at the top, and whip stitched it to the top edge to help keep it in place. The band itself is cotton and was woven specifically for this project. 


For the shoulder straps and front loops, I used the same fabric as the body of the dress to create a thin double-folded tube, whipstitched closed on the side, following Inga Hagg's sketches of the loops found within the tortoise brooches at Birka: 

Hagg, 1974


I used period stitching methods on this whole dress, like I did for my serk. I used a backstitch for the primary construction seams, a running stitch to attach the linen binding at the top, flat-felled the seams and whip-stitched them in place, and then folded the lower hem and stitched it in place with a herringbone stitch (Inga Hagg's "Osenstitch"): 

Hagg, 1984


This dress has its problems, to be sure. I deviated from my inspiration pieces in areas like fabric choice, and in the use of an edge binding at the top. This was my first time hand sewing an apron dress, hand sewing on wool, and creating pleats/smocking.  Overall, though, I’m pretty happy with the way this turned out, and I can’t wait to wear it with my new serk when the weather cools off a bit! The whole dress took approximately 21 hours to make, including the weaving. 

Whew! Next project! 

13 August 2024

SCA: The Hand Sewn Viking Project, Part I

For the last couple of years, I've been paying special attention to finishing my machine-sewn garments by hand as much as I can.  Usually I do the long construction seams on the machine, and then hem everything by hand; and I've made several small things - hats, bags, etc.- completely by hand, for the practice. 

Now it's time to level up, and try sewing an entire outfit by hand for the first time. This will eventually be a complete (female) Norse outfit (generally 9-10th century); for now, I'm starting with the serk, or underdress. 

lower hem meets side seam


The fabric for this serk is 100% linen (very light weight, 3oz), and the thread I used is 80/3 linen in a color as close to matching as I could find. The fabric is near-white, bleached linen.  For accuracy, my linen could have been left natural (unbleached and undyed), but I'll be honest with you, I look awful in the beiges and pale taupe shades of natural linen - those tones make my skin look green. There is some evidence of dyed linen serks, but not just a whole lot of it, so I wanted to steer away from using dyed linen for this project. That left me with bleached linen, which is a historically correct option, albeit one that might not have been worn by *everybody*.  Most people would probably have used undyed, unbleached linen (in cases where they used linen at all, but that's a whole different discussion).   

The pattern for this serk  is a basic tunic such as the ones found in Greelqnd and the UK: a rectangular front and back, rectangular sleeves, square armpit gussets, and triangular side gores to widen the skirt.  The neckline is a wide round one, with a deep keyhole slit in the front.  I made the sleeves a bit longer and wider than I usually do so that I could roll them up when I needed to. 

I used period stitches throughout the garment.  I used a backstitch on the long seams for strength and stability, and then flat-felled each seam with a whip stitch.  The hems were folded twice and then secured with a herringbone stitch:  

Inga Hagg's "Osenstitch" (1984) 


I pre-washed my linen fabric in hot water to shrink the fibers and soften them; after I was done sewing the serk I washed it again to shrink the thread and tighten up the seams.  I like add a little bit of cheap, sulfate-free hair conditioner to my washing machine when I wash linen, which makes the fabric SUPER soft and comfy.  

Overall, I'm pleased with how this sewing project turned out.  It didn't take me as long as I'd feared it would to sew this entire garment by hand - about 14 hours (spread over about three months).  The thing that took the most time to was the sleeve under seams and armpit gussets, because I put them on inside-out the first time and had to take it all apart and redo it. 

here, have a neckline instead


I do feel like my hand sewing improved on this project.  It was easier than I thought it would be, and like I said, it was faster, too.  By the time I finished this I was ripping through the sewing like it was nothing, and my stitches got smaller and more even the more I worked. My one complaint is about the thread: my waxed linen thread felt like sewing with dental floss, and I hated the feel of it. I think next time I do this I’ll order a finer thread.   


The next phase will be to create a new smokkr (apron dress) to go with this underdress. But that’ll be it’s own post. 

08 June 2024

SCA: An Iron Age Peplos Outfit (First Draft)


Here's something new for me: I made an Iron Age Peplos outfit for myself.  I really loved wearing my Roman at Warlord - it was so cool and breezy and comfortable - and I wanted something that would feel similar but still be somewhat adjacent to the styles I normally wear (similar/adjacent cultures, earlier time period).  


the Huldremose peplos
This style was fairly long-lived, and widespread throughout England and northern Europe.  It's known from several Anglo-Saxon burials, and just a TON of early Medieval artwork in which the peplos is depicted often worn over a long-sleeved under dress and under a large wrapped cloak. There's a remarkably complete wool peplos from Huldremose in Denmark (Huldremose II, not related to the "Huldremose Woman"); you also see the style in later Finnish costume from the 11th century (the "Eura dress" outfit).

My peplos is made from linen, because (a) I wanted it to be lightweight and good for hot late-summer weather, and (b) linen was what I had.  In fact, someone recently gave me a piece of linen that she didn't need for anything recently, and that's what I used.  

It started out as a light lavender color, but I dyed it to WHAT COLOR you see in the pic at the top. I actually tried to dye it with black first, hoping it would come out sort of a charcoal color - but I had forgotten that Rit's black dye is actually a deep purple, and so it came out...purple.  


Oops. It turned out it was pretty easy to fix - I treated it with Rit Color Remover, which worked remarkably well  it actually removed the “black” dye as well as most of the original lavender color, and I ended up with a sort of pale band-aid pinky peach color. The stuff smells just AWFUL, though. Anyway, I dyed the fabric again with brown and charcoal gray, and ended up with the sort of chocolate-ice-cream brown color in the first pic up top. 

Anyway, in the picture above my peplos is shown over a light blue linen “Eura” style underdress, which I made many years ago and never get to wear.A peplos is normally folded from the side across the body and left open on the other side; because of the size and shape of my fabric piece, I had to split it into a front and a back, so it's open on both sides.  There was no sewing involved aside from hemming the edges, which I did by hand. 

It's pinned at the shoulders with a pair of round bronze brooches that I've had for years. They were my first Viking brooches, although I don't know anything about the style - I was told they were "early Viking" but I don't know anything more than that about them, or even if that's true.  But they work here for the look.  

I've seen many reenactors string beads between these brooches like you see in later Viking clothing, and sometimes people wear a long unadorned chain between them as well.  I didn't have any chain on hand that didn't look super shiny and modern, and I didn't have enough beads to make a swag for  my brooches, so for the time being I'm using a few of my leftover homemade beads on a plain cord as a necklace instead. 

The belt is the same tablet-woven one I wear with my viking dresses (not a period design, but that's an issue for another post - and seeing this outfit out together I think I’m going to make a new belt just for this outfit anyway); from it hangs an apron which is a darker blue linen remnant left over from another project. I think the blue color is too strong for the other pieces; I may replace it with a gray one or something else, I’m not sure yet. 

All in all, I'm pleased with the way this came out - it’s a pretty good “first draft.”  It needs work, but it was fun to put together and I’m looking forward to making it better. 

05 February 2024

SCA: Just Some Viking Stuff


In addition to spending two months whomping up a new Italian outfit for Candlemas, which was this past weekend, I also, in that space of time, made a TON of largesse items for a largesse competition that was supposed to be held at the event. 

I started working just before Thanksgiving, and finished about the middle of January; and I made the following items: 


thirteen Hedeby bags

1.  Hedeby bags!  

I love making these things, and I had plenty of supplies on hand, so I went for it. The handles are a simple, curvy Hedeby-style similar to the ones I usually make (based on the handles found at Hedeby and Birka), and they are made from 1/4" red oak flooring pieces that someone gave to me a few years ago. The handles were cut on my table saw and shaped with a hacksaw and electric sander; then stained with a walnut Minwax stain.  It took me about a week to produce all thirteen pairs of handles.  

The bags are hand sewn out of linen, because I had a lot of linen scraps on hand that were perfectly sized for this project. Some are lined, some are not, depending on the weight of the linen used. Each bag has a hand-stitched trim in a braided/herringbone stitch, examples of which were found on an apron dress fragment from Hedeby and on a hat from Denmark; some are bands across the front of the bag, some are stitched around the top edge, and some are covering the side seams. The handles are sewn onto the bag with matching thread (cotton embroidery floss).  Each bag, from sewing to decorating to handle attachment, took me about three hours.  

The bags's carrying straps are a combination of flat card-woven bands, and tubular card-woven cord bands made after a method I found described in this paper by L. Elena Hylton.  You use 4-6 cards with 4 holes threaded, and pass the weft thread/shuttle through one side of the warp only, looping under the warp to get back to the first side (instead of going right-to-left and then left-to-right as you do in "regular" card weaving).  This causes the weave to pull itself into a hollow round tube when you pull the weft tight, instead of creating a flat band. This method of weaving tubular cording is documentable to as early as the 1100s, according to Elena's research. I used 6 cards for my tubular straps, after I found 4 to make a square-profile band and I really wanted a rounder profile.  I also found that it's harder to weave this tubular band after switching the card's direction in order to untwist the threads - for some reason it just works better going "fowards" than going "backwards".  I'll have to practice it more. 


tubular strap


thirteen woven bands
2.  Tablet-woven trim

Something else I really, really enjoy doing.  I had a number of spools of cotton crochet thread on hand from another project, and so I used up my excess on thirteen 1.5-2 yard pieces of trim.  

There are five different designs, each very simple and no more than 10 cards each, and all are either period designs or based on period designs. Each one took me about 3 hours to make from warping to finishing. 


3. Lampworked glass beads 

I hadn't made glass beads for several months (due to it being summer, and about 120ºF inside my garage where my glass workshop is set up), and I needed the practice badly. I'm not very good at doing this - I'm still VERY much a beginner, so my beads aren't, like, awesome or anything - but they'll make nice additions to someone's Viking kit, I'm hoping.  

I made thirteen sets of 8 beads.  All of them are about 8mm in size; some are round, some drum-shaped with flat sides, and some are kind of round/oval with little bumps or dots on them - there are 2 of these "fancy" beads in each set, and 6 plain ones.  It took me about a month to make all the beads, working in 20-minute sessions of about 7 beads per session (not all of which turned out right).  


Guess What? 

For some reason, the competition didn’t happen at the event. I don’t know why it got scrubbed - I KNOW I read a whole post about it on the event page two months ago, but no one knew anything about it when I got there and asked about where to set up. Shoot! All that work...!  Not "for nothing" - after all, I'm now prepared to enter the next largesse competition, whenever that happens.  

Meanwhile, I learned a lot, and got a lot of good practice with woodworking and weaving. And glass bead making, although I'm kind of burnt out on glass beads for the time being and probably won't be doing any of that any time soon.  We'll see.  


dry run of display at home


17 June 2023

Regency: Teal Velveteen Pelisse


Behold:  a finished velveteen pelisse for winter wear!  


Last fall I acquired a huge stack of velveteen Ikea curtain panels from my local neighborhood swap group.  I knew right away I wanted to make a pelisse out of it. The fabric is heavy and warm, but not TOO heavy - perfect for our relatively mild central Texas winter weather. 

It would be a nifty addition to my Regency wardrobe, I thought, but more than that, I was in dire need of a long winter coat that was affordable - so I knew I wanted to make one, but I could never find the right fabric and pattern for it.  Yes, I absolutely plan to wear this in "real life" as my regular winter coat! 


left: fashion plate from Ackerman's;
right: design inspiration from Laughing Moon


This fashion plate, and this gown, were my first inspirations.  I loved the ruffles around the neckline and the big tie in the front of both, so I decided to use my Laughing Moon Spencer pattern (#129) for the bodice and sleeves, since it already has the shaping and design on the bodice that I wanted. 

I used the skirts from my Reconstructing History round gown pattern as a guide for the width and length of the skirt panels. 


dyeing the velveteen

The first problem was the color of the velveteen curtain panels:  they were bright aqua, which - no. Too bright and cheerful for me.  

Fortunately, they're 100% cotton, so they dyed pretty easily with Rit dye.  I used a 2:2:1 mixture of dark green, teal, and charcoal gray,  and came up with this lovely deep muted spruce green color.  (Okay, it's TEAL. Rit dye's formula charts call this "Blue Spruce Green," but it's totally teal).  


inside ties and hand-finishing

The pelisse is lined in a sage green cotton fabric that started life as a duvet cover I had sitting around not being used. Here you can see the ties I placed inside the bodice to help hold the thing together - I didn't want to rely on the belt/sash to do the job on its own.  The ties will help keep everything aligned properly when I wear it. 

The problem with dyeing the fabric was that I originally did it in two separate batches.  I measured carefully, and used the exact same dye on both batches...and yet, they still came out slightly different colors - one batch was a bit greener, and one batch was a bit bluer. 

So, after I finished the pelisse, I overdyed it again to bring the colors back in together.  The lining dyed, as well, and now it matches the velveteen fabric. 


bodice back

Since I do plan to wear this coat mundanely (i.e. not as a costume, but as regular daily wear), I made a few modifications to the pattern to help it be more wearable - the inside ties are one. 

I also lowered the hem of the bustline by 3" to accommodate a "normal" modern bustline.  It still fits fine when I'm corseted, but since I mostly won't be wearing this with a corset, I wanted it to conform to my "regular" bust shape when I'm wearing it to the office, for example.    

I added hidden side-seam pockets to the skirts as well.  Bitches need pockets! I generally don't carry a purse - just my phone which is in a wallet case, and my keys, and I needed somewhere to stash them. 

I also added belt loops to the side seams of the waistline, to help keep the belt/sash in place. 


before hemming the bottom

Altogether, this pelisse took me about 12 1/2 hours (over the course of 7 days) to construct and finish.  Most of it is sewn on the machine, although I did do all the finishing - anything that's visible from the outside - by hand.  Because it's so long, and there's so much fabric, it's surprisingly heavier than I thought it would be, and it IS very warm.  It'll make an excellent top layer and windbreak in winter weather this year. 

Thankfully, our winters are generally pretty mild, usually averaging about 40-50º most of the time, and only getting down into the 20s-30s for a couple of weeks in January or February; so this pelisse didn't have to be very heavy - it's mostly just a windbreak and an extra layer. With a sweater underneath and a scarf at the neck, it'll be just fine for the weather here.  


Things I would change if I had to do this again: 

(1) the sleeves are a teensy bit too long. They're lovely, but I worry about them being in the way while driving.  

(2) the back of the bodice and the shoulders are very fitted, and I worry that they won't accommodate more than a very thin shirt underneath - I won't be able to wear sweaters with this thing.  (Good impetus to lose a bit of weight before this winter!) 

(3) The belt loops are laughably too big. I should have made them half the size I did; but it's okay, I doubt anyone will notice or care. 


20 November 2022

Regency: White Cotton Neck Frill

I made a silly accessory just for fun! My original inspiration for this frill (also called a ruff or fraise) came from two places:  this pointed and ruffled chemisette made by Sarah at Romantic History, which was based on a Janet Arnold Patterns of Fashion pattern, and which I love to pieces; and the ruffled collars worn in the 2020 movie adaptation of Emma by Emma and Mrs. Elton.  

I haven’t seen these frills terribly often in fashion plates or in impressions by other costumers; but I did manage to find a couple of historical examples in museums and fashion plates: 

1800s ruffed frill from Meg Andrews auctions


1807 ruffled collar from the Metropolitan museum


ruff worn with a pelisse; no clue if it's part of an underlying chemisette or not. 
LACMA


another similar fashion plate


Mrs. Elton’s orange ruffled collar in 2020 Emma


I essentially copied Sarah's design for the ruffles and neck band, and omitted the chemisette panels.  My ruffle pieces were 34” long and 3” wide at the widest point (narrower in the front, about 1.5”); and the neck band (finished) 17” x 1.”

The fabric is cotton voile, starched a tiny bit to make the ruffles stand out.  I didn’t have any starch on hand, so I mixed a tablespoon of cornstarch into 2c hot water and sprayed the fabric with that before I completed assembly. I honestly had no idea you could do that. No, seriously, all my life I thought laundry starch was just some magical (and probably dangerous) chemical concoction.  The more you know. 

pinning the ruffles to the neck band


I used two ruffles, each gathered and sewn into the neck band of the same fabric, one at the top and one at the bottom. I cheated and cut them as one piece and hemmed the pointed edges that way before cutting them apart, to keep the straight edges from fraying while I worked on the points.

TINIEST ROLLED HEM EVER


I attached a vintage silver-colored 1/8” silk tape to the neck band ends that I had in stash, and left long tasseled ties in the back to hang down. 

the finished fraise/ruffled collar


Tada!  I love this piece. It’s very silly and froofy, and I had a lot of fun making it. In retrospect, I think I should have paid more attention to staggering the ruffles so they weren't so stacked on top of one another; and I think I should have made them longer on the bottom than on the top to accentuate the layers more.  Overall, I like it, though, and I plan to wear it with...a dress I haven't made yet.  More on that at a later date.