Showing posts with label before and after. Show all posts

18 July 2025

SCA: About Hrefna

I'm in the process of creating an SCA resume with the guidance of a Laurel friend of mine, and it occurred to me that I haven't done any sort of introductory thing on this blog in a pretty long time.  So here goes: 


ME

I am Honorable Lady Hrefna Hroksdottir, and I play a 9th-century Norsewoman in the SCA, in the barony of Bryn Gwlad in the kingdom of Ansteorra. I currently hold an Award of Arms (2011) Sable Thistle (an armigerous award for arts & sciences in Ansteorra, 2015) in costuming, as well as an Iris of Merit (grant level A&S award, 2025).    


BACKGROUND AND INTERESTS

I've been sewing since I was 9 years old when my mother first taught me, and I've been costuming since I was 18 when I was in Amtgard (Barony of Tori-Mar, Celestial Kingdom).  I very much enjoy all things sewing, especially hand sewing. I'm also an avid tablet weaver, and I do a bit of woodworking, jewelry making, and making glass beads.  

I dance when I can, and I try not to let people hear me sing although I love doing it and really enjoy the bardic circle when I can make it to one.  I also cook quite a bit, although that was sort of an unintentional side-hobby - I help out the Ansteorran Longship Association with their omelet breakfast fundraisers when I can, and I've helped my friend Cristiane make feasts for events on a few occasions, too.  

I don't teach formal classes at all, although I wish I could.  I actually love teaching, but I have some pretty serious anxiety issues which make the act of standing in front of a group of people and speaking to them impossible for me.  I do, however, really enjoy teaching one-on-one, and I've done that pretty frequently.  I'd much rather come to your house to teach you tablet weaving than stand up in front of a class full of people all staring at me.  


NAME AND HERALDRY

My name, Hrefna, means "raven" in Old Norse; my last name comes from the name Hrokr, meaning crow or rook - hence, I am Raven the Crow's Daughter.  That might sound a bit silly, but it spoke to me.  (I sort of have a thing for ravens - I have a pretty large raven tattoo, and I wear raven jewelry pretty much all the time).

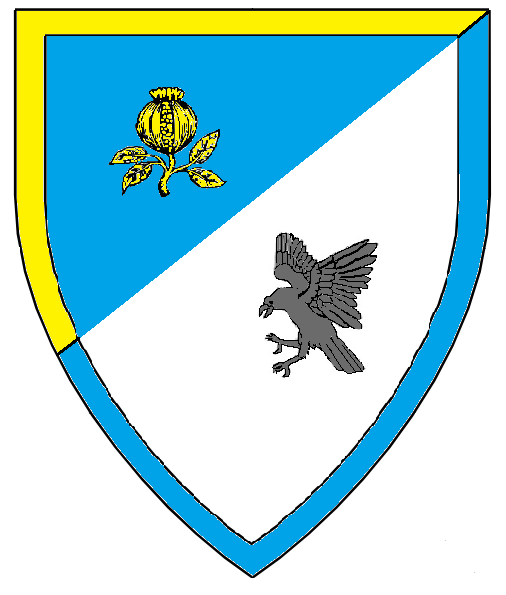
My device, which was just approved earlier this year, is the second one I've held.  It looks like this: 


Per bend sinister azure and argent, a pomegranate slipped and leaved Or 

and a raven rising sable, a bordure counterchanged Or and azure


The pomegranate was a major feature on my old arms, which I had registered in 2011 when I joined the SCA.  Since I've shed my original (14th century English) persona, I decided this time around to keep the pomegranate as well as adding the raven for my new persona, as a way of honoring the "old me" and the new at the same time.  I chose the colors simply because I love blue and gold (my old device was black and white and red).  


HISTORY 

My history in the SCA is divided almost neatly in half.  I joined the SCA in 2011.  From 2011 - 2016 I focused mainly on 14th century clothing, and I enjoyed making new outfits to fit the theme of whichever event I was attending.  I did a lot of work on commission for friends, much of which is in this blog if you look back far enough. From 2016 - 2019 I took a long hiatus from the SCA in order to focus on my "real" life, which was kind of blowing up in my face at the time.  I returned in 2019 - right in time for the pandemic - and I've been focused on Viking/Norse ever since, and my sub-focus, I guess, is learning to make my clothing as historically accurate as possible (I shudder to look at some of my Viking attempts pre-2016, some of that stuff was so awful! Don't scroll back that far).  


WHAT'S NEXT? 

So where do I go from here?  I honestly don't know.  I spent many years keeping myself hidden as much as I could, and now I feel a bit invisible, although I know I'm not.  I love that I've been stepping out of my comfort zone a lot with A&S the last couple of years and I'd really like to keep building on that. Yes, I would like to be a Laurel one day, but that's going to be a long way off, I think.  I'm proud of my work, but I know I have a lot more work to do.    

I'm working on getting an Ansteorra Wiki page set up for myself - waiting to hear back from the people who do that, actually.  When it's published I'll add a link to the sidebar on this blog.  


So that was a long text post, sorry about that!  Hope it was at least somewhat entertaining.  Back soon with more STUFF.  


18 February 2025

SCA: Male Viking Tunic Replacement

 I finally made myself a new tunic to go with my male Norse outfit. The last one had seen better days: it started out life as a dress, which I altered, dyed, and finally cut off to make into a tunic. Then it got dyed again, and I switched out the trim on it twice, and I don’t even know how many repairs to this thing I had done. This is what it looked like in November: 


I decided I hated the woven trim, and I was in the process of measuring for new trim when I discovered that the back right shoulder seam had blown out - and the seam allowances inside were utterly shredded, so it wouldn’t be an easy repair. When I found two more destroyed seams in it, I decided to scrap the whole tunic and just replace it. It was time. 

Here is the new one: 


Simpler, and a better color, I think. The tunic is linen, the woven trim is cotton. I seamed this together on the machine, and then felled all the seam allowances and did the finishing/hemming by hand. I cut the side gores much narrower than the ones on the old tunic - they were wider because it used to be a dress - and it hangs better now that there’s not too much fabric. 

While I love the trim I wove for this tunic (Ladoga 2b), I’m not wild about the way the neckline came out. It’s…I don’t know, I just don’t like it much. Maybe it just needs jewelry. 


But all in all, I like the new tunic, I LOVE the color, and I like the fact that my male outfit is complete again -  I can wear it to Gulf Wars next month. Woohoo!  


Now to make myself a new serk…

20 July 2024

The Right Tool For the Job: Modding My Dressmaker's Dummy

This week I modified my dressmaker’s dummy to be a more accurate fit for me. It was incorrectly sized; and also the bright teal color clashed with everything I put on it and made my photos look crappy. 


First I adjusted the shape of the whole thing: I cranked the dials down until the waist and underbust measurement were correct; and then I added bits of foam (from a thin foam mattress topper I had in storage) to bump out the boobs, belly, butt, and shoulders - all secured with spray adhesive and duct tape. 


Next, I wrapped the whole thing in quilt batting (which I got for free from the neighborhood swap group this week), in order to smooth out the whole thing and cover up the duct tape. The batting is secured with spray adhesive. 


The last step was to create a cloth cover for it, which I made from some old cotton sheets I had in my stash. I pinned it in place, sewed it, and flipped it inside out, just like making a quick furniture slipcover. 


There’s a zipper up one side of the body so that I can take the cover off to wash it or resize it; and the bottom is drawn tightly closed around the pole with a drawstring. 


Tada!  I love this. I can pin into it, iron on it, and now that it’s actually the correct shape and proportions it’ll be MUCH easier to drape and fit clothing and costumes on it. Also, the soft gray will look much better in photos. 

This was a fun, quick project (two afternoons), and except for the can of spray adhesive I had to buy ($12), it was almost completely free. 


15 June 2024

SCA: Some New Additions to the Iron Age Peplos Outfit


Some updates to the new peplos outfit: 


  • I overdyed the brown peplos to darken the color. It’s subtle, but I like it a lot better 
  • I created some new jewelry to wear with it 
  • I wove a new belt 


The jewelry is two parts: an amber and carnelian necklace I made from stash parts and a broken amber necklace; and 

A string of bronze colored chains to suspend between the shoulder brooches. They’re the wrong kind of chain, but it’s a good place to start! 


I finished the belt this morning, and I’m in love with it. It’s 8/2 cotton in blue, gold, and navy, with wrapped and braided ends. 

It also just happens to be in my household colors, which I didn’t realize until I was nearly done. Happy accident! :) 


23 April 2024

SCA: Sprucing Up An Old Viking Coat

before
A before picture: 

This is an old gray coat that I made approximately one billion years ago.  The outer shell is a "linen weave"cotton canvas; the lining and the blue edge banding are linen.  Once upon a time it was covered with inappropriate decorative embroidery and really, really ugly faux-fur trim - all of which I removed, and the end result is as you see here. 


Over the weekend I wove a whole lot of new trim - originally to use on my male viking tunic, but, when I saw all the colors together, I decided the trim would look MUCH better on this coat. So I wove about two more yards so I'd have enough - a total of 9y - and grabbed some 1/2" red silk ribbon from my ribbon box which I had been saving for a rainy day. 

Here's what the coat looks like now: 


The red silk ribbon only goes along the lower hem, and the sleeves cuffs.  I didn't have enough to use for the entire border around the front opening and neckline; but I think it looks neat on just the hem and sleeves. Gives it a little pop of color without being overwhelming, I think. 


The weave is the "Oseberg Narrow Band" design (12L1), to which I added some extra width in the blue background, and a red and navy border stripe on the edges.  


I'm super happy with the way this came out!  I still need to do something about the lack of trim on my male tunic; but now I have TWO coats (the green one got new trim last month) that I can wear in the colder months.  


Of course, now I still don't have trim to put on my male tunic - I guess that's what's next! 


31 December 2023

SCA: Green 1490s Florentine Outfit - for Candlemas 2024

1490s Florentine Italian
for Candlemas 2024

In the beginning, I honestly had no thoughts about what to wear to Candlemas in February - I figured I would just go Viking, like I always do.  But then I went to the event webpage and saw this: 

"The year is 1494 and the wealthiest bride in Europe is about to become the queen of Germany and future Empress of Rome.  Come re-live the wedding of Bianca Maria Sforza of Milan and King Maximilian I of Austria and Germany." 


1490s Italian? I'm in.  The Sforza wedding was said to be one of the most amazing spectacles in years, by several people who wrote about it later: a pageant of high fashion and pomp the likes of which the writers had never seen.  Candlemas this year is intended to be a huge costume extravaganza, and everyone will be wearing their finest Italian and German garb - there's even a costume contest!   Time for a new fancy outfit, I thought.

My first thought was to make some minor alterations to the red velvet Florentine-ish outfit I wore to Baronial in 2022 (the trim is wrong, the sleeves are too big, and the whole thing needs small adjustments here and there), but I wanted something new.  And so of course, I started with something  old.  


Gamurra

I started with my black silk noil gamurra, which I made in 2014 and which has undergone many transformations in the past nearly ten years, mostly in the form of various decorative stitching and trims being applied and removed to change the look.  

I did the same this time, applying a gold and black braided trim to the neckline and front edges, and attaching some gold (brass) lacing rings to the front opening (yes, on top of the hand-sewn eyelets that were already there. The eyelets are very small, and they don't show under the rings when the dress is laced at all).  


Giornea

before - Burgundian dress
For the giornea,  I made over an old Burgundian dress that I had made in 2013 and had never worn - I just never got around to making an underdress or headgear to wear with it, so it just sat ignored  in my closet all these years. The outline was already nearly perfect, though. The dress is voluminous (much fuller than it looks in this picture), but the sleeves were too tight at the top, which made the shoulders fit weird.  Fortunately, I didn't need the sleeves.  

I removed the sleeves and all of the faux fur trim, cut the armscyes a bit deeper, removed the collar and opened up the center front seam all the way to the hemline.  

I also stitched a length of gold braided trim along the neck opening/center front.   I didn't want to dress this giornea up TOO much, because the sleeves and the trim on the gamurra were more than enough decoration for this outfit, but it did need something so that the edges weren't just plain. 


closeup of the front


Giorneae were usually open either at the front or sides or both, to allow the gamurra underneath to show through - mine is only open up the front, and is belted all the way around with a long, black, double-faced satin ribbon sash.  My giornea was inspired by several Renaissance paintings, like these two (both fragments of frescos by Domenico Ghirlandaio): 


fragment from the "Birth of St.
John the Baptist" fresco

fragment from the "Visitation" fresco


Sleeves 

While 90% of this dress was basically free - I made over old costume pieces and used materials from my stash for almost all of it - I did actually splurge on fabric for the sleeves. This is a silk damask in aqua and gold (sort of a shiny tan, really) from Rennaisance Fabrics - it’s so soft and pretty, I just love it!   

Since the fabric was fairly dressy, I opted for a plainer sleeve design, closed at the upper arm and open on the lower arm, and laced open to allow my linen camicia to poof out through the lacings.  

I stitched eyelets along the open forearm edges and on the sleeve heads where the sleeves attach to the gamurra in a tan/brown thread which matches the "gold" parts of the fabric's design. 

I took my inspiration from images like these: 


another fragment from the
"Visitation" fresco by Ghirlandaio


I'll talk about the accessories, and my hair, tomorrow. For now, although I won't be the fanciest nor the richest-looking person at the Candlemas event in my made-over dress, I'm proud of this outfit and I can't wait to wear it.  I just hope it's not too hot, and that it holds up to dancing.  


Bonus:  my Project Cat, Rabi, asleep on an Ikea pillow underneath my work table: 


25 September 2023

SCA: Table For Sprezzatura

I refinished a table! 


Earlier this year, I had grand ideas about building some sort of Medieval-ish wooden table for my household's camp.  Until now, we have used a plastic folding table in the center of our pavilion for people to gather around and eat and hang out; but I wanted to make something nicer and somewhat period-ish. Unfortunately, budget and lumber prices kept me from starting the project I had in mind. 

But then, at the beginning of August, I found this little wooden table for free on the curb in my neighborhood: 


It's in great shape construction-wise, a perfect size for our camp (48" x 32", a little shorter than our plastic table, but wider), and the design, though a bit generically Pottery Barn-farmhouse-y, is sort of vaguely Medieval in style and resembles many trestle tables I've seen in artwork from the 1300-1400s, so I think it works.  Ten-foot rule, right? Or as my friend Kate says, it'll look just fine when seen from a galloping horse.    

The only problem with it was that the previous owner (?) stained it with black stain...and they did a horrible job of it. The stain was applied unevenly and not wiped off in between coats, so there are visible brush marks and places where the brush marks overlap, and even areas where it's obvious the stain pooled on the wood and just congealed there.  Also, they sanded off the original finish before staining it, and the sanding was done with a sandpaper that was so heavy and coarse that it marred the wood in places, and half the sanding marks are against the grain.  Ugh! 

Left: uneven and blotchy stain; 
right: sanding and brush marks against the grain


Enter: two cans of Easy Off oven cleaner.  

That's right, oven cleaner.  I saw this trick on Instagram, and then read some blogs about the process and watched some videos, and then tried it out on this table.  You basically spray the entire piece down with oven cleaner, let it sit for about half an hour, scrub it down thoroughly with soap and water, and then hose it off with water.  (The soap and water neutralize the cleaner chemicals so that you're not washing anything harmful into your yard, just dirty water).  Et voila: most of the stain came right off!  

this was after the first treatment; after the 
second pass it came almost completely clean! 


The rest of it came off pretty easily with the sander, and I was able to smooth out the rough sanding marks the previous DIYer left behind.  After it was all sanded, I cleaned off the entire piece and coated it with wood conditioner to prep the wood for staining.  


While the black stain that was originally on the table was nice, I wanted something lighter and warmer.  I have an "espresso" stain that is way too dark, and a "Jacobean" that is a nice dark brown but it's got weird green undertones.  I love my walnut stain, but I wanted darker, so I ended up putting two coats of the walnut on the wood, and it came out really nicely, I think: 


After the staining was complete, I coated the whole table in polyurethane to protect the finish.  


Tada!  New table.  The whole project took me about a month and a half, working on weekend mornings before it got too hot outside, and a little bit here and there during the week in my spare time. 


always wear your PPEs, people. 


17 September 2023

SCA: Men's Viking Outfit: Dyeing All the Things

The other day I posted a couple of pictures of me in a couple of my Viking outfits.   When I first saw the picture of me in my men's Viking outfit, I realized two things:  (a) that was the first time I'd ever actually SEEN my men's Viking outfit on me from an outside perspective, and (b) I didn't like it at all.  

Most of my (women's) Viking outfits are in varying shades of blue and green, and I like them all.  But each women's outfit is primarily one color:  the color of the apron dress, backed by a white or pale gray under dress, with coordinating accessories (hats, bags, etc) in complementary shades of blues and/or greens. Very simple.  

The man's outfit, however, was made up of several pieces in varying light blues and light greens that were worn all together,  and the different colors were NOT working well with each other.  Overall the whole outfit looked...kind of Smurfy.  And that's not good. 


before


The Problems

1.  Multiple shades of blue and green that don't all go together very well

2.  Main body of tunic is a really weird green that is probably not a "period color"  which was bothering me

3.  I never really cared for the big trapezoidal neck yoke and the sleeve cuff pieces.  I don't like the shape of the yoke at all.  

(Please ignore the violently turquoise socks - those are being replaced by new socks in natural colors).  


The Solutions

THE TUNIC 

I removed all the trim, visible top-stitching, and the blue yoke and cuff pieces. Then, I re-hemmed all the edges by hand, and dyed the whole thing.  After that, I applied some new trim pieces to the neckline, sleeve cuffs, and the lower hem of the tunic.  


The new color of the tunic (right)  is much better.  I used a royal blue and teal to achieve this shade of blue, which is one that would be achievable with natural dyes like woad, and therefore makes the tunic a bit more period-looking than it had been before.  


 The trim fabric is made from an old linen apron dress that didn't fit me anymore; I also couched a twisted cord in coordinating colors to the edge of the trim fabric.  I don't wear this rust/orange color as a primary color, because it looks awful on me in large amounts; but I really love the way the rust/blue set each other off.


PANTS, SOCKS, AND WININGAS


The linen pants, which started out a sort of "light navy" color (sort of darkish grayish blue, shown on the left of this picture), were dyed with a deep brown, which rendered them a sort of charcoal gray, which grounds the more intensely colored tunic nicely.  


I dyed the winingas with a bit of the same brown and some charcoal gray.  They started out a sort of baby-blue, and the warp threads in the wool remained blue, while the weft threads dyed a deep charcoal-brown, and I REALLY like the effect.  


The End Result


after

Here's what the finished outfit looks like: 


This is a much more balanced color scheme, with a single intensely-colored piece grounded by dark neutral tones. I feel like the colors here are much more natural and realistic-looking - these browns and grays and blue are colors which are achievable with natural dyes, and might have been worn in period.   I'm immensely happy with the way the dyeing turned out. (The tunic actually looks more blue than this in person, I could NOT get it to come out right on my camera).  

I'm also pretty stoked that I managed to do this entire project for only about $20 for just the fabric dye.  That's far less than half of what I would have spent on just the linen for a new tunic!  


Just for fun, here's a pic of with my blue wool cloak. 

Bonus: new hat! 


Whew, done!  For now. 

08 September 2023

SCA: Finishing A Long-Overdue UFO

This week I completed a UFO (unfinished object) that's been outstanding for SEVEN YEARS.  

In 2015 I made this linen Skjoldehamn hood.  I'd meant to put a lining in it, since it was just medium-weight linen, but I never got around to it.  I did at one point embroider the edges of the hood (apparently? I don't remember doing it), but it still wasn't lined, and so it wasn't warm enough or heavy enough to really be functional, or even really sit right. The first thing I did this week was remove the decorative embroidery, since it was (a) in my way and (b) not period-appropriate for this garment piece. 

The original hood, found in Norway in 1936 and dating from the 10th century, is made of wool, with a woven (probably whipcord) woolen tie in the center of the hood which can be used to tie the hood closed in the front or tied behind the head.  

Mine is made of linen instead of wool, because at the time I started this project I still thought I was allergic to wool (I'm allergic to the chemicals they use to treat wool fabrics, but I've since learned that those can be carefully washed away and I'm fine).  I went ahead and lined it in linen (actually a linen/cotton blend) because the outside was linen.  I've omitted the ties on mine for the time being. 

Also, since my hood was machine-sewn, I went ahead and sewed the lining by machine as well; although all the stitching that shows - where the inside and outside are stitched together around the face and the lower hemline - are done by hand (whipstitch), and the trim is sewn on by hand (running stitch through the outside edges of the trim). 

Here's my finished hood: 


I applied a thin card-woven trim to the bottom edge of the hood, which I wove myself last week (my second-ever card weaving experiment).  It's made of #10 cotton crochet thread in brown and light gray, because that's what I had on hand.  I got the pattern from this website; it's a design which was inspired by some of the Oseberg weaving patterns (not an actual period copy).  


Hooray, it's finally finished and I can wear it!  This will look great with my men's Viking outfit this fall. (The men's Viking outfit is getting a major overhaul right now, I'll show you when it's done). 


For reference, here's a photo of the original Skjoldehamn hood as found on the bog body: 


the Skjoldehamn hood

More information on the Skjoldehamn hood: 

Náttmál. “A Skjoldehamn Hood.” NÁTTMÁL, 21 Mar. 2021nattmal.wordpress.com/2016/03/16/skjoldehamn-hood/ 

Dan Halvard Løvlid (English translation by Carol Lynn) – The Skjoldehamn find in the light of new knowledge, 2011

Carletti, Francesca. “The Skjoldehamn Hood Class Handout.” Carlys_sewing, Her Ladyship Francesca Carletti, July 2016, carlyfenton.files.wordpress.com/2016/05/theskjoldenhamnhood_revised.pdf

Brennasdottir, Ula, "Skjoldehamn Hood" 2021 (SCA blog) https://medievalexcellence.com/2021/05/12/skjoldehamn-hood/

09 August 2023

SCA: "New" Viking Shoes FTW + Bonus Project

 So my Viking shoes, which I love*, had seen better days.  After two years of running around dusty events, the leather was dirty and stained and dry, and the laces were too thick, too short, and never stayed tied.  (I actually cut them off short because they kept coming undone, and then literally the day after I did that, I saw someone with the same shoes, with the laces tied up around her ankles, and I thought, why didn't I think of doing that before I chopped them off??  Argh).  

I kept thinking I'd eventually get to the leather store to get new laces for them, but then it dawned on me that I could just WEAVE some on my inkle loom!  Et voila: 


On the left is the old shoe.  On the right is the new teal inkle-woven lace.  I took the opportunity to clean and condition the leather as well, and I replaced the navy stitching with teal thread to match the laces.  

No socks, aaaa! 


It was a quick and easy fix, and now my shoes are both more functional and prettier.  I can't wait to wear them next month when events start happening again! 


Bonus Project: 

I also made a new belt for myself: 


I recently ordered some "Rainbow Lace" #10 cotton crochet thread from Hobbii - I used it for both the belt and the shoe laces and shoe stitching.  It's soft and smooth and lovely to work with, and it comes in a zillion awesome colors.  

These two projects were the 4th and 5th inkle weaving projects I've done; and this belt is the first time I've done a multi-colored weaving project.  It took for EVER to warp up the loom with all the stripes, but I really love the way it came out. It's long enough to wrap around me twice. 


~ fin ~


*If you're wondering, they're the Vlaardingen shoes from Bohemond, and they're available in brown and black, both with white stitching. 

27 January 2023

SCA: Return of the Cotehardie : A Dress Makeover

 I’m in love with my new 14thC bycocket, but I had nothing to wear with it to the next event. It’s been years since I busted out ye olde cotehardie - and while I am no longer young and thin, I’ve seen plenty of larger women rock a cote and look fabulous doing it, and so I shall be among them. 

So. 

I took a ride through all of my old costumes, and I found one that actually *almost* fit. Luckily, it had HUGE like 2” seam allowances from old alterations taken to make it smaller in previous years, and I was able to take almost all of it out and re-shape the dress so that it fit me again. Success!! 

The next problem was that it was pea green. It was a neat color, but totally the wrong tone for my skin - it makes me look really pink, and not in a good way. More like in a carbon monoxide poisoning way. So I overdyed it with Rit’s dark green, and voila - it came out a dark, warm, sort of hunter green: 


I order to spiff this dress up, and because the old polyester thread didn’t take the dye, I: 

  • removed all the visible hand and machine stitching and replaced it with hand stitching in the correct color 
  • removed the machined buttonholes and replaced them with hand stitched buttonholes 
  • removed the buttons and re-sewed them with dark green thread, since for some strange reason I had  originally attached them with orange jeans thread (see pic above)
  • removed the neckline binding and re-stitched it by hand, repairing a rip in the binding in the process


With the stitching and dyeing out of the way, it was time to make some new sleeves for this dress - it has half sleeves on it with long pendants, but I had no dress to wear underneath it. So I made a pair of half sleeves out of a blue cotton drapery fabric I had on hand, which I basted into the insides of the green short sleeves: 


 I also made a “medieval sports bra” sort of under-bodice thing out of the same fabric to wear underneath.  I had no modern or period contraption to make my bust look the appropriate shape and placement for this dress, and the dress itself, being unlined linen, would stretch out of shape as soon as it warmed up and not hold me correctly without supporting undergarments. So I made basically the sleeveless top half of a cotehardie out of the same fabric as the sleeves, which will support me, bring my waist in a little,  smooth out my back, and - along with the half sleeves - make it look like I’m wearing two layered dresses: 


All put together, it goes a little something like this: 


Bonus:  along with this dress and the blue bycocket I trimmed up last week, I made some new jewelry to go with it.  I had a purple and silver costume piece (plastic and pewter) which was badly tarnished and the plastic setting was chipped in a couple of places, so I took the whole thing apart and put the beads on new gold metal, and painted the plastic centerpiece setting with gold leafing paint to make it gold:  


Tada!  Now I just need somewhere to wear this.  I'm posting this in the hopes that nobody I know is reading it, because I want this to be kind of a surprise - I've been a Viking ever since I came back to the SCA in 2018, and whenever I wear this ensemble will be the first time I've worn anything but Viking since then.  I can't wait to wear my new hat and dress!  :)