Showing posts with label velvet. Show all posts

25 October 2023

SCA: A 15th-Century Velvet Houppelande

At my very first Gulf Wars, someone lent me a giant flannel houppelande on a cold night, which I threw on over my cotehardie, and I have wanted one ever since.  So comfy!  So voluminous!  It's like wearing blankets!  This year I finally made one for myself, since War of the Rams (BAM) in November is likely to be pretty cold in the evenings.  


This houpelande is made of the same cotton velveteen Ikea curtain panels that I used for my Regency pelisse, back in June.  Last year I acquired a huge box of these curtain panels from my local neighborhood swap group for free, and I still had 4 of them left (about 10 yards of fabric) - they were perfect for this project.  

I didn't have enough of the velveteen to make a full circle houppelande, so I used a simple A-line cut for the body of the dress, (adapted from a vintage 80s dress pattern) with side gores for as much fullness as I could pack into this thing.  The sleeves are D-shaped, and come to a short cuff at the wrist.  


The houppelande is unlined - I didn't have any fabric to use as lining, and I figured this velveteen would likely be heavy enough to keep me warm when worn over my other clothes. After it was put together I dyed the entire piece with teal and charcoal Rit dye, which gave the aqua-blue fabric a lovely medium blue-ish-gray color: 


After dyeing the whole thing, I added a collar and cuffs of white faux fur from my stash: 


The belt is one I made for a Burgundian gown that I made several years ago and never got around to wearing (oops). I had to move the hooks out several inches from where they were to get it to fit, but thankfully, the belt was long enough that I had plenty of space to work with.  The hooks themselves are gold-colored plastic highlighted with green nail polish to mimic an enamel look; I forget where I bought them originally, I've had them for aeons. 


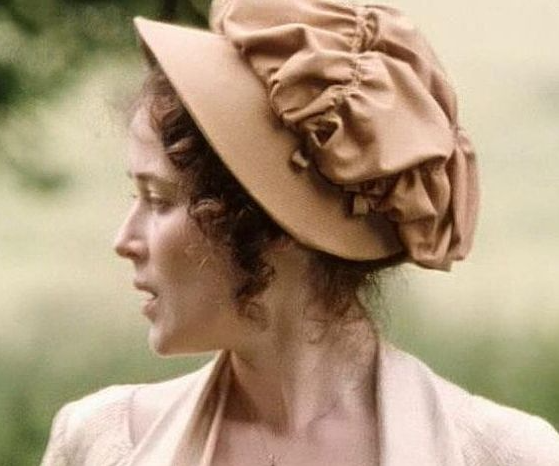
The padded roll hat in the first picture is one I made many years ago.  It's nothing fancy, just a stuffed roll of damask upholstery fabric with pearl beads sewn on, worn with a netted/beaded snood and a couple of lightweight veils pinned onto it.  


So there's a big, new, warm outfit for BAM that I can wear on cold nights.  I also have my linen coat to wear over my Viking outfits, which won't be terribly warm on its own, but which I can wear with layers of hoods and caps, and my wool shoulder cloak.  


Edit:  It turns out the weather at BAM wasn't cold at all - mid-70s during the day, and only into the 60s at night, so I didn't get a chance to wear this at the event at all.  Maybe next year.  


17 June 2023

Regency: Teal Velveteen Pelisse


Behold:  a finished velveteen pelisse for winter wear!  


Last fall I acquired a huge stack of velveteen Ikea curtain panels from my local neighborhood swap group.  I knew right away I wanted to make a pelisse out of it. The fabric is heavy and warm, but not TOO heavy - perfect for our relatively mild central Texas winter weather. 

It would be a nifty addition to my Regency wardrobe, I thought, but more than that, I was in dire need of a long winter coat that was affordable - so I knew I wanted to make one, but I could never find the right fabric and pattern for it.  Yes, I absolutely plan to wear this in "real life" as my regular winter coat! 


left: fashion plate from Ackerman's;
right: design inspiration from Laughing Moon


This fashion plate, and this gown, were my first inspirations.  I loved the ruffles around the neckline and the big tie in the front of both, so I decided to use my Laughing Moon Spencer pattern (#129) for the bodice and sleeves, since it already has the shaping and design on the bodice that I wanted. 

I used the skirts from my Reconstructing History round gown pattern as a guide for the width and length of the skirt panels. 


dyeing the velveteen

The first problem was the color of the velveteen curtain panels:  they were bright aqua, which - no. Too bright and cheerful for me.  

Fortunately, they're 100% cotton, so they dyed pretty easily with Rit dye.  I used a 2:2:1 mixture of dark green, teal, and charcoal gray,  and came up with this lovely deep muted spruce green color.  (Okay, it's TEAL. Rit dye's formula charts call this "Blue Spruce Green," but it's totally teal).  


inside ties and hand-finishing

The pelisse is lined in a sage green cotton fabric that started life as a duvet cover I had sitting around not being used. Here you can see the ties I placed inside the bodice to help hold the thing together - I didn't want to rely on the belt/sash to do the job on its own.  The ties will help keep everything aligned properly when I wear it. 

The problem with dyeing the fabric was that I originally did it in two separate batches.  I measured carefully, and used the exact same dye on both batches...and yet, they still came out slightly different colors - one batch was a bit greener, and one batch was a bit bluer. 

So, after I finished the pelisse, I overdyed it again to bring the colors back in together.  The lining dyed, as well, and now it matches the velveteen fabric. 


bodice back

Since I do plan to wear this coat mundanely (i.e. not as a costume, but as regular daily wear), I made a few modifications to the pattern to help it be more wearable - the inside ties are one. 

I also lowered the hem of the bustline by 3" to accommodate a "normal" modern bustline.  It still fits fine when I'm corseted, but since I mostly won't be wearing this with a corset, I wanted it to conform to my "regular" bust shape when I'm wearing it to the office, for example.    

I added hidden side-seam pockets to the skirts as well.  Bitches need pockets! I generally don't carry a purse - just my phone which is in a wallet case, and my keys, and I needed somewhere to stash them. 

I also added belt loops to the side seams of the waistline, to help keep the belt/sash in place. 


before hemming the bottom

Altogether, this pelisse took me about 12 1/2 hours (over the course of 7 days) to construct and finish.  Most of it is sewn on the machine, although I did do all the finishing - anything that's visible from the outside - by hand.  Because it's so long, and there's so much fabric, it's surprisingly heavier than I thought it would be, and it IS very warm.  It'll make an excellent top layer and windbreak in winter weather this year. 

Thankfully, our winters are generally pretty mild, usually averaging about 40-50ยบ most of the time, and only getting down into the 20s-30s for a couple of weeks in January or February; so this pelisse didn't have to be very heavy - it's mostly just a windbreak and an extra layer. With a sweater underneath and a scarf at the neck, it'll be just fine for the weather here.  


Things I would change if I had to do this again: 

(1) the sleeves are a teensy bit too long. They're lovely, but I worry about them being in the way while driving.  

(2) the back of the bodice and the shoulders are very fitted, and I worry that they won't accommodate more than a very thin shirt underneath - I won't be able to wear sweaters with this thing.  (Good impetus to lose a bit of weight before this winter!) 

(3) The belt loops are laughably too big. I should have made them half the size I did; but it's okay, I doubt anyone will notice or care. 


06 December 2022

Regency: A Green Linen Capote Hat

Before the SCA took over my life at the beginning of October, I was working on a new hat for my Regency costumes.  It started out silly, which I'll tell you about, but first, here's the finished hat: 


First, in July, I bought a blank hat form from Etsy (Austentation) and trimmed it up in blue fabric/ribbon and LOTS of hot glue.  First mistake.  I hated it - it was overly frilly and girly, and I felt like a blue version of Strawberry Shortcake when I put it on.  NOPE.  I took it apart and removed all the hot glue from the straw with my iron and a scrap of fabric.  


just...no.  


What I wanted was something more subtle and graceful - like this ruched capote worn by Jennifer Ehle in the BBC Pride & Prejudice miniseries from 1995: 


The crown of the straw hat was too tall for that ruched soft fabric crown, so I cut part of it off and wrapped the edge in a bit of cotton bias tape to keep it from unravelling: 


(please excuse the hot glue, I removed it)


Next I created a mock-up of the fabric cover for the brim, and an 18" circle crown piece with some spare cotton sheeting I had on hand.  Once I got the fit right across the brim, I took apart the mock-up and used it as a pattern to cut out the pieces in a dark green linen (which I dyed; the linen used to be a light blue).  The linen was a bit limp for this application, and a good deal heavier than the blue fabric had been, and it sagged in places in an unattractive way, I ended up using the gray cotton mock-up pieces as a lining, to give the linen some stiffness: 


This time I sewed the pieces onto the hat with plain cotton sewing thread, rather than gluing them in place - it made the pieces lay flatter and more smoothly, and I should have done it in the first place, really, but I was too excited and in a rush with the blue. Oops.  I used a pad stitch to baste the brim cover in place around the base of the crown; and whip-stitched the turned edge of the crown piece to the brim cover, then pressed the crown piece outward over the stitching.


At first, I didn't like how it came out.  The fit around the edge of the brim was too loose, didn't look clean and smooth at all.  Also, the crown was too small, and wasn't fluffy enough.  I ended up taking the hat completely apart, re-stitching the brim edge so that it fit better, and cutting a new 22" circle for the crown so it would be large enough.  After altering the fabric pieces, I tacked on a green poly satin ribbon to the sides for ties:


I'm really happy with it now; it looks great, fits perfectly, and is a lot more understated than the frilly blue thing I first made.  The only thing is that now the crown is TOO big, and because of the limpness of the linen, it hangs in weird ways around the back of my head.  The hat still needs a lining to protect my hair;  I think when I do that, I'll stuff the crown of the hat with a bit of tulle or something to keep it poofed up a bit more so that it'll stay in place and not sag.  

I plan to wear this hat with my white Ikea dress and the green velour spencer jacket I made in 2021, if I ever get another chance to wear either:


So what's next?  I got some fabulous, FREE fabric the other day, and I'm working on a new Spencer jacket.  More soon!  


12 September 2022

SCA: 1490s Florentine

 After refitting my two Florentine-cum-Venetian dresses, I still had my old red velvet court dress to figure out. Here it is in 2013 when I first made it


It still fits! I still had the original pomegranate-print linen sleeves, too, thankfully.  They were too tight, however, and originally I thought I'd just add a gusset under the arm to widen them, but then I thought, hey, I'm a bona fide Crazy Person, right?  Let's do something crazy! 


So, I cut them apart and re-shaped them as pieced sleeves a la 1490s Florence, to make them a little more accurate for the style of the dress (see below).  See the embroidered pouch on the far left?  It's the same fabric, but in 2013 I embroidered over the printed design to spice it up a bit, and I decided to do the same thing to these sleeves.  

Here they are finished: 


And here's the whole dress, updated and complete (click to make bigger): 


The dress isn't period accurate, I'm afraid.  A big thing with the laurels around here is to be able to explain THAT you know something is wrong, and WHY you chose to let it remain wrong.  Technically, the red velvet gown should be a giornea, open at the sides or the front to reveal a gamurra dress underneath.   However, I simply don't have the funds right now to make a whole new gamurra to wear under this dress, so I left it closed and used the matching sleeves and front panel to simulate the look of a separate under-dress.  I'm not a huge believer in the "10 foot rule", but it passes the 10' rule, and it looks cool, even if someone who really knows their Italian stuff would know right off the bat that this isn't right.  It bugs me, but it's what I've got.  I guess for making something old wearable again, I didn't do a half bad job.    

So now I'm all set for Baronial in October! At least, as far as things to wear goes.  I've been designated site decorator for the event, so I have a lot of work ahead of me making loads of flags and pennants and signs and ribbons and who knows what all.  I'll be busy with that for the next month and a half.  Meanwhile, I might even figure out what to do with my hair for the event.  And before Baronial, the annual fall Bjornsborg event is coming up early in October, so there's that to prepare for, too!  October is going to be busy.  


07 March 2016

Gulf Wars!

Only four days left before Gulf Wars, you guys!  And guess what?  I finally got to quit my night job!!!  *DANCES AROUND IN CIRCLES**   I've had time to actually get all of my chores and prep for war done on time, and I'll be taking commissions again once we all get home.  YAY!  So excited.  (In case you couldn't tell).

Completed in the last two weeks:


1.  A man's Viking tunic, embroidered.  There are pants and cloth winingas to go with it;  I'll have pics of the finished outfit after war.


2.  A new Caerleon company surcote, which I made from a black linen cotehardie that I made back in 2012 (I don't have pics of it, sorry).  I closed up the front and cut out the sides, over-dyed the whole thing with a fresh coat of black to spruce up the color; then added the gold binding at the top (cut from some lightweight damask from my scrap pile), the white faux-fur on the sides, and three appliquรฉ'd lions down the front of the skirt.


3.  HOLY CRAP I FIT INTO THIS DRESS FROM 2012 AGAIN:


4.  Seven new flags for the Caerleon campsite ropeline (five pictured) and a new canvas banner/flag to hang outside of my tent (that's the big one on the left):


5.  More canvas bags, this time made from a blue, heavy cotton with a decorative weave and stitch, from which I removed a TON of orange thread in January:

L-R:  finished bag; fabric before thread removal; fabric after

6.  Fixed up this mask for the  Known World Party next Friday night - this year's theme is that of a Venetian-style masque:

L: finished, painted with teal/black nail polish, with dark flowers, star-shaped
spangles, and "raven" feathers (dyed turkey feathers from the craft store);
R:  The mask as purchased in NOLA before Gulf Wars (aside from a bit of nail
polish on the nose - I almost forgot to take a "before" picture), where a few of
us spent a day before heading to the war last year.


I've also done a million small alterations on my older cotehardies; the green Burgundian dress which I made last summer and then never wore; re-painted a small wooden chest I made last that had a horrible finish on it; and completed a Sekrit!Projekt! about which I'll post after I'm back from war.

I'll have pics of everything when I'm back. This week I've got to run a thousand errands, and finish packing - which just seems a Danaidean task, at this point, but I'll get there - and then I'm on the road Friday afternoon. Whee!

TO WAR!   


08 February 2016

Candlemas

Yep.  I just never remember to ask someone to take pictures of me.  Here are some selfies, though, of the finished pink dress and new ear cauls.

In my uber-Medieval living room, with
turban and brown linen/blue cotton hood.

At the actual event site, with blue velvet dress
and a bit more cleavage than I meant to show.


ONWARD, TO GULF WARS!  More soon.


.

18 January 2016

Blue Velvet Redux


new dress, for Candlemas 2016
In 2012, for my second Candlemas, I made a midnight blue velveteen gown that was more or less cotehardie-ish, with a shimmery leaf-green lining in the sleeves, embroidered with gold thread and tiny faux pearls. It had seen some wear, and was far too small for me, the last time I tried it on (six months ago), so I decided to adjust the sizing a bit, and to change the look of the whole dress.

In an awesome turn of events, when I tried the dress on a couple of weeks ago, before starting this project, it fit me perfectly!  Yay!  No re-sizing necessary!

Here's What Changed: 


1.      I removed all of the gold metallic embroidery and beading, steamed out the impressions left by the decoration and brushed up the fabric's nap with a soft brush to smooth it back out. 
2.      The original front lacing placket was removed and replaced with buttons. 
3.      I unstitched the neckline edges and flattened them out, then re-shaped the neckline at the bust. 
4.     The neckline was a wee bit deeper in the front than I wanted before, so I added a 1/2" edge binding in a linen the same color as the velveteen. 
5.      A twisted, blue, cotton, embroidery floss was couched in along the join between he body fabric and the edge binding. 
6.      I removed the green sleeve linings were removed and replaced with a blue washed-silk fabric from stash.
7.    Finally, I put smaller buttons onto the sleeves.  The size and design don't match the front buttons, but the metallic tones of both styles look great together, and I like having smaller buttons on the sleeves, anyway - less banging my arms on feast tables. 


The dress in 2012, made from a pair of
cotton velveteen curtains purchased at Ikea

Buttons and edge binding on new dress

One Last Thing

I tried out an embossing technique that I'd seen online - there are many tutorials on YouTube and on various blogs out there, this is one.  Basically, you wet the fabric with a spray bottle, place a rubber or foam stamp underneath it, and use a hot iron (without steam) to dry the fabric against the pattern of the stamp.  I thought it would be nifty to have a band across the lower hem, and one at the hips -  similar to the decorative bands in this image from Les Belle Heures du Duc du Berry.  At first, it looked fantastic: 

yay?


After a day or two, though, the embossed design simply disappeared from the fabric.  I tried it a few different ways (wetting the fabric on the inside, the outside, different iron settings, using starch, not using starch), but no matter what I did, the pressed pattern simply would not stay where i put it - after hanging for a couple of days, it just vanished. Oh, well.  It was a neat idea.  

Okay, Two Last Things


I thought I might "reupholster" my old red ear cauls for this outfit, as well, before I remembered that one had gotten badly crushed at war last year, and I'd thrown the pair out and resolved to make a new set when I needed one.  

Instead, since I felt like trying out something new, and didn't want to spend the time on making a new set of cauls, I decided to try my hand at making a bourrelet, or padded roll headpiece, instead - which, of course, ended up taking more time than a new set of cauls would have.  Whatever. :) 


Cotton/poly damask scraps from stash, over-embroidered along the fabric's design, with (plastic?) silver trim, plastic pearl beads, and a glass "ruby" and plastic pearl drop in the front.  There's a wire inside from an old Halloween witch's hat, and it's stuffed with the contents of an old bed pillow that had gone flat.  I love recycling old stuff!   

I may or may not end up doing some more embroidery on it.  The more I look at it, the less finished it actually looks.  Then again, 90% of it will be under a veil.  I'm not sure yet. 


I'll have pics of the finished outfit, with jewelry, veils, and other accessories, after Candlemas. 


.

27 August 2013

Okay, One More Box, and Then I'll Start Sewing, I Promise.

Sadly, I didn't have the presence of mind to take a "before" picture of this, but it was basically just a brown wooden box.  Light brown.  I "stained" it with watered-down red craft paint, sprayed it with a super-shiny gloss clearcoat, and lined the inside with some scraps of a vivid blue uncut corduroy (feels/looks like velvet, but sturdier).


It's hard to tell except in the last picture, which is horribly over-exposed with flash, because it's the only way I could get the red edging to show - the box edges are highlighted in a shiny red lacquer paint, to hide some flaws in the stain, and to better blend the edges of the wood and the blue "velvet" visually.  

Okay, NOW I'm going to go sew.  Two weeks to go from first-draft-pattern to completed 12th century side-laced pendant-sleeve gown.  No pressure. 

ฯƒ_รด


.


04 March 2013

Two More Purses

Well, this past weekend was Gulf War Prep weekend.  I kid you not, I sewed for eleven hours on Saturday (with a two hour lunch break), and another eight on Sunday, after which I spent about three more hours painting things.

I have a LOT of finished projects to show you; the first of which are both of the embroidered purses I started several months ago.

The Pomegranate Purse

From September:


Three shades of red, green; lined with red linen, and finished with gold tassels and tie, through a simple casing and buttonholes at the front. 


The Blue Velvet Purse

From November:


Blue velvet (actual just uncut corduroy), lined with light blue linen;  gold stars, green leaves, red flowers, and a pomegranete in the center on each side;  blue lattice to match the fabric, and finished with a turquoise ribbon tie and turquoise tassels.  There's also a a hidden cellphone pocket inside this one.

Woo!


.

26 February 2013

Allons Bourguignonne! O no?

Remember that red velvet Burgundian I inherited?

yes, this one. 

Well, in December, I got it all torn apart and ready to be made over.  I took the sleeves off to alter them, lowered and widened the neckline in the front, removed the collar and cuffs and even cut out a new collar and cuffs from some white faux fur I had lying around.

Carlo Crivelli1470
And then one day a couple of weeks ago, it went all Italian on me.

I blame the painting at right.  Many moons ago, I loved it for the amazing detail and pattern on the sleeves (click to visit pinterest, and a larger image).  Every time I ran across this painting, I thought mournfully of the pomegranate sleeves that were never to be.

Then I happened across it again while I was idly and half-heartedly sketching out some changes to the red velvet Burgundian...and I thought....wait...

It was already torn apart.  I made an Excel spreadsheet comparing the changes and amount of work needed to finish it as a Burgundian or turn it into an Italian gamurra (because I'm a dork like that), and realized that not only would it be LESS work than the Burgundian, I wouldn't need to also build a hat at the last minute before the tournament last weekend, but I also had some fantastic jewelry already made that I can wear with it!

And, of course, the pomegranate sleeves - which I did eventually cut out and sew together, but I had never finished them (I couldn't find the right buttons).


Permettetemi di presentarvi Maddelina della Sarta.  
I love this so much. :) 


So what'd I do?  I removed the sleeves from the Burgundian, and faced the arm holes and neckline with red linen.  I cut the top of the bodice , took in the sides and the back to fit. then pleated the top edge of the skirt and stuck it back on.  I also made a privacy panel to pin inside the front under the lacings, to make it look like there are more layers going on here than there really are.  

So how many layers are going on here?  In this picture the only thing underneath it is my fitted chemise.  I have that fluffy camicia that I made somewhere - but I'll be damned if I can find it lately.  I'm hoping it turns up before this weekend, since I was planning to wear this at court!

The silver lacing rings on the front are plain ol' aluminum "chain maille" rings from the jewelry section at the hobby store (because they were cheap and not crappy-looking);  after I took the picture I replaced the black ribbon on the front with silver, and tied the sleeves on with silver ribbons to match.  Here I am at the event over the weekend, Bjornsborg's Tournament of the Smitten Heart:


with my pointy almost-period tent in the background, with silver lacings
and sleeve ties instead, and all my pins and favors from the event. :) 
I had so much fun wearing this, and it was so comfortable, and I felt so nice wearing it, and got soooo many compliments, that I've decided that Italian Ren is my new love.  I can't wait to make some from the ground up!

.


.