
I've wanted for years to make a version of this gown for myself, and in recent months, the most amazing fabric came to me. It took me about a month of researching and planning an entirely different outfit for it, before I came across some old research on the Hapsburg gown and realized that it was finally time to do it.
Since Candlemas this year is German- (specifically Landsknecht-) themed, and I haven't been terribly interested in going full German, I settled on this as a compromise. The gown's design, "...influenced by the leading fashion of Burgundia and the taste of the German renaissance," (says the Hungarian National Museum, where the gown is currently displayed), is a nice balance between German styling and...something I'd actually wear. (I mean absolutely no disrespect, it's just not my thing).
And so...
 |
| The completed bodice, which doesn't fit my dummy, Violet, as well as it fits me. Violet needs some serious overhaul. |

The fabric is a printed drapery-weight linen, which came from...you guessed it: a trio of drapes passed to me by a friend, in a round of "Take what you want out of these boxes and then pass them on." The background is sort of an ecru color, and the botanical designs are in shades of cherry red, and burgundy.
Aside: the drapes had once hung in the home of a heavy smoker, and lemmetellya, it was some work getting it clean, but I managed it. Yay!
The trim pieces are cut from a silk sari I'd owned for years (and once wore to a friend's Bollywood-themed wedding).
Construction-wise, I started with my Italian bodice pattern, since it had about the right shape and cut. I adjusted the arm scyes, since my Italian is cut to be worn sleeveless; and adjusted the neckline and front opening, which was actually far more challenging that I thought it would be.
My bust is large and in charge. That makes a flat, straight line from the shoulder to the waist, for a bodice cut like this, impossible. These double-deez need a bit of a curve - but this is NOT a curved-edge look at all.

I started with fitting a mock-up with a straight front cut, then added some long, curved pieces to the front to fit my bust and put the front opening where it needed to be.
 |
| (You can see the seam better here) |
Once I was happy with the fit, I slit the center front bust to make the pattern piece lay flat. When I cut the drapery fabric I did NOT include the seam you see in the mock-up pattern piece. I stitched a dart into the front, just to get the front line and bust fit correct, and used it to mark a line across the center curve where the dart had been, to mark the fabric that needed to be cinched up:

Then I gathered the area very tightly by hand. This is a tailor's fitting trick I learned from a my friend Simona, who has been allowing me to observe and help a little bit with her amazing late-period doublets. It's been very educational, and fun!

There's a corresponding, albeit smaller, gathering at the armpit of the front pieces. The two gathered areas form sort of a boob-pocket that curves over the bust:

The resulting fit is a straight line from shoulder to waist, and flat across the bust and midriff; but the center front is curved enough to cover the bust and to stay in place:

As you can see from the finished bodice picture, the gathering doesn't show at all once the trim and sleeves are in place, and I have a "flat" bodice that actually covers The Girls without falling off the sides or gapping in the center.
Other Construction Notes On This Bodice
- The entire bodice is fully lined in an off-white muslin. The body pieces are flat-lined, and seams opened and clean-finished. The sleeve linings are stitched to cover the seams on the inside.

- The cuffs and neckline trim are interlined with the same muslin, since the silk is very lightweight and flimsy.
- The neckline trim is sewn to the bodice pieces on the inside, behind the bodice edge, and turned outward, and tacked down by hand around the outside edges.

- The sleeve cuffs were treated in almost the exact same way, except that they're extended from the end of the sleeve instead of wrapped around the edge of it. The cuff itself is not as widely bell-shaped as I would have liked, but I do like the way they look. They're soft enough, even with the interlining, to not restrict hand movement (the cuffs come down to the ends of my fingertips), and can be turned back easily so as not to be in the way (of eating, for example).
- The lower edge of the bodice will sit on top of the pleated skirt, once it's attached - you can see in this close-up photo on flickr that the bodice on the extant Hapsburg gown is treated the same way. (The flickr poster's blog has even more excellent photos of the construction details of the Hapsburg gown, but somehow I lost the bookmark I had and I can't find the blog again! In any case, her flicker photos are just amazing).
- From drafting the pattern to finishing the bodice, this half of the gown has taken me just over a week to complete.
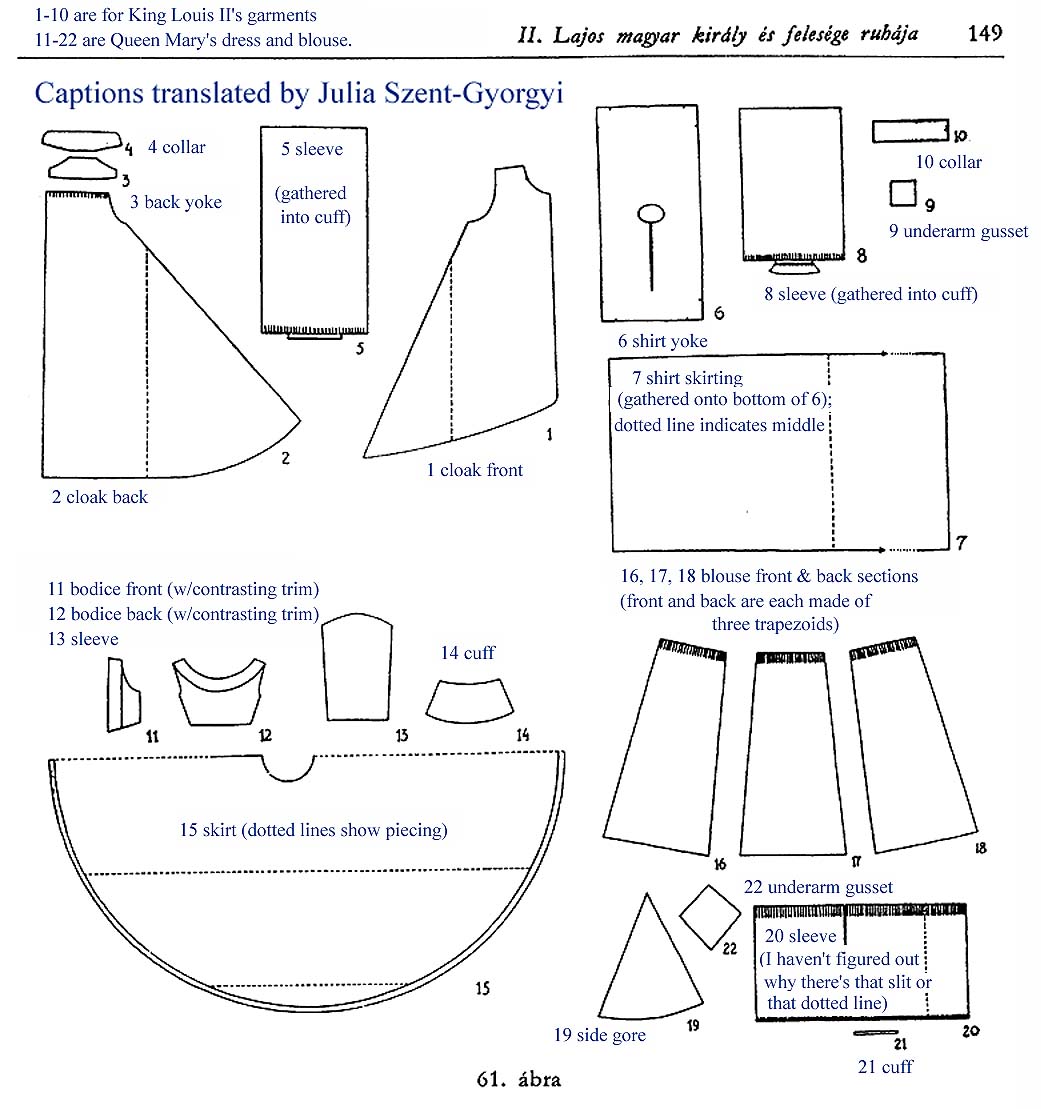
I used one of my three 84x48" drapery panels on this bodice. I have to say, I've been terrified to cut out the skirt, because this isn't a panel-and-gore skirt - it's a full circle. The skirt on the extant gown is pieced, which is what I'd planned to do...but how? While writing up this blog post, I happened across a cutting diagram I hadn't seen before, which actually answered all of my questions about cutting the skirt pieces. With any luck, I'll have a skirt post, and a finished dress for you before too long. :)
To be continued...
.
No comments:
Post a Comment
Hooray, comments! Be nice to each other, and to me. Or I shall boot your ass and then mail you a dead fish. :D