07 July 2014

One Night In Bangkok...

Today's post title is the fault of my BFF.*
____________________________________

SO ANYWAY I finished the corset I started in March (here, and here).  Finished it June 29th, actually, but it's taken me until now to locate my camera data cord so I could bring you some finished-product pics:


The finished corset!

Fabric: cotton damask, drapery-weight
Lining: cotton calico
Interlining: 2 layers of lightweight buckram
Boning: stiff boning of bamboo baking skewers; flexible cording of heavy upholstery welting cord

Trim: black linen (over finished edging, not structural, purely decorative)
Lacings: 4-strand braid "viking whipcord" made from cotton crochet thread.
Eyelets: stitched by hand over aluminum backing rings, with DMC embroidery floss.


A note about the fit: as is evident in the first picture, the front piece is about 2" longer than the side pieces.  It's actually not; I had it laced incorrectly.  I unlaced them and moved the side pieces down, like in the diagram here - which does NOT look like it'll fit nicely when laced, but which actually fits perfectly when on my body.

The things you learn.


Things I will do differently next time:

 This is my very first corset...er...discounting the renfest corset that I tore down in order to start work on drafting the pattern for this one.  I LOVE the way it fits, however, for the next one:

  • the front bustline needs to be just a skoch lower, as it peeks up above every dress I put over it
  • The front waistline is too long for sitting comfortably for very long time periods, at least, with the bamboo boning in place.  I either need to shorten the length of the boning in the front, so that it doesn't go all the way down, or I just need a shorter corset in general - or to go the opposite way and make it long enough to bypass the tummy pooch that this corset stabs when I sit. 
  • I will probably leave a small pocket in the front for a busk (and for my e-cig, hehe)
  • the angle of the top pieces of the back result in a bit of a point at the center back, which I think I'll remove on the next try
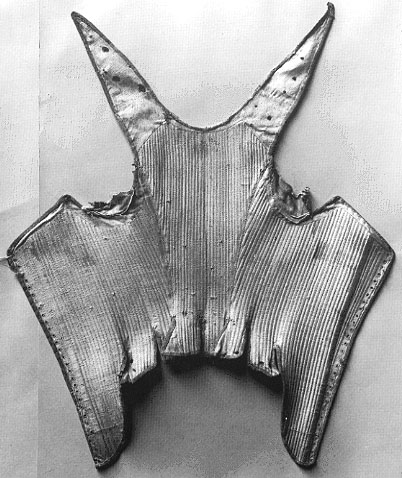
  • The straps are about 1" longer than I'd like, now that I've worn it about a bit;  and the origin point for the straps, on the back pieces, needs to be moved inward towards the center about 1.5" so that they sit correctly on the back of my shoulders  (i.e. I now understand why the famed "effigy corset" is shaped the way it is (Mine is NOT supposed to be an effigy knockoff, nor even remotely contemporary to that one. It's far earlier, and no, for the record, not 100% period in design. This is just an exercise in corsetry for me, my first serious foray). 
  • The pieces (1 front, 2 sides, 2 backs) were designed to allow for a LOT of size adjustment, since I've been losing weight and gaining muscle like crazy for a while now.  I knew I'd have to take this in, and change some of the angles.  Turns out, enough of that has already happened since I drafted the pattern and began construction in March, that the corset is already laced all the way closed, and if I lose ANY more weight, will already be too small!!  I'm mulling over ways to keep that from happening again on my next corset, without resorting to just making it too small to begin with and hoping for the best. 
  • I will make SURE, before I start sewing eyelets, that I have enough of the same color floss to complete that phase of the project!  This corset's eyelets are four different blues, and one green.  :/ 


You may recall...


The brown linen Italian dress I made for myself last year.

This is what it looks like without a corset.  (I.e. a stack of brown pillows, and shoulders that fall off).


Sooooo much nicer.  


One final note:  yes, the chemise here is my Italian camicia,  which I adore.  I DO plan on making a second one, with longer sleeves and more frill; as well as a second, actually-period corset, now that this one is done (I'll likely sell this one), and another couple of late-15th-C Italian kirtles to be worn with various other [new] sleeves.

In the meantime, though, I have a to-do pile stack list as long as my arm, and a couple of projects for other folks that I'm finishing up.  More on that soon!


____________________________________


* To wit:


.

30 June 2014

Let's Talk About Boobs

Most women I know in the SCA wear modern bras under their clothing, either because of a lack of period options or because it's simply easier to stick with what you know.  A discussion on Facebook about getting a proper bra fitting in a store prompted the following explanation from me, and I thought it might be useful to share here, for my seamstress readers.


______________________________________________

"...you can do it yourself easily. Measure underneath your breasts around your ribcage where the band goes - better yet, have someone else do it for you so that you can mind your posture (because if you're crunching over to see the tape, you're not getting an accurate measurement). Then measure around your breasts, at the widest part (the widest part, not the nipple itself). 

The difference between the band measurement and the breast measurement is your cup size. Every two inches of difference is a cup size. For instance, my band is 40" (actually forty-and-a-half, but round down for give in the elastic of the bra); and my bust measurement is 45". That makes me between a D (which would be 44") and a DD (46"). In truth, one breast is a D and one is a DD.  (Also keeping in mind that if you're like me, and your cup size doesn't change when you lose/gain weight - as your band size changes, your cup size will as well.  I wear a larger cup size when I'm thinner, for example, because the difference between my band and bust measurements increases). 

That's where a professional tailor or lingerie fitter comes in - they can eyeball small anatomical differences and tell you whether (still using my measurements as an example) a D or a DD would be better, and when to go up/down a cup size or when to make adjustments in the band size itself. But if you can measure yourself, or have a friend do it, you can experiment and see what's comfy for you. I wore a C cup and a band size that was FAR too large for me for many, many years before I learned to do this; the reason we HAVE bra fitters is that most women do the same. When in doubt, try on a larger cup and a smaller band than you normally wear. 

This segment brought to you by the letter N for nerd." 
______________________________________________


That said...

  1. It's not an exact formula, and 
  2. It's not going to work for every single person, since every person's body is a bit different. 

The formula, however, is also easily adaptable for very-fitted SCA garments like cotehardies and "period brassieres", for example.  The more information you know about how to fit your breasts, the more information you'll have about fitting them into a garment, whatever your underwear of choice. 

Another thing many women tend to overlook, both with bra fitting and with costumery, is that your "breast" covers more area than just what you think of as your "boob."  

original diagram from THIS ARTICLE at NursingCrib.com 
 

Take a look at the purple lines I've added to the above diagram.  For fitting purposes, you need to know that your breast, in a bra or a very tailored garment, begins at the side line of your body directly underneath your armpit; and also goes up to the point under your collarbone between your shoulder and the hollow of your neck.  (This is especially true for larger-breasted women, since both modern bras and supportive SCA garments push the breasts upward towards that point).  

* Also, keep in mind that if your breasts don't happen to be the ones that you grew yourself, sometimes the side-line will be moved forward, or be entirely absent, depending upon how your current model was installed by your surgeon.

Just as when fitting the cup size for a modern bra and taking into account the underarm/side area so that the bra cups support the whole breast and not just the "boob" on the front of your body; when fitting a supportive cotehardie or other supportive garment, you must take into account, in your alterations and pattern construction, the fact that your body pieces will need to support that area as well as everything else.  This is why the line of tension in a self-supporting garment goes from that side seam to the front center of the garment, like this: 

Here, the blue line is the tension line.  The red circle is the placement of the
lifted and supported breast in such a garment. 

And DO keep in mind that ALL of this is going to change from individual body to individual body, and your mileage may vary.  In general, though, I hope this information helps you in your fittings. 


.

26 June 2014

There Once Was A Woman From Texas...

Who couldn't be bothered to think of the rest of the limerick.

Anyhoo, I'm still alive and kicking.  I've been uber-busy with the rest of my life (aside from sewing and the SCA) for several months, hence the lack of posts.

I'm making a suitcase at the moment (I know, right? Weird), but as soon as that's done, I have looooots of lovely SCAdian plans, including:


  • re-fash'ing about half my SCA wardrobe
  • replacing the rest entirely!!! 
  • customizing that dress dummy I got a few months ago
  • a whole bunch of new clothes for boys
  • some furniture re-do's

And lots more. Stay tuned!  


06 May 2014

And Now For Something Completely Different...

Hey, check it out, guys, I'm selling my artwork!

Visit   my new Etsy shop

Shop now! 

What: 
  • soft pastel drawings and sketches
  • acrylic paintings
  • available framed or un-framed
Why?  
  • Because where the hell would I hang dozens of drawings and paintings?  I must make it...therefore eventually, I must sell it. 
When:
  • Right now! Go buy art!   
For updates and new product info:


10 April 2014

The Old Switcherooni (March Sewing Challenge)

Well, this post is late, and the blue corset I had named as my March Sewing Challenge project still isn't finished (hand-sewn eyelets are time-consuming, and I'm making like three thousand of them). 

So I'm cheating, sort of - technically I DID make this outfit from start to finish in March, even though I hadn't planned to feature it:  

A viking "apron dress with straps in a V
configuration at the back, for a friend. 

Decorative contrast stitching on all the seams, the top and
bottom edges, and arrows on the straps (the recipient is an archer). 

Decorative band of rows of stitches along the lower hem...and
Daisy's butt, which she manages to get into like 98% of my photos. 


Ta-da?   I think so.  She loved it. :) 

More on the corset soon, I hope! 


.

31 March 2014

We Interrupt Your Regularly-Scheduled Costuming Blog To Bring You:


A FREAKING DRESS DUMMY!!    ** APPLAUSE**   I've always wanted one of those!  A friend of mine came over Saturday to work on a joint project, and she brought me this from someone she knows who was getting rid of it.  YAY!


Everyone, meet Violet:


Step 1:

This was originally a plus-size dummy, which my friend's friend had cut down in order to make it a non-plus-size dummy.  I had to expand it again, obviously, because I R plus-sized.  Anyway, that's why the huge gaps - lots of plastic is missing that would normally fill in around them.


Step 2:

Once I got the thing adjusted to my measurements*, I had to adjust the shoulders, because my shoulders are far wider than the ones on the dummy.

I cut some pieces of plastic Ikea placemats to extend the shoulders the right amount on each side, and taped them in place with painter's tape (for some reason, it stuck to the red cover fabric really, really well).


Step 3:

Then I padded the plastic bits very lightly with some thin blanket backing I had laying around not pulling its weight.

This was just so that the "cover" I was about to put on it wouldn't get poked and pulled by, and slide around on, the plastic shoulder bits.


Step 4:


And here's the "cover" - an old tshirt, which I ADORE, but which is too small to wear out in public anymore...but it makes a great, tight-yet-forgiving cover for this dress dummy.


...And last, but not least, she wears a collar I made for a costume and then never ended up wearing.


Say "hello", Violet!   (Yes, it needed a name. Violet was the name of my imaginary friend when I was a kid. The girl in the mirror was me; but the girl in the reflections of glass cabinets and such, that was Violet. She was my twin sister).


* A word about the measurements:   yes, this thing has my exact measurements.  And no, it looks NOTHING like my body shape, at all.  My waist comes in a LOT more if you look at me from the front; but I have a large, round belly, so it sticks out way more if you view me from the side. Also, while the bust measurement is the same as mine; my back is narrower and my breasts much larger than the dummy.

So, this thing is going to get some very serious customization in the very near future - certainly before I start using it for serious fitting.  But that can wait.  It still needs a stand, so I'll do the rest then. For the time being - new dummy, temporary fix, just because I just wanted to start playing with it.  :)


.

25 March 2014

March Sewing Challenge: Part 2

Work on the blue corset proceeds apace:


Post #1:

  • pattern drafted from existing Renfest corset:  re-sized, no. of pieces changed, back/sides re-shaped for style
  • pattern traced onto paper for future use
  • fabric cut out:  outer shell, inner lining, two layers of interlining

As of now: 
  • interlining basted in place
  • lining and outer shell sewn together, including straps
  • Boning and cording channels sew in front/back/sides
  • Cording inserted (sturdy upholstery welting cord, cotton)
  • Boning inserted (bamboo kitchen skewers (it was what I had on hand)

I've also got most of the edge trim attached, but not finished, all the way around the pieces - but I've changed my mind about the color, and will be removing the trim and replacing it tonight.  After that, all that's left is the finishing that I have to do by hand - some stitching, some eyelet holes, stuff like that.  

Next set of pics should be a finished corset!  :D 


14 March 2014

P.S.

I made a new pincushion.


It doesn't seem like a huge deal, but it really, really is.  To me, that is.  It's about 6" across, flat on top and bottom (except for the button), made from scrap linen, and stuffed with about six outfits' worth of pure linen dryer lint that I've been saving in zippy bags for over a year, LOL.  (I've been told by a couple of people that polyester stuffing (and some types of cotton fill) dulls pin and needle points, whereas linen stuffing doesn't.  Idk if that's actually true, but the linen lint (linent?) is easy to get a frigging pin through!)

My old pincushion was too soft, filled with polyester, too round on the bottom (it rolled all over the place), and made of deep teal fabric, which made it hard to see my [teal!] pins.  I've hated the thing for two years, and I'd been promising myself that a pincushion would be my next palate-cleanser project between big jobs, but I kept not getting around to it.

Hee!  I love the new one.

.