Showing posts with label silk. Show all posts

10 April 2025

Update on Stuff

 I know, I haven’t posted anything since I got back from Gulf Wars. I’ve been busy as heck, I just haven’t had much to say here. 

At the moment I’m working on another full hand-sewn outfit for A&S, which I’ll have lots to say about in a couple of weeks after the competition. Fun stuff about that: I hand-sewed a wool garment for the first time, I tried out weaving with silk thread for the first time (and I’m in love), and while I normally have my A&S project finished a week or two before the deadline, this time I had sort of a supply emergency and now will end up working up until the last minute - possibly even the late night before the event. So…that’s fun, I guess?  Heh. 

I have lots planned for afterwards, too. A new Viking coat for myself, lots more weaving, and a Regency gown I’ve been “dying” to make for over a year now. I may also get a new tattoo next week, but y’all don’t care about that. 

Anyway, more soon, I promise! 

Just for fun, here’s a pic of my first silk weaving project. The band on the left is cotton crochet thread; the band on the right is silk thread from Dixie Weavers, which I purchased at Gulf Wars. It’s so soft and shiny and smooth! It’s a dream to work with - once I got the tension right, that is - and I can’t wait to keep playing with this stuff. 


Bye! 


31 December 2023

SCA: Green 1490s Florentine Outfit - for Candlemas 2024

1490s Florentine Italian
for Candlemas 2024

In the beginning, I honestly had no thoughts about what to wear to Candlemas in February - I figured I would just go Viking, like I always do.  But then I went to the event webpage and saw this: 

"The year is 1494 and the wealthiest bride in Europe is about to become the queen of Germany and future Empress of Rome.  Come re-live the wedding of Bianca Maria Sforza of Milan and King Maximilian I of Austria and Germany." 


1490s Italian? I'm in.  The Sforza wedding was said to be one of the most amazing spectacles in years, by several people who wrote about it later: a pageant of high fashion and pomp the likes of which the writers had never seen.  Candlemas this year is intended to be a huge costume extravaganza, and everyone will be wearing their finest Italian and German garb - there's even a costume contest!   Time for a new fancy outfit, I thought.

My first thought was to make some minor alterations to the red velvet Florentine-ish outfit I wore to Baronial in 2022 (the trim is wrong, the sleeves are too big, and the whole thing needs small adjustments here and there), but I wanted something new.  And so of course, I started with something  old.  


Gamurra

I started with my black silk noil gamurra, which I made in 2014 and which has undergone many transformations in the past nearly ten years, mostly in the form of various decorative stitching and trims being applied and removed to change the look.  

I did the same this time, applying a gold and black braided trim to the neckline and front edges, and attaching some gold (brass) lacing rings to the front opening (yes, on top of the hand-sewn eyelets that were already there. The eyelets are very small, and they don't show under the rings when the dress is laced at all).  


Giornea

before - Burgundian dress
For the giornea,  I made over an old Burgundian dress that I had made in 2013 and had never worn - I just never got around to making an underdress or headgear to wear with it, so it just sat ignored  in my closet all these years. The outline was already nearly perfect, though. The dress is voluminous (much fuller than it looks in this picture), but the sleeves were too tight at the top, which made the shoulders fit weird.  Fortunately, I didn't need the sleeves.  

I removed the sleeves and all of the faux fur trim, cut the armscyes a bit deeper, removed the collar and opened up the center front seam all the way to the hemline.  

I also stitched a length of gold braided trim along the neck opening/center front.   I didn't want to dress this giornea up TOO much, because the sleeves and the trim on the gamurra were more than enough decoration for this outfit, but it did need something so that the edges weren't just plain. 


closeup of the front


Giorneae were usually open either at the front or sides or both, to allow the gamurra underneath to show through - mine is only open up the front, and is belted all the way around with a long, black, double-faced satin ribbon sash.  My giornea was inspired by several Renaissance paintings, like these two (both fragments of frescos by Domenico Ghirlandaio): 


fragment from the "Birth of St.
John the Baptist" fresco

fragment from the "Visitation" fresco


Sleeves 

While 90% of this dress was basically free - I made over old costume pieces and used materials from my stash for almost all of it - I did actually splurge on fabric for the sleeves. This is a silk damask in aqua and gold (sort of a shiny tan, really) from Rennaisance Fabrics - it’s so soft and pretty, I just love it!   

Since the fabric was fairly dressy, I opted for a plainer sleeve design, closed at the upper arm and open on the lower arm, and laced open to allow my linen camicia to poof out through the lacings.  

I stitched eyelets along the open forearm edges and on the sleeve heads where the sleeves attach to the gamurra in a tan/brown thread which matches the "gold" parts of the fabric's design. 

I took my inspiration from images like these: 


another fragment from the
"Visitation" fresco by Ghirlandaio


I'll talk about the accessories, and my hair, tomorrow. For now, although I won't be the fanciest nor the richest-looking person at the Candlemas event in my made-over dress, I'm proud of this outfit and I can't wait to wear it.  I just hope it's not too hot, and that it holds up to dancing.  


Bonus:  my Project Cat, Rabi, asleep on an Ikea pillow underneath my work table: 


15 January 2023

SCA: The Blue Bycocket

 So, I was at coronation yesterday, and a friend of mine busts out this huge box full of felt bycockets she’d made, and gives one to another friend who was sitting nearby.  And I said, “That’s f——-g cool! I want one!” AND Y’ALL, SHE UP AND GAVE ME A HAT.  It’s been years since I rocked The One True Century*, but I’ve always wanted a bycocket to play with - and now I had one. 


using sewing pins to mark the position of the future embroidery


It didn’t take me long to figure out how I wanted to dress it up.  It needed feathers, and I just happened to have a stash that included some teal McCaw, Blue Jay, and some lovely brown feathers that I’d picked up over the years. I bound them together with some teal ribbon and sewed the package together. 


feathers before securing them to the hat


Now for the body of the hat. It’s midnight blue, and what could be more perfect and more me than a nighttime full of stars?  I covered the crown of the hat in gold and silver embroidered stars, and teensy pearl beads: 


Next I used some of the leftover teal silk ribbon from other projects to cover the edge of the brim, and added a strip of some old blue and gold medallion jacquard trim that I had in my stash. I also found a fabulous giant button to use to set off the feather cluster. 


Tada!! A finished starry night bycocket.  I’m in love with it  and I can’t wait to get into what’s next - this hat has engendered a whole slew of new ideas as far as what to wear with it! 


* my friend JM calls it that, and I love the phrase.  Don’t get me wrong, I love my Viking and I always will, but 14thC rocks.  


11 September 2022

SCA: 1520s Venetian - Black Dress

 After completing the wine-colored linen Venetian dress, I set about making the same changes to my black silk Florentine dress


Once again, the silk fabric was badly faded, and needed a refresh.  I over-dyed the whole thing with Rit's black dye. 


I created some new bag sleeves for it, just like I did with the wine dress, cut from the skirt of an old sideless surcote that had seen better days, and dyed them at the same time as the dress so the black tones would match.  This fabric is linen, with a woven stripe pattern, which I find just neat as hell. 


There's two old 1490s Florentine dresses turned into 1520s Venetians for the price of a couple of bottles of fabric dye. Yay! 


The only thing I'm not sure of at this point is what to do with my head.  My hair is very short these days (I cut off like two feet of hair in May and am growing out my gray), and I prefer to keep it covered in the SCA.  With Viking all I have to do is throw on a kerchief or a Jorvik hood and I'm good to go.  But what will I do with these Venetian dresses?  I suppose I could just pop on a snood, but I want to do more than that.  Hmm.  Maybe some more research is in order.  

22 November 2020

...And Now For Something Completely Different

So, here's something a bit out of the ordinary:  I made myself a Regency-era (Empire) gown.  I had six yards of sage green crushed Dupioni silk on hand that I had had for years, and  I was saving it for "something special", but that something never came around - what was I saving it for then?  I decided to have fun with it. 

And so I give you:


At first I thought I'd get a Simplicity pattern and just start sewing; but I had too many questions about the fashions themselves - first and foremost, was that Simplicity pattern even accurate?  A LOT of reading and study happened next.  Long story short, I finally ended up ordering the Morning Dress pattern from Reconstructing History, and got to work. 


I adore these buttons!


The pattern went together pretty easily once I figured out some snags I had along the way.   But once I got it sorted the dress came together just like it was supposed to.  I made three mock-ups of the bodice, and two finished bodices,  to get the fit right.  

I also made a Regency-style chemise, and a pair of stays to wear beneath the dress.  The fashion in the early-mid Regency period was to let it all hang out - no corset, no stays, nothing.  Of course, larger women (me) and larger-busted women (me again) did opt to wear stays to keep everything in place.  The chemise is made of handkerchief-weight white cotton;  the stays are made of cotton calico with bias tape binding and hand-stitched lacing eyelets.  


Credit where credit is due: 

A dear friend gave me a big gift card for my birthday this year, which I used to purchase a new cutting table (hooray, no more cutting out on the floor!) and all the notions and supplies I needed for this dress.  I had the fabric already, but without that birthday present this outfit wouldn't have happened.  Thanks, Friend!  


What's Next? 

Sadly, I don't have anywhere to wear this outfit - I'm not involved with JASNA or any local Regency groups (there aren't any local Regency groups), and Halloween didn't happen this year.  This was purely an exercise in branching out and learning something new.  It'll hang in the closet forever, I suppose.  Even if it does, I plan to keep learning and keep adding to the ensemble - it needs a Spencer jacket and a hat!  Those are "one of these days" projects, I think. 

For now, though, my next project is going to be a [modern] winter coat for me.  I've always wanted to make one, and I've found the perfect pattern for it.  It'll take me a while to collect all the components I'll need for the coat, though, so I probably won't have the blog post about it for you for a couple of months.  In the meantime, there are always masks to make.   


15 November 2019

The Sari Quilt


So I had this huge silk quilt.  The front was made from dozens of pieces cut from the edge banding on silk saris from India.  The border around the front was made from a deep purple dupioni silk.  The backing was made from a royal purple rayon challis.   It was GORGEOUS.  It had been given to me by someone who'd received it as a gift many years before and didn't want it anymore. It was also something I was never, ever going to use - my cats would destroy it, and it was really hot. 

After having kept it in storage for years, I looked more critically at the quilt: on closer inspection, the quilt was badly worn around the edges, some of the sari pieces were fraying, it was discolored in several places, there were bleach stains on the back, and the inside was lined with an open-cell polyurethane sheet which was crusty and starting to melt with age.  

So I choked back my revulsion to destroying a beautiful piece of art, and cut all the sari silk and the dupioni free of the quilt so that it could be salvaged for other applications.  Since we know that Viking apron dresses were often finished with trim made of strips of imported silk and other fine fabrics (Hilde Thunem's paper on apron dresses, see Inga Hagg references/biblio and Birka finds), I opted to use a few of the pieces from this quilt on my naked apron dresses and smocks:  


Here's a bit of navy blue sari silk with pink and blue on the top edge of my brown linen/cotton dress.  And yes, I picked out all that embroidery on the brown dress.  It killed me - I'd just done it in September and I did a really good job, but it was incorrect for the dress and the time period and I just couldn't look at it anymore.  


Here's a lovely gold and teal on the "bayou" blue smock sleeves. (Bonus cat).  
.  


Here's a bit of the same navy and gold with blue and pink that's on my brown dress, on the "bayou" blue apron dress.   


And two extras: 


A bit of gold and silver on the sleeves of my white smock. This fabric actually came from an old lightweight curtain panel I had in my stash, and I was really pleased with the way it looked on my white smock,  It was this look that convinced me to try out some of the sari fabric on my clothes.  (I'm NOT pleased with the zigzag stitch I used to put the trim on - I'll be picking that out and using a less obvious stitch as soon as I get back from BAM).  


 This isn't from the quilt either, but I did find a bit of trim in my stash that works with the color on my "bluebonnet" blue apron dress (the one I just made over in October).  I really love the way it looks with the teal rayon ribbon at the top.  


And finally, lest you think the orange cat (Rory Williams) is my only sewing friend, meet Rabi and Gypsy:  two brothers who also like helping me with my sewing, usually by sleeping in my chair or sitting on my lap to keep me warm while I work.


What's Next?

Technically I'm out of stuff to do before BAM, but I do have a couple of small projects I'm playing with that might be done before I leave - I'll show you if I get them done, if not, I'll see you after the war!

06 January 2015

Candlemas: The Hapsburg Gown (1/2

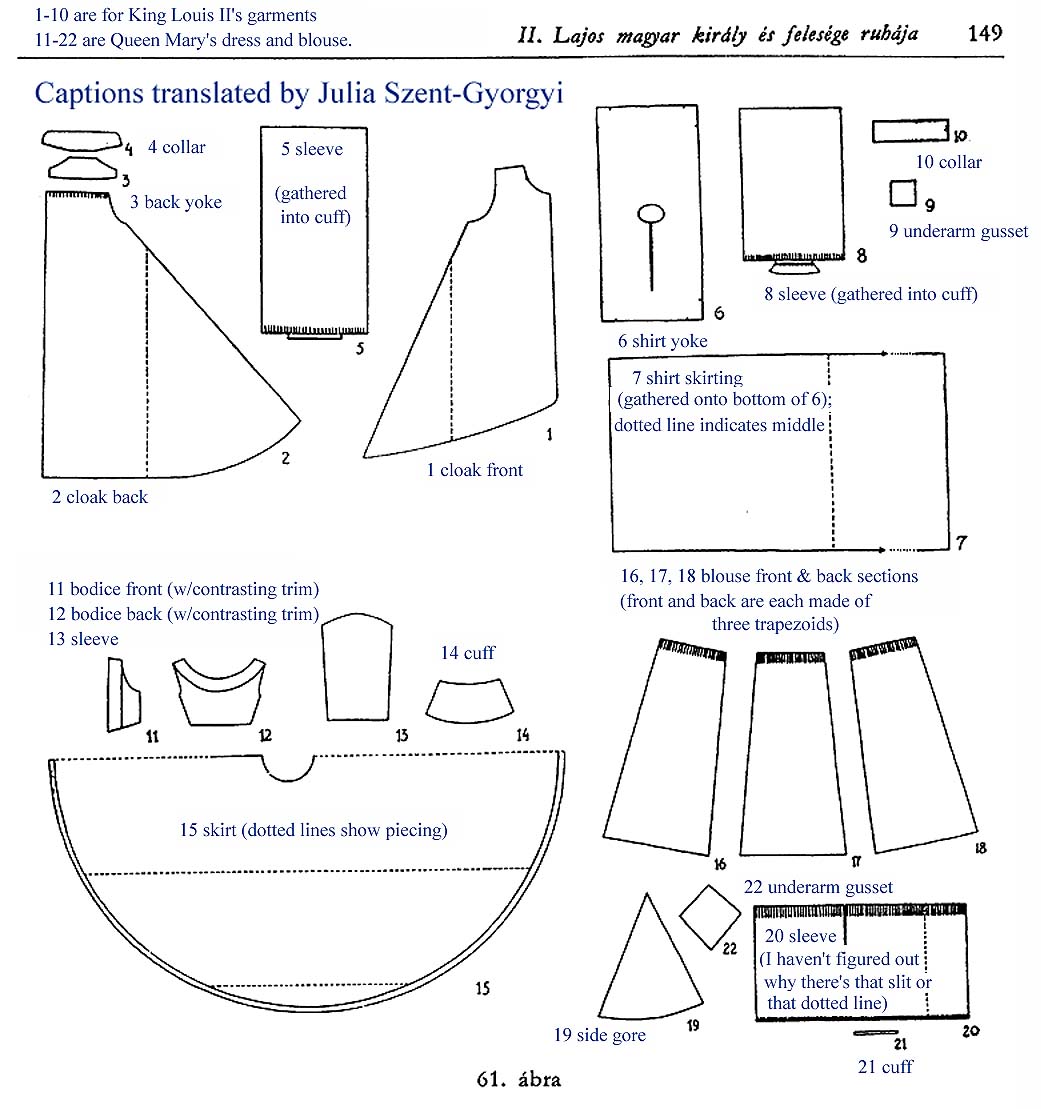
This year, for Candlemas, I'm making a version of "The Hapsburg Wedding Gown", made for Mary of Austria, for her wedding to Louis II of Hungary in 1515.


I've wanted for years to make a version of this gown for myself, and in recent months, the most amazing fabric came to me.  It took me about a month of researching and planning an entirely different outfit for it, before I came across some old research on the Hapsburg gown and realized that it was finally time to do it.

Since Candlemas this year is German- (specifically Landsknecht-) themed, and I haven't been terribly interested in going full German, I settled on this as a compromise.  The gown's design, "...influenced by the leading fashion of Burgundia and the taste of the German renaissance," (says the Hungarian National Museum, where the gown is currently displayed), is a nice balance between German styling and...something I'd actually wear.  (I mean absolutely no disrespect, it's just not my thing).


And so...


The completed bodice, which doesn't fit my dummy, Violet, as well as it fits me. Violet needs some serious overhaul. 


The fabric is a printed drapery-weight linen, which came from...you guessed it: a trio of drapes passed to me by a friend, in a round of "Take what you want out of these boxes and then pass them on."  The background is sort of an ecru color, and the botanical designs are in shades of cherry red, and burgundy.  

Aside: the drapes had once hung in the home of a heavy smoker, and lemmetellya, it was some work getting it clean, but I managed it. Yay!  

The trim pieces are cut from a silk sari I'd owned for years (and once wore to a friend's Bollywood-themed wedding). 


Construction-wise,  I started with my Italian bodice pattern, since it had about the right shape and cut. I adjusted the arm scyes, since my Italian is cut to be worn sleeveless; and adjusted the neckline and front opening, which was actually far more challenging that I thought it would be. 

My bust is large and in charge.  That makes a flat, straight line from the shoulder to the waist, for a bodice cut like this, impossible.  These double-deez need a bit of a curve - but this is NOT a curved-edge look at all.


I started with fitting a mock-up with a straight front cut, then added some long, curved pieces to the front to fit my bust and put the front opening where it needed to be.  

(You can see the seam better here)


Once I was happy with the fit, I slit the center front bust to make the pattern piece lay flat.  When I cut the drapery fabric I did NOT include the seam you see in the mock-up pattern piece.  I stitched a dart into the front, just to get the front line and bust fit correct, and used it to mark a line across the center curve where the dart had been, to mark the fabric that needed to be cinched up:  


Then I gathered the area very tightly by hand.  This is a tailor's fitting trick I learned from a my friend Simona, who has been allowing me to observe and help a little bit with her amazing late-period doublets.  It's been very educational, and fun!  


There's a corresponding, albeit smaller, gathering at the armpit of the front pieces. The two gathered areas form sort of a boob-pocket that curves over the bust: 


The resulting fit is a straight line from shoulder to waist, and flat across the bust and midriff;  but the center front is curved enough to cover the bust and to stay in place: 


As you can see from the finished bodice picture, the gathering doesn't show at all once the trim and sleeves are in place, and I have a "flat" bodice that actually covers The Girls without falling off the sides or gapping in the center.

Other Construction Notes On This Bodice

  • The entire bodice is fully lined in an off-white muslin.  The body pieces are flat-lined, and seams opened and clean-finished.  The sleeve linings are stitched to cover the seams on the inside. 

  • The cuffs and neckline trim are interlined with the same muslin, since the silk is very lightweight and flimsy.  
  • The neckline trim is sewn to the bodice pieces on the inside, behind the bodice edge, and turned outward, and tacked down by hand around the outside edges. 

  • The sleeve cuffs were treated in almost the exact same way, except that they're extended from the end of the sleeve instead of wrapped around the edge of it.  The cuff itself is not as widely bell-shaped as I would have liked, but I do like the way they look.  They're soft enough, even with the interlining, to not restrict hand movement (the cuffs come down to the ends of my fingertips), and can be turned back easily so as not to be in the way (of eating, for example). 
  • The lower edge of the bodice will sit on top of the pleated skirt, once it's attached - you can see in this close-up photo on flickr that the bodice on the extant Hapsburg gown is treated the same way.  (The flickr poster's blog has even more excellent photos of the construction details of the Hapsburg gown, but somehow I lost the bookmark I had and I can't find the blog again! In any case, her flicker photos are just amazing). 
  • From drafting the pattern to finishing the bodice, this half of the gown has taken me just over a week to complete.  

I used one of my three 84x48" drapery panels on this bodice.   I have to say, I've been terrified to cut out the skirt, because this isn't a panel-and-gore skirt - it's a full circle.  The skirt on the extant gown is pieced, which is what I'd planned to do...but how?  While writing up this blog post, I happened across a cutting diagram I hadn't seen before, which actually answered all of my questions about cutting the skirt pieces.  With any luck, I'll have a skirt post, and a finished dress for you before too long. :) 


To be continued...


.


09 September 2014

Italian: Now Available In Black Silk

In July I shared my first-ever period corset, which I made to go under, among other things, my brown Italian dress.


Just before I completed it, I ordered a large quantity of black, raw, silk suiting, from FabricMartFabrics.com...on sale for four dollars a yard.  (Check them out, if you haven't - their sales are fantastic).   I hadn't figured out quite what to do with it until about mid-August, when I decided that I needed another Italian gown.

First I drew up a new pattern, making some minor adjustments to the bodice length and the shape of the front closure.  (I also cut down the front of the blue corset, since, as you can see in that post, sticks up above my neckline.  Nope).


Skipping ahead, since there's really nothing special to share about the rest of the process, I give you:


My new, black, silk, Italian gown.

I made it from the same pattern that I used for the brown one, except that I made the waistline a bit longer, and the front panels a bit wider in the center so that the lacings would meet instead of leaving a gap.

On seeing this all put together, over the corset (which now doesn't show, yay!), I think I was wrong to drop the waistline. The cartridge pleating on the skirt now hits the bottom of my corset and tries to tuck under it, which throws the line of the skirt WAY off, especially in the back.  Also, it's too long for a late-1400s Florentine waistline.  I'll be removing the skirt and fixing this issue soon.

The shoulders stay in place much better than the brown dress, due to a small change in the pattern shape (you can see it in the above picture: I drew the shoulder strap as usual, then cut it off and angled it up toward the face, so that when attached to the back piece, and on the body, it would stretch a bit, making it tighter and flatter across the body.  This is a trick a friend of mine showed me for my cotehardie patterns that I thought I'd try on this).

Now, if I'd only remembered that the dresses like this I've seen in paintings actually ARE off-shoulder...


The trim, applied with a ladder-style couching stitch on my machine, is an antique, silk twill tape, given to me by a friend who was de-stashing some of her inherited old family sewing things.

It's a wee bit wonky on the right corner, which you can see in the pic.  The ribbon twisted while I was sewing it down; I'll have to fix that, too.

The yellow ribbon lacing the dress was just for fitting purposes;  I'll be lacing it with more of that silk tape, in whatever color I end up feeling like. :)


I'll also be making a couple of pairs of sleeves to go with this.  I don't have any more black silk, but I have a pair of light blue fitted sleeves which tie onto the bodice, as well as at the elbow and the back of the arm.  I'm also going to make a couple of pairs of big, boofy bag sleeves, like this:

Madelena Doni, Rafael, 1506


In the meantime, I've also finished a snood that I started a year ago and then LOST!  I found it when I recently re-arranged and cleaned up my sewing room, LOL.  Yay!


.

13 March 2014

Two Hours to Paisley Paradise

Time out for a mundane project!  (Yes, the corset proceeds apace).  This, like the pincushion, was a quick project I'd been meaning to get around to for ages.  It started with this:


A paisley silk sarong I bought from Victoria's Secret about twelve years ago.  It's been to the Bahamas and back, Florida, and New Mexico, and has served as a skirt, beach cover-up, and tablecloth for like three different tables.  It's got wax stains on it, and teeny tiny burn holes, and the little plastic beads that once graced the corners had long since peeled and fallen off.  I still loved it, but it had been relegated to sitting in a drawer for the past year or more.  

And then I saw this on Pinterest: 


And this:  


And after about a year of procrastination (sensing a theme here), and then a 2-hour flurry of work last night, this is what happened: 


The edge trim, belt, and belt loops are all made from a dark blue polyester charmeuse curtain panel I picked up at a thrift store a million years ago for like a dollar, hehe.  


In fact...I may make another little robe like this out of the rest of the blue curtain panel.  

I didn't use a pattern for this;  I made it the same way I make Sir Takuan's kosode and kataginu: 

A rectangle of fabric, folded in half (or two, sewn at
the shoulders), slit up the center front and bound
with a straight double-fold [bias] strip.  The kosode
is sewn at the sides (red dotted line) and knee or ankle
length;  the kataginu is open at the sides and usually
only hip length.  My robe is made kosode-style, with
added belt loops in the side seams. 


P.S. - yes, I patched the teeny tiny burn holes. 

.