Showing posts with label boxes and containers. Show all posts

16 August 2022

SCA: Heraldic Chest: Refit

 I built this little chest in 2014, I think, and it’s undergone a lot of different finishes.  It was stained, then painted about six times - the last time I painted it with my heraldry (2019), as you can see in this pic: 


Sadly, the polyurethane I used to seal it turned really yellow really quickly, and it looked just awful. I could have just painted it black again, but some of the paint edges and detail would have shown through the paint, so I decided to strip it back to the wood and start over. 

I stripped all the paint off and then sanded it clean, then re-stained the whole thing and clear-coated it, this time using Polycrylic, which doesn’t yellow like Polyurethane does. I also gave the inside a fresh coat of black paint, and painted the handles with gilding paint to cover up the crappy gold spray paint job they had before.  


I have no idea what kind of wood that is, by the way. It’s plywood from a wooden shipping crate I picked up for free a million years ago - the whole thing looked like that. 

I may still throw some heraldry onto it, but I haven’t yet decided what exactly to do.  For now, this little chest will return to duty holding my camping supplies - mallets, stakes, flashlights, etc.  I’m trying to weed out all the plastics from my camping gear: wood boxes instead of Rubbermaid tubs, baskets and canvas bags instead of plastic sacks and Ikea bags.  


20 November 2019

A Case to Put It Into

The last thing I did over the weekend was fix up a small wooden box to use as a jewelry box for all my Viking jewelry.  A lot of it is big and clunky (brass brooches, arm bands) and doesn't fit into the soft cloth jewelry pouch I've been using anymore. 

So I purchased a $4 wooden box and some adhesive-backed felt sheets and made a new jewelry box:


For right now all I had time to do was stain this box and clearcoat it, but I want to paint it one day - maybe a Jelling dragon design, or a Jormungandr (Midgard Serpent) - so I made sure to make this as smooth and clean as possible, so that painting on it will be easy when I get to it.  


I have to say, I'm loving the adhesive-backed felt sheets I found for this project.  I never had any idea they CAME with adhesive backing - I've always used plain felt fabric or velveteen in boxes, and adhered them to the wood with messy spray adhesive.  This was GREAT!

And I love my little box.  It was such a ridiculously simple project, but I love it all the same.  And there's room in there to grow my jewelry collection, too - more beads!  Must collect all the beads.


Okay, so BAM starts tomorrow!  See you fine folks on the flip side - and some of you I'll see there!


07 October 2019

A Heraldic Chest

In 2014, when I made this chest for my friend Simona, I made one for myself, too.   I didn't stain or finish it - it came in very handy at events, but it was always unfinished.  Eventually I painted it plain black.   I've always wanted to do something cool with it, but I never got around to it.


However, I finally painted it!  It's an adaptation of my device


I painted one half of each side of the box white with 3 coats of Killz primer;  then painted the red parts with red artists actylics and acrylic craft paint.  I used  artists' acrylics for the green leaves.  I coated the entire box with polyurethane to seal the paint.  While the hardware was off the box, I also sprayed the handles with primer and then a metallic gold spray paint, to spruce them up since they were looking a bit tarnished and gross.

I'm not sure exactly how to use it, though.  I used to use it at big events to pack and store all of my underthings and accessories - braies and bras, socks, headgear, and jewelry.  On the other hand, my feast basket recently died and I'm thinking this chest might make a great little feast box.  I'm not sure yet.


What's Next? 

I still need to fix or replace the back of the blue chair I re-covered a few weeks ago.  I may also make a new cover for my old parasol this week,  if I have time.  And, of course, Valkyrfelt is coming up - not this weekend, but next, and I'm planning and scheming like mad because I'm nervous as hell about camping for the first time in nearly three years.  


16 September 2019

A To-Do List: On Project Management and Prioritization

In days past, project management was a big topic on this blog, mainly because I (like most of us) tend to take on too much work, work in a rush, and end up either not getting everything done or turning out half-assed work.  Right now, as I come back into the SCA after a long hiatus, I'm in a pretty great spot:  I have no projects right now, and it's up to me to pick and choose where I spend my efforts going forward.  A fresh start!

So I'm looking at the upcoming Bjornsborg Viking event, Valkyrfelt, and trying to decide where to spend my money, my time, and my sanity.  The event is on October 19th, which is exactly one month away from my start date of September 20th (payday).  Here's what my list of ideas looks like right now:

  • a new apron dress
  • a pair of men's pants for myself
  • repairs to my broken Hedeby bag
  • a refit of my old parasol which needs a new cover
  • new Viking jewelry for myself
  • a wooden box I'd like to make just for fun 

Let's look at the time frames on those:  

  • apron dress - 3 hours, not including embroidery (approx. 6 hours)
  • men's pants - 2 hours
  • broken bag - possibly 12 hours
  • parasol - 2 hours
  • new jewelry - 3 hours
  • wooden box - 6 hours

All told, that's 34 hours.  I'll round it up to 40, because you just never know.  That's great!  I have plenty of time to get everything done.  

However, I also have a set of couch cushion covers that I'm making for a friend, and I'm spending about 4 hours a week on those right now.  All in all, I still have "plenty" of time to get all of this done...but do I really want to spend an average of 14 hours a week working on all of this?  No. No, I do not.  I want to have time to do other things with my life, too.  So how do I prioritize this a bit better?  Let's look at what each project is worth to me:  

  1. Apron dress:  I'm down by two apron dresses, and so this is definitely needed for this event. 
  2. Hedeby bag:  this is my only Viking bag, and I'll need it to carry at the event - it's not unusable right now, but it's definitely a pain in the ass.  Plus, I'm very proud of it and I want to have it with me, and I want it to look its best.  This one stays.  
  3. Wooden box:  this takes very little time, and I've already got the box and the supplies I'll need, so this project is free.  It stays on my list for Valkyrfelt, but it'll be the first to go if other things need more time. 

  • Men's pants:  while I really want a pair of pants to go with my male Viking outfit (great to pack up camp in on the last day!), I don't really want to spend the money on this right now.  Tabled for future events. 
  • The parasol isn't necessary for this event.  The site is fully shaded by trees, and the parasol isn't Viking at all - I'd rather use hats and sunscreen for a Viking event.  This one can go.  
  • New jewelry would be fun, and beautiful (and I'm craaaaving amber right now), but do I really need it?  No, I do not.  I'll table this project until necessary items are done, if I still have time and money.  

There.  I've just cut my list in half!  From +/-40 hours to about 23 (round up to 26).  That's much more doable, and I'll have the time I need to do each of those three "needful" things nicely and correctly, instead of rushing through trying to get 6 projects done.  I'd like to try to time myself as I work to get a better idea of if my estimates are correct - if I remember to, I'll post about it here.  

As of right now, I've already completed the brown apron dress and am now working on the embroidery (seams, top edge);  and I've begun the wooden box.  Hopefully I'll have pics of finished projects for you soon. 


15 September 2014

Little Boxes Made of Ticky-Tacky

I made a box for my friend, Simona!


It's not exactly heraldic, more...heraldy.  I've decided that's the new term. :)  Elements of her device worked into the box, without being the actual device itself. Heraldish.


It's made of pine plywood harvested from a large shipping crate that I picked up for free from the warehouse at the company where Simona's husband works.  I had a LOAD of fun knocking the crate apart with a big mallet...

for a while, anyway. 

I'm working on a smaller one for myself as well - should be done and up on the blog this time next week.


.

10 September 2014

Poky Storage + Sewing Kit

Perhaps you remember my little red velvet needle case, which I made in February of '13:


It's just a little tri-fold doodad, made from fabric scraps, padded and lined with the inside of a fake fur blanket.  I was very new to embroidery then, and so only the random leaves and wee pomegranates were hand-embroidered - all the swirly bits were done on my machine.

Don't get me wrong, I've always loved it's functionality;  but recently I pulled it out to work on some hand-sewing, and I thought, "Wow, this is crap, I can do WAY better than this!"  So I grabbed some more fabric scraps and sat down in front of Game of Thrones season 2...all of it.  (I had a migraine, but couldn't sleep).  This is what I made to replace the red one:


This one is also a trifold wallet-like design; and these are two of the panels.  The third panel is left blank, since it's going to be tucked inside anyway.

The white backing is cross-stitch fabric.  The inner lining is the fuzzy blanket lining from the old needle case, for padding.  The blue lining, which is wrapped around the outside as a decorative edge, is turquoise linen/rayon blend.


The full pomegranate is the back of the case.  This is the front, when it's closed.

Yes, it's all rumply.  I intend to iron the whole thing out, and then put a button or tie or something on it to keep it closed, like the red velvet needle case had.


The inside, which contains a smattering of sewing and embroidery needles in various sizes, several sizes of glass-head pins, a small curved darning needle, and a large upholstery/leather needle.


I keep it in here, a box I made in 2011, along with more pins, some bobbins of thread in common colors for on-the-go repairs, a small pair of steel snips, and random things people always need, like safety pins, extra bobby pins, random buttons, and a couple of extra dress lacings:


.

27 August 2013

Okay, One More Box, and Then I'll Start Sewing, I Promise.

Sadly, I didn't have the presence of mind to take a "before" picture of this, but it was basically just a brown wooden box.  Light brown.  I "stained" it with watered-down red craft paint, sprayed it with a super-shiny gloss clearcoat, and lined the inside with some scraps of a vivid blue uncut corduroy (feels/looks like velvet, but sturdier).


It's hard to tell except in the last picture, which is horribly over-exposed with flash, because it's the only way I could get the red edging to show - the box edges are highlighted in a shiny red lacquer paint, to hide some flaws in the stain, and to better blend the edges of the wood and the blue "velvet" visually.  

Okay, NOW I'm going to go sew.  Two weeks to go from first-draft-pattern to completed 12th century side-laced pendant-sleeve gown.  No pressure. 

σ_ô


.


26 August 2013

The Big Black Box

I needed a six-panel chest.  You know the one, it's ubiquitous in the SCA.  It comes in all shapes, sizes, colors, finishes, and types of detail.  It's SO handy.

Enter this guy:  


This is a wooden toybox that my grandfather built for me when I was only a year old.  It's as old as me, and like me, it was showing a bit of wear.  It's been useful and beloved throughout it's thirty*COUGH* years, but lacking a hinged top made its use a bit limited.  Eventually it was relegated to storage, tucked on top of a shelf in my garage.

I was hesitant, at first, to refinish it at all (even though I hated the paint job - it's green/yellow on the other two sides), because it was my grandfather's work, I finally decided that I'd rather change it and use it and love it anew, than let it rot on top of a high shelf - and why not look at it like this: he put loving work into this thing, so why shouldn't I? This is as close as we would get to having worked on it together.

The paint was old enough to have been lead, possibly, so I did no sanding.  I spent weeks scraping and peeling and covering it with liquid and foam paint remover, before finally giving up once I realized that even where I'd gotten through the paint, it had long since soaked into the wood, and it would never be stain-able.  So I scraped it smooth, applied a wood conditioner to re-hydrate it, sealed some slightly separated joinery, and painted it inside and out.

From there, the rest was all fun.  I've been working on this guy all summer (you saw the background on the lid, and the smaller box which was kind of a dry run for this one).  Here's the finished product:

Black outside, and mint-green-blue inside (because that's
the color I had, hehe.  The top is stained because it was
cut from an old desktop, and was already finished.  

A close-up of the decorative mountings, which are
just jewelry plaques bent and nailed on with small tacks. 


The handles on the sides, which are simple drawer pulls,
backed with more jewelry plaques.   Not remotely period,
but, as with all facets of this project, I used materials
I already had on hand. 

On the outside of the lid is a mural that took me like three weeks to paint.
I absolutely love it, warts and all, from the derpy little deer to the appalling
mélange of artistic styles used  (this is a learning project, you guys).

See?   I do love how all the colors came out, though, and overall I'm quite
pleased with the finished chest. 


I do have to say that the sky is my favorite thing, though.  It doesn't show
well in these pics, but all of the gold is metallic.  Not leafing paint (my jar
of leafing paint is stuck shut!), but my trusty gold liquid paint pen. 


So, this is going to be my nightstand in my tent, and very likely full of underwear and socks, hehe.  Very few people will ever even see it, but that's okay with me.  I'm really pleased with it, and I want to keep it where I can see it all the time, and where it won't be damaged by the elements.

Next up, woodworking-wise, is another, smaller chest, that I'll be building from scratch; but with the first event of the season only weeks away, I need to lock myself in my sewing room for a while.
See you guys on the flipside.


.

09 August 2013

Progress!

A

Remember the little painted black box?  I'm doing a much larger version - a 24" six-panel wooden chest.  The box itself is nearly finished, and painted; now I'm working on the box top:

(part of the upper right corner)  


B

I've also decided I need a Tudor corset.  I don't have a pattern, and I don't feel like drafting one from scratch, so I'm drafting one from an old renfest corset that still [mostly] fits me.  The first part was getting it on and laced up, and then marked with a chalk pencil where I'll be making shape and sizing adjustments:


C

And just for fun (because I'm still in the process of re-organizing my sewing and craft/art rooms, and because I had to re-organize my jewelry supplies into better containers and had the beads out anyway), I made a little necklace to wear with...whatever!  To me it says "rubies and pomegranate arils", even though it's just glass and tiny tumbled garnets.


More soon.

.

01 August 2013

The Little Black Box

Well, my phone ate the before picture.  :-/  


So, this is an 8x10" wooden box from the craft store, with a sliding top, about 6" deep.

This is kind of a "before" - it started out life with a sheer black stain on the wood, and the inside painted a deep wine color.

In re-doing it this time around, I painted a black border around each side, outlined with a thin gold line (extra-fine point gold paint pen), and accented it with plain ol' brass thumbtacks.  


 This is the sliding box top. Originally, it was just stained black, like the sides.  Recently I had painted the whole top blue, and stenciled a vine-y, botanical design all over it in gold paint...that I ended up hating.

So I sanded it smooth to get rid of the stencil lines, painted the whole thing black, and then painted this little scene, with the same gold paint pen outline, to match the sides.


It's not a copy of any extant scene, just inspired-by.  I absolutely adore forest scenes in medieval paintings.

This one, for example, which, unfortunately, I found via a google search and a "print vintage art for free" website which listed NO source. There were a series of these, with different animals in them. I loved the greens and blues - and the acanthus leaves in the sky!

Obviously my box top isn't nearly so detailed, but it's my first.  Give me time. :)


My pronouncement on the finished product:  doesn't suck.  

And as a rough draft/trial project for a much larger version of this, it went pretty well.

Yes, there's something much larger, and cooler, on the way.
Soon.


.

04 March 2013

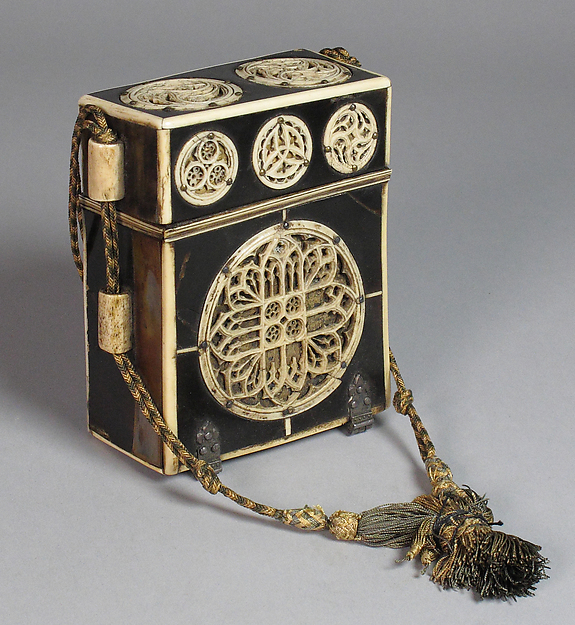
15th Century French Cigarette Case?

Step One:  Before  

Mine was black with skulls all over it.
It was pretty cool, but it was also worn around the edges and really faded. 


Step two: Inspiration

French manuscript case, 4x3", early 1500s
Tortoise shell and ivory
Metropolitan Museum

Step Three: supplies already on hand


Et Voila:  

Sorry for the blurriness - I'm back to phone pics until I can figure out wtf picasa is smoking these days.

1 plastic cig case
black spray paint
3 plastic buttons, spray painted almond
gold paint marker
7 "pewter" plastic beads
embroidery floss, 6-strand braided cord (and yes, the box slides up and down on the cord, and opens properly).

Not bad for a bunch of plastic crap.


.


.

Two More Purses

Well, this past weekend was Gulf War Prep weekend.  I kid you not, I sewed for eleven hours on Saturday (with a two hour lunch break), and another eight on Sunday, after which I spent about three more hours painting things.

I have a LOT of finished projects to show you; the first of which are both of the embroidered purses I started several months ago.

The Pomegranate Purse

From September:


Three shades of red, green; lined with red linen, and finished with gold tassels and tie, through a simple casing and buttonholes at the front. 


The Blue Velvet Purse

From November:


Blue velvet (actual just uncut corduroy), lined with light blue linen;  gold stars, green leaves, red flowers, and a pomegranete in the center on each side;  blue lattice to match the fabric, and finished with a turquoise ribbon tie and turquoise tassels.  There's also a a hidden cellphone pocket inside this one.

Woo!


.

24 February 2013

Blue Box the First

Lookit:


That used to be a banged-up old wine box that a friend gave me several month ago.  All the black "hardware" is just painted on, except for the catches in the front.  (The holes are where the handle goes.  The box came with a rope handle; I'm trying to find something of the right dimensions to replace it).

I have no idea what I'm going to keep in it, but it's pretty. :)

From the Romance of Alexander

23 February 2013

I Suck At Embroidery, But I Enjoy Every Minute Of It

I made a wee needle case to tuck into my sewing kit, to replace the plastic packages I was carrying them in before, and to negate the need for toting my gigantic pincushion around in my SCA sewing kit with me.

red velvet scrap, various "gold" (yellow) embroidery thread

interlined with cotton scrap, and lined with a fuzzy furry scrap.
Gold braided ties to close. 

I embroidered the vines on my sewing machine (I'm not
completely insane), then did the leaves, knots, and of course,
a wee pomegranate, my device. :) 


.

20 February 2013

Yea, and A Purse To Put It Into

If you've been reading, you know I'm [still] in the middle of embroidering two purses for myself.  There's no deadline there;  they're my "sitting around at an event and need something to do with my hands" projects.

But I DID need a new purse.  The one I had was just a big circle with a drawstring, made out of a scrap of red polyester microfiber.  I loved the shape and size, and ease of use.  I did not love that it was falling apart, because I carry it everywhere.

So, last night, after altering *two* dresses to fit, and finishing a third (more on all three later this week), I replaced my worn red circle-pouch with a new one:


This one's BRIGHT RED cotton velveteen, given to me by a friend, with a plain white cord drawstring, and machine embroidered, just for a little extra sumpn-sumpn.


That took a long.    freaking.    time.


*

As I said, I'll have clothing updates soon.   Also, this weekend is the Tournament of the Smitten Heart, in Bjornsborg.  Will I remember to take pictures this time?  ***drumroll***


.

25 October 2012

VIKING EPICSAUCE: Behind the Scenes (A Very Long Entry)

Today I'm going to talk about the process I used to make the Viking Casket, aka The A&S Project That Wouldn't Die, or The @$%#^%&!! Viking Box.

You guys know what Scope Creep is, right?  YEESH.  This was a nifty project to work on, don't get me wrong, but it ended up involving a LOT more work than I thought it would, and took a LOT longer than I thought it would, and was a LOT harder than I thought it would be.  I bled.

So, this was a $3 hobby store unfinished wooden box.   I really wanted to simulate the look and feel of ivory on the finished piece, but I wasn't sure how - clay? Jewelry plastic?  I'd never worked with either of those things.  I decided to go with what I knew: decorative painting and faux finishes.  There was a bit more to it than that, but let's not get ahead of ourselves.


First I primed the box with white paint.  Then I went looking for designs, LOL.  I did a bit more research than simply finding two extant Viking caskets on a website somewhere;  I wanted to make this fit my recipient's persona as nicely as possible, so I learned about various styles of Viking carvings and art through the ages.  (And yes, I looked at more than Wikipedia, for you research nuts reading this).  The two designs I chose are in the Borre style of Viking animal carvings.  The oblong design on the top of the box is oblong for a reason - it's copied from a rather common style of Viking brooch. The other motif along the sides is based on some modern recreationist jewelry pieces I found that were themselves based on, I believe, extant horse tack hardware.  (And no, I don't have documentation on this, as only minimal docu was required for this project).  Anyway, I sized the images on my computer and printed them out to the scale I needed, and then traced them onto the box with sewing tracing paper.  Because the chalk from the paper was rubbing off like crazy, I traced over the lines with a pencil.  Which I should NOT have done.

I gold-leafed my nails, lol. 


Here's me doing the first round of carving the designs into the wood.  It's hard to tell, but because of the pencil marks, all the cut lines came out black.  I really wasn't happy with that, because it meant more work for me to correct it.  But first I also had to go back and bevel the edges of each cut to widen the marks and soften the edges.

Keep in mind, here, that I am not a wood-carver, and have NEVER carved wood before.  What was I saying earlier about sticking with what I knew?  Yeah.  I have no idea where the carving idea even came from.  Originally I was just going to straight-up trompe l'oeil this thing.


These are my "carving tools".   I mentioned I'm not a wood carver, right?

  • butter knife
  • paring knife (I used the back of the blade, which required me to layer my fingers with several band-aids, a glove ,and wrap the blade of the knife in leather, since I had to press against the blade of the knife to control it!)
  • a small awl, which didn't work at awl
  • a crochet hook, which I actually used to trace the designs onto the box with the sewing paper
  • an X-Acto knife, which I used to make all the initial cuts, and which gave me a MASSIVE blister on top of a callous, which I didn't even know was possible.  I thought that's what callouses were *for*.  


there's kind of a sneak preview in this picture. 
Anyhoo, the next step, as I said, was to fix those black carved lines.  I wanted the finished effect here to be very warm, aged, but not dirty looking.  

Enter the first paint color:  Weird Tan (that's what I'm calling it).  It's a 99c generic acrylic craft paint.  I smashed it on with a small stippling brush to get it into all the lines, and then smoothed off the excess with a wet paper towel, which also served to "stain" the background a bit and make it look aged.  It accentuated the wood grain on the box a bit, but I liked the effect. 


top: another necessary part of this project - CAFFEINE

With the same paint, on a moist brush, I started painting in the background shadows of the designs etched into the sides.  

Since my carvings weren't very deep, I used paint to give the impression of a much more serious carving than I'm capable of delivering.  I really, really loved the way it came out.  


After the tan background and "shadows" came some highlights with plain white acrylic paint.  

Easy 2-step paint process?  Nope.  I actually went back over the design about three times with both colors, adding and shading and lightening, until I had a soft but obvious 3-D effect.  I paid special attention to the eyes and the ridges on the snake's (?) back, which were very pronounced in extant animal carvings. 


I love this paint, but I don't have brush cleaner.  
I used nail polish remover.  

Here's where it gets cheesy.  I really wanted to do the edging on this box in real metal - not that I work with metal, but hey, I don't carve wood, either.  At first I couldn't find gold-colored metal thin enough for this project.  Finally I found some sheets of stamping/etching metal in the jewelry section of my local Michael's, but (a) it was really expensive, and (b) it came in packages of 2 pieces each of gold, copper, and silver - I would have to have bought three packages, and then what would I do with the other colors??   And so we have:  popsicle sticks painted with Liquid Leaf gold leafing paint.  I'm not even kidding. 

The next step is where we go from plain ol' painted wood to faux-ivory finish.  It worked out so incredibly well, I'm actually impressed that I thought of it, although I have no clue why it even occurred to me to try it - it just did. 

Wood glue. 

Yup.  

You know what wood glue feels like when it dries; and how it has that sort of creamy, yellowy-clear sheen to it?  That's exactly what I wanted.  So, with a very soft, wide fan brush, I painted the entire box with wood glue.  The fan brush was so that I could sweep the glue on very evenly, without leaving streaks or ridges in the glue.  It wasn't hard to paint with, but it sure was different.  

After one smooth coat over the entire box, basically to seal and color it, I glued the popsicle sticks on.   Then I painted another coat of glue on each panel of the box individually, staying away from the very edges, to give the appearance of a slightly-raised panel.  

The glue fell into the cuts in the wood, just like I'd envisioned (thank goodness), and it really does feel smooth and hard, just like ivory or bone or horn.  The top of the box came out a leeetle bit more yellow than I wanted, but it does this nifty thing where it very gradually and evenly gets darker towards the center...just like an old natural material would, so, I'm actually pretty pleased with it. 

After that was dry, I used wood filler to putty the small gaps in between the pieces of popsicle stick, and then painted over all the trim with the gold leaf paint again, and then sealed the trim with Polycrylic. 

the inside is just painted purple. 
The "rivets" in the gold edging are actually the heads of teeny-tiny brass brads from the scrapbooking section of the craft store.  I looked high and low for gold nails or tacks of the right size, and they were nowhere to be found.  ARGH.  But these guys were just right.  The brad "stems" were far too flimsy to nail into the wood like nails, though.  I clipped them off with a toenail clippers (the only thing I had that was both strong enough to cut this thin metal, and small enough to get in there - scissors and nippers were far too large for the job), leaving about half a millimeter of stem on each one.  

I simply glued them in place with more wood glue, and then tapped them in gently with a small hammer, so that the remaining stem on each head would grab the wood underneath and help it hold. 

Later, a friend of mine asked me why I hadn't just drilled tiny pilot holes and tapped in the brads with a bit of glue.  Genius!  I totally didn't even think of that.  

So, there you have it!  

.