06 December 2022

Regency: A Green Linen Capote Hat

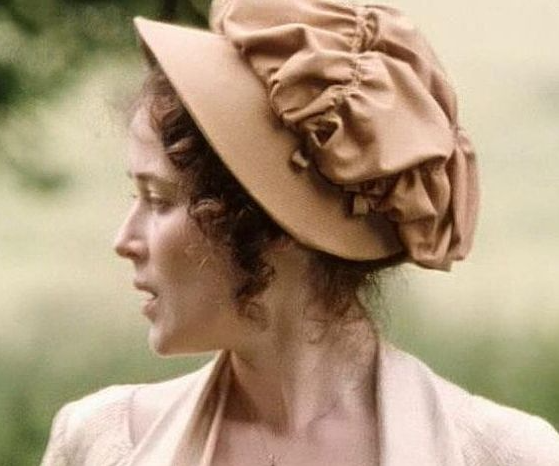
Before the SCA took over my life at the beginning of October, I was working on a new hat for my Regency costumes.  It started out silly, which I'll tell you about, but first, here's the finished hat: 


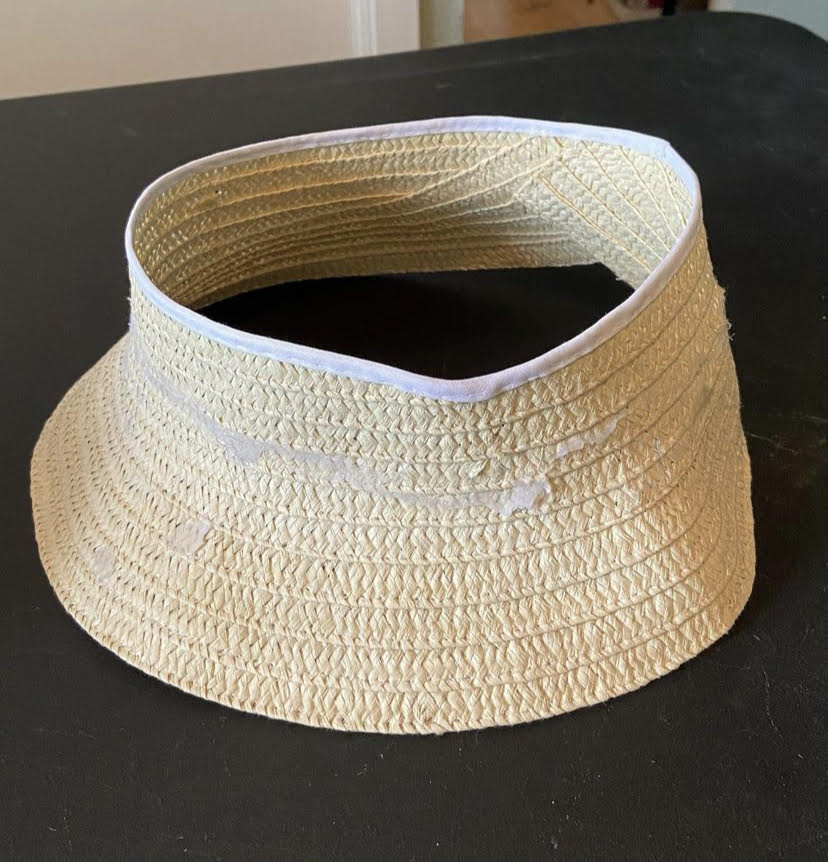
First, in July, I bought a blank hat form from Etsy (Austentation) and trimmed it up in blue fabric/ribbon and LOTS of hot glue.  First mistake.  I hated it - it was overly frilly and girly, and I felt like a blue version of Strawberry Shortcake when I put it on.  NOPE.  I took it apart and removed all the hot glue from the straw with my iron and a scrap of fabric.  


just...no.  


What I wanted was something more subtle and graceful - like this ruched capote worn by Jennifer Ehle in the BBC Pride & Prejudice miniseries from 1995: 


The crown of the straw hat was too tall for that ruched soft fabric crown, so I cut part of it off and wrapped the edge in a bit of cotton bias tape to keep it from unravelling: 


(please excuse the hot glue, I removed it)


Next I created a mock-up of the fabric cover for the brim, and an 18" circle crown piece with some spare cotton sheeting I had on hand.  Once I got the fit right across the brim, I took apart the mock-up and used it as a pattern to cut out the pieces in a dark green linen (which I dyed; the linen used to be a light blue).  The linen was a bit limp for this application, and a good deal heavier than the blue fabric had been, and it sagged in places in an unattractive way, I ended up using the gray cotton mock-up pieces as a lining, to give the linen some stiffness: 


This time I sewed the pieces onto the hat with plain cotton sewing thread, rather than gluing them in place - it made the pieces lay flatter and more smoothly, and I should have done it in the first place, really, but I was too excited and in a rush with the blue. Oops.  I used a pad stitch to baste the brim cover in place around the base of the crown; and whip-stitched the turned edge of the crown piece to the brim cover, then pressed the crown piece outward over the stitching.


At first, I didn't like how it came out.  The fit around the edge of the brim was too loose, didn't look clean and smooth at all.  Also, the crown was too small, and wasn't fluffy enough.  I ended up taking the hat completely apart, re-stitching the brim edge so that it fit better, and cutting a new 22" circle for the crown so it would be large enough.  After altering the fabric pieces, I tacked on a green poly satin ribbon to the sides for ties:


I'm really happy with it now; it looks great, fits perfectly, and is a lot more understated than the frilly blue thing I first made.  The only thing is that now the crown is TOO big, and because of the limpness of the linen, it hangs in weird ways around the back of my head.  The hat still needs a lining to protect my hair;  I think when I do that, I'll stuff the crown of the hat with a bit of tulle or something to keep it poofed up a bit more so that it'll stay in place and not sag.  

I plan to wear this hat with my white Ikea dress and the green velour spencer jacket I made in 2021, if I ever get another chance to wear either:


So what's next?  I got some fabulous, FREE fabric the other day, and I'm working on a new Spencer jacket.  More soon!  


20 November 2022

Regency: White Cotton Neck Frill

I made a silly accessory just for fun! My original inspiration for this frill (also called a ruff or fraise) came from two places:  this pointed and ruffled chemisette made by Sarah at Romantic History, which was based on a Janet Arnold Patterns of Fashion pattern, and which I love to pieces; and the ruffled collars worn in the 2020 movie adaptation of Emma by Emma and Mrs. Elton.  

I haven’t seen these frills terribly often in fashion plates or in impressions by other costumers; but I did manage to find a couple of historical examples in museums and fashion plates: 

1800s ruffed frill from Meg Andrews auctions


1807 ruffled collar from the Metropolitan museum


ruff worn with a pelisse; no clue if it's part of an underlying chemisette or not. 
LACMA


another similar fashion plate


Mrs. Elton’s orange ruffled collar in 2020 Emma


I essentially copied Sarah's design for the ruffles and neck band, and omitted the chemisette panels.  My ruffle pieces were 34” long and 3” wide at the widest point (narrower in the front, about 1.5”); and the neck band (finished) 17” x 1.”

The fabric is cotton voile, starched a tiny bit to make the ruffles stand out.  I didn’t have any starch on hand, so I mixed a tablespoon of cornstarch into 2c hot water and sprayed the fabric with that before I completed assembly. I honestly had no idea you could do that. No, seriously, all my life I thought laundry starch was just some magical (and probably dangerous) chemical concoction.  The more you know. 

pinning the ruffles to the neck band


I used two ruffles, each gathered and sewn into the neck band of the same fabric, one at the top and one at the bottom. I cheated and cut them as one piece and hemmed the pointed edges that way before cutting them apart, to keep the straight edges from fraying while I worked on the points.

TINIEST ROLLED HEM EVER


I attached a vintage silver-colored 1/8” silk tape to the neck band ends that I had in stash, and left long tasseled ties in the back to hang down. 

the finished fraise/ruffled collar


Tada!  I love this piece. It’s very silly and froofy, and I had a lot of fun making it. In retrospect, I think I should have paid more attention to staggering the ruffles so they weren't so stacked on top of one another; and I think I should have made them longer on the bottom than on the top to accentuate the layers more.  Overall, I like it, though, and I plan to wear it with...a dress I haven't made yet.  More on that at a later date.  


15 November 2022

No BAM for Hrefna - What's Next?

 So it turns out that I can't make it to BAM this weekend after all.  My ride got very sick at the last minute, and I can't make the trip on my own or find another ride.  So I'll have a nice, long weekend off work to myself, to rest and work on various projects around the house.  Here's what I've got going on right now, which I'll be posting about in the coming weeks: 

  • SCA:  I'm crocheting a new Hedeby bag (yes, crochet, I'll tell you all about it soon) - I need to finish it and then dye the finished product
  • SCA:  I've decided to update the male Viking tunic I made for myself over a year ago, which will involve changing the neckline and sleeve cuffs
  • Regency:  I'm in the middle of working on a new hat for myself, which I need to finish and then trim up with ribbon and floral elements
  • Regency:  I have a new outfit planned, and some accessories to go with it.  That'll be a lot of pattern drafting and engineering patterns from pictures I've seen online

Plus I have about a million other little projects around the house to get done, some of which I'll post here and some I won't (you don't care about the doorknob on my pantry, right?)  I have plenty of things to keep me busy over the long weekend, as well as a birthday dinner for my best friend and roommate; and lots of projects to plan and work on over the coming winter.  


One of the many crochet things I've been working on


08 November 2022

SCA: Prepping for BAM

 The third week of November is "BAM" - Bordermarch Autumn Melees, now called War of the Rams.  It's a five-day event in the middle of east Texas, and it's usually wet and cold...and a TON of fun.  

In 2020 and 2021, my Pandemic Project was an all-new Viking wardrobe - two new serks and three new apron dresses.  By the time the Pandemic blew (mostly) over and we were free to hold SCA events again, however, I'd gained enough weight that exactly NONE of my new dresses fit, so earlier this year I rushed to make two new serks and two new apron dresses that would work for me (the teal one that I've never blogged about (oops), and the blue herringbone).  

However, in August I started hitting the calorie-reduction and daily-walking bits as hard as I could, and I'm pleased to say that I've lost about 25lb since then - enough that I can fit into all of my Viking clothes, both the pandemic projects and the new pieces, as well as some older apron dresses that I spiffed up in 2020 and have never worn since.  

So, I've been spending my spare time in fixing up these older new dresses. All of my newer Viking clothing is seamed on the sewing machine and then finished by hand, and constructed in as period-correct a way as I can make them.  Except the older new dresses weren't - some of them were hemmed on the machine, so I'm picking the hems out and re-doing them by hand to make them look a bit better.  I did the same with my serks, which were all made entirely by machine - I picked out all the necklines, hemlines, and cuffs, and re-did them by hand in either a herringbone stitch (on the inside, which looks like a running stitch from the outside), or a running stitch. 

linen serk with new neckline stitching

All of my clothing is ready for BAM, and all of my packing is as pre-packed as I can make it, and I still have a week and a half to go.  So I'll be re-hemming dresses, ironing things, and working on various crochet projects until then.  I can't wait! 


02 November 2022

It Goes "Ding" When There's Stuff!

 MAN I have been busy the last few weeks.  I haven't been blogging much, because I've been too caught up in my work.  I went to two SCA events in a row, and then threw a big Halloween/birthday party at my house.  So the past three weeks or so have been spent spiffing up garb and costumes, cleaning the house and getting ready for the party like a crazy person, and decorating for our local Baronial event, which was last weekend.  Our decorator got sick, so I took over for her, and made fences and flags and tablecloths and all sorts of neat stuff.  

Now that it's all overwith (all three events were awesome and made my heart full!), it's time to turn to the next set of Things: 

  1. BAM (Bordermarch Autumn Melees, now called War of the Rams, in Gleann Abhan on the 17th) 
  2. More Regency stuff
  3. Prepping for next Halloween - yes, already

For BAM (War of the Rams, whatever, we all still call it BAM), I need to delve into my Viking wardrobe and see what fits and what doesn't.  During the pandemic, I made like five new apron dress outfits, but then quickly grew out of them and had to replace them with two more in a hurry before this fall.  But in the past two months, I've lost some weight, and I think my "old" new dresses might fit me again.  So I've got a lot of trying on and possibly altering to do, in order to have enough to wear for a five-day event.  I also need to repair my camp chair, as the seat blew out at baronial two weeks ago.  Whoopsie! 

For Halloween, I wore my white Regency round gown and the teal cap I made a couple of months ago.  Unfortunately, I didn't manage to get any decent pics of me in the dress for you.  A few friends have recently expressed a desire to get dressed up in Regency finery and go to tea somewhere.  The local English-style tea house is very expensive, and booked up months in advance; so I decided that next Spring I'll just host my own tea party and invite all my Regency-costume-minded friends.  I just happen to have a heap of teal cotton, so I'm planning on making this dress to wear: 

Elizabeth Lisee Vigeé Le Brun, by Tatiana Potemkina, Met Museum


And for next Halloween, I want to change up my decorating scheme, so I'm starting with my collection of (8?) brass candlesticks.  I got them at a thrift store for a couple of bucks each many years ago, and smeared them with black paint to make them look gross and tarnished.  I decided for next year (and for the tea party) I want them gold again, so I tried to take the paint off, but it's been stuck on there for so long that it wouldn't come off no matter what I tried.  Rub N Buff to the rescue!  


So far, so good.  I'm still not finished with them.  


So there's a very random, stuff-filled post for you.  I'll show you my progress as I work towards getting my wardrobe ready for BAM; and I'll certainly be back with more Regency stuff soon.  Ta! 

01 October 2022

SCA: An Exercise In Repeated Failure

And now for a fun post! Warning:  I'm going to cuss in this one.  You'll see why.  

Sometimes things just don't go your way.  I love dyeing fabrics and clothing, but man, when dye goes wrong, it goes WRONG.  I had this "natural" colored (oatmeal colored) linen serk that I wanted to dye blue, and it took way more work than it really should have...mostly because I screwed up in the beginning. 


Here's where we started.  This "oatmeal" color is lovely, and correct for the period, but this tone looks AWFUL on my skin.  Every time I wore it, I looked ill.  No bueno.  


I selected a teal Rit dye, and a charcoal gray one.  Just a bit of each, and the gray was supposed to tone down the tealness of the teal and make it more of a plain blue.  According to the Rit recipe from the website, it should have happened that way. 

Except that I forgot to take into account the native color of the fabric, which was basically BROWN.  Brown + blue = more brown.  So effectively, the two colors cancelled each other out and all I added was gray.  So the dress came out...gray.  


So I bleached the fabric.  Twice.  The first time didn't accomplish anything at all; the second time returned the dress to more or less its original color.  

But I thought...I could go lighter.  


Bleach spots on the third time through.  Oops again.  And also, fuck.  

I tried again, with double the bleach the fourth time.  I was leery of doing it, because too much time in the bleach can start eroding the fabric.  Thankfully, throughout this process, THAT never happened, at least. 


After the third round with the bleach, I had achieved something that looked kind of like zombie flesh:  mostly chalky white, with some brown streaking and spotting.  Gross.  

But once the dress was dried, the spotting/streaking barely showed, so I thought maaaybe it might be ready to take dye now.  

Wary of using too much teal dye (and no gray this time!), I only put a couple of capfuls into the washing machine with my dress. 


Shit, it's green!  Like, candy mint Peeps green.  UGH.  

But the color came out even.  Hm. 

I decided to give up.  I threw the rest of my teal dye in to the washer, and a couple of capfuls of the gray, and let 'er rip, let the chips fall where they may.  I was sick of messing with this dress. 


To my surprise, the dress came out a light greenish blue - exactly the color I'd wanted to dye the dress in the first place!  

Finally! Yay!  The color is nice and even, maybe a touch dark around the side seams, but that's okay - that'll be hidden by an apron dress anyway.  

SO DONE WITH THIS DRESS.  Glad it turned out ok. 


The End.  

SCA: Possible CRF (Critical Research Failure)?

 I recently discovered the wonderful YouTube channel, The Welsh Viking.  Jimmy presents dozens of videos on early Medieval Viking society, in all it's facets, backed up by research and web sources, and his own research as a reenactor and grad student. He reminded me recently of something I've heard before:  make the outfit fit the research, don't do the research to fit the outfit.  It made me wonder:  which have I been doing? 

My research process has been something like this: read the research, establish that the [Thing] I want to make IS historically accurate for what I want, and then make it.  Once I'm in the creation phase, I tend to forget most of the research - I can tell you that a [Thing] IS Viking, but not when it was found, who found it, who published the research, when the original article is dated from, or which aspect of "Viking culture" it comes from.  Most of my research has been only to establish "Yes, this is good."  I mean, I read all I can get my hands on, but I often just forget once I'm actually making things.  

So I wondered, is my reenactment Viking kit simply a mishmash of random "Viking" stuff I've read about, or does it even all go together?  I couldn't answer that question at all.  Think of cosplaying 20th Century American with an Edwardian corset, a flapper dress from the 1920s, with spectator shoes from the 40s and a bullet bra from the 50s, and a curly shag hairstyle from the 1980s and smoky black 90s eyeshadow.  Sure, it's all 20th century, but none of it goes together at all.  Had I done that unintentionally?  The idea horrified me.  

And so I made a list of all of my Viking kit components, and re-did all my original research, and then kept going until I had answers to all those questions from earlier in this post answered for each item.  The results pacified my earlier horror: it turns out that by dumb luck, most of my Viking kit is solidly 10th century Swedish/Danish, with a few exceptions.  Here's a short list: 

  • My serk and apron dresses are solidly in the area of finds from Birka and Hedeby from around 9-10th centuries
  • The blue colors in which I do all of my clothing are backed up by blue serks and apron dresses also found at Birka and Hedeby
  • The small round silver-colored brooch I use to hold my serk neckline together is not period, but is made to resemble finds of similar small round silver brooches found at Birka and Hedeby from the 10th century
  • My beloved "Hedeby bags" are made based on extrapolated designs proposed based on wooden bag handles found, again, at Birka and Hedeby from the 10th century
  • My two rectangular shawls/cloaks (one wool and one linen) are reminiscent of similar items of clothing worn by figures shown on the Oseberg tapestry, and which were also commonly worn in early Saxon and other neighboring cultures in the 10-11th centuries
  • Two coats/caftans, modeled after a find from Birka from the 10th century, probably only worn by high nobles - not many of these were found, but they are known (the fur trim on the gray coat was actually a thing.  Not the white fur that I used, but probably brown fur or sheep's wool which was either added to the garment post-construction or woven into the cloth used to make the coat).  
  • My wool winingas are known from graves from around Scandinavia, for my purposes most notably Hedeby from the 10th century (but winingas/leg wraps are known from the ancient Romans onward through WWII).  
  • The beads that I wear both suspended from my brooches and as necklaces are modern glass, amber and metal beads, made/chosen to resemble beads actually found in Viking graves from the 8-11th centuries.  (The metal, I've learned is not correct, but the glass and amber are okay). 

This stuff is all around 10th century Swedish or Danish.  Here's some stuff that differs a bit: 

  • My leather turnshoes are based on a find from Vlaardingen, Holland, from the 11th century, and similar finds from York, England.  
  • The Jorvik hoods that I wear are modeled after a silk hood found in Jorvik (York, England) from the 10th century
  • While tortoise brooches are known from the 8th-10th centuries throughout Scandinavia, mine are a replica of a pair of Vendel Period brooches, which predate the Viking Age by a little bit, probably from 650-700CE. 
  • The Skjoldehamn hood is known from a single find in Skjoldehamn, Norway, which dates to the 11-12th centuries, and is from a man's grave.  No hood like this has ever been found in a woman's grave that I'm aware of.  (The crocheted version of this hood that i made several years ago is basically just ridiculous, I made it just for fun and mostly to wear mundanely anyway). 
  • My earrings, which I made to coordinate with my necklaces and bead strings, are basically not a thing.  No jewelry which can be called "earrings" has ever been found in a Viking Age grave as far as I know.  

So what now?  I'm pleased that most of my kit turns out to be correct for 10th century Sweden/Denmark, which is what I was vaguely aiming for to begin with. There are some things i'd like to fix, and some things I'd like to change going forward to make my kit more authentic: 

  • I've known for a while that I'd like to try hand-sewing an entire outfit from the ground up.  Usually I machine-sew the construction seams and serge the seam edges, and then finish all the other work by hand.  I'd like to try actually sewing the whole dress by hand, including finishing the seams, which terrifies me. 
  • As much as I love my Rit dye, I really would like to learn to dye with natural dyestuffs. I don't know if this will happen though, because dyeing supplies and materials are expensive, and I'd have to start basically on the ground floor. 
  • I'd like to make a few Jorvik hoods out of actual silk fabric, like the original find was.  
  • Now that I know I'm not allergic to actual wool and can treat wool so that I don't react to the chemicals in it, I'd like to try making a wool apron dress.  It's too hot here for wool most of the year, but I could wear one at BAM in November...maybe next year. 
  • I'm working on getting better at inkle loom weaving, but inkle weaving is not period for Viking Age recreations.  As much as I loooove tablet woven trims, I'd really like to try learning to do tablet weaving and make my own. 
  • Two years ago, before the pandemic hit, I was learning to make glass beads, and had amassed some supplies of my own.  The classes I was taking are no longer available; I'd like to acquire the rest of the supplies I need and begin practicing in my own garage, and replace all my storebought glass beads with homemade ones that resemble or replicate actual Viking glass beads.  
  • I'd also like to learn naalbinding.  I've tried before and it was miserable and practically impossible, but I've learned recently that I was using the wrong kind of needle.  I'm going to make my own wooden needle soon, and I'll try again.  

Whew! That was a long post.  But wait, let's list some of the sources I've been reading/reading about: 

Carolyn Priest-Dorman (SCA): https://www.cs.vassar.edu/~capriest/viktunic.html 

Hilda Thunem: http://urd.priv.no/viking/ 

Thor Ewing, Viking Clothing, 2006

Agnes Geiger, Textile Finds From Birka, 1983

Inga Haag, Die Textilfunde aus dem Hafen von Haithabu, 1983
Inga Haag, 1974

Else Ostergard, Woven Into the Earth, 2003


Onward, to better reenacting!


22 September 2022

SCA: A Bag and A Hood, and the Last of the Herringbone Linen

 After the blue herringbone Hedeby bag, I still had some of that herringbone linen left over, and I had a set of walnut bag handles already made, so I decided to make one last Hedeby bag, and another Jorvik hood to go with it: 


This time I dyed the fabric a rich dark green. I dyed the pieces separately; the bag came out UNBELIEVABLY  DARK, but the color is gorgeous. The hood is a bit more believable.   

The bag is lined with linen I dyed the same color, and includes a phone pocket on the inside. Fabric straps attach the bag to the handles, which are the walnut handles I took off another bag which I didn’t like. The carrying strap is a three-strand braid (doubled) of some charcoal gray acrylic yarn I had in my stash. 

The hood is French seamed up the back and top, like the other ones I made recently; the front is cut on the selvage edge this time, the way the extant Jorvik hood was done.  The ties are just tubes of the same fabric.  I didn’t put a sit in the back of this one, honestly I just forgot because I was going too fast. 

So that’s all for the herringbone linen (or is it?) I got a lot of mileage out of that stuff.  I forget what the original yardage was, but from the piece I bought in January, I got: 

I'm already wishing I had more.  I'd love to find some diamond-twill linen to work with next; maybe I'll keep my eyes open for it the next time I can go to Gulf Wars.  


16 September 2022

SCA: The 2,000th Hedeby Bag

 Just kidding, I only have four of them at this point.  I just feels like a lot, you know?  I have more Hedeby bags than I have days in a standard weekend event.  And I'm about to make a new one: 


Remember the herringbone linen? I still had some scraps left over, and so I decided to make a new Hedeby bag with it.  I actually have enough for two bags, but I'm focusing on this one for the moment, while I decide what to do with the second.  

I dyed the fabric this deep blue color (Rit's "evening blue" with a touch of "teal" to warm up the color a bit).  The lining fabric is linen, the last of the "agave" color from Fabric-Store.com, left over from a previous project.  


This time I made the handles from pine. I recently acquired a large bundle of small pieces of thin oak planks from a friend, which included ONE pine plank that just happened to be thick enough for these handles, and long enough to cut both from the same piece. As always, I cut the basic shape out with my jigsaw, and fine-tuned the shape with my drill, sandpaper and chisels.  I originally stained them with a dark walnut color, but it didn't take well on the soft pine, so I sanded it off and stained them instead with an ebony stain, and it came out much better.  


Instead of attaching ribbon or decorative fabric, this time I decided to sew on a strip of wool tablet-woven trim in the Oseberg design (same stuff I used on my blue herringbone apron dress, purchased from Etsy).  I used the remainder of the trim as a carrying strap. I also couched a length of teal acrylic yarn around the edges of the bag, using navy blue embroidery floss as thread - the yarn and floss coordinate with the colors of the trim pretty well, I think.  

I opted for fabric straps to attach the bag to the handles this time, instead of sewing the bag onto the handles with embroidery floss as I've done in the past.  I've always liked the look of fabric straps, and it was certainly faster and easier than the embroidery floss method.  At first I attached the straps to the outsides of the bag, but given the color of the linen, that looked too much like a blue jeans patch pocket, and so I took the top of the bag apart, put the straps inside, and closed it up again.     

So that's five bags, if you count the one with no handles which I hate and might have actually thrown away.  There's a green one coming up next.  :)


12 September 2022

SCA: 1490s Florentine

 After refitting my two Florentine-cum-Venetian dresses, I still had my old red velvet court dress to figure out. Here it is in 2013 when I first made it


It still fits! I still had the original pomegranate-print linen sleeves, too, thankfully.  They were too tight, however, and originally I thought I'd just add a gusset under the arm to widen them, but then I thought, hey, I'm a bona fide Crazy Person, right?  Let's do something crazy! 


So, I cut them apart and re-shaped them as pieced sleeves a la 1490s Florence, to make them a little more accurate for the style of the dress (see below).  See the embroidered pouch on the far left?  It's the same fabric, but in 2013 I embroidered over the printed design to spice it up a bit, and I decided to do the same thing to these sleeves.  

Here they are finished: 


And here's the whole dress, updated and complete (click to make bigger): 


The dress isn't period accurate, I'm afraid.  A big thing with the laurels around here is to be able to explain THAT you know something is wrong, and WHY you chose to let it remain wrong.  Technically, the red velvet gown should be a giornea, open at the sides or the front to reveal a gamurra dress underneath.   However, I simply don't have the funds right now to make a whole new gamurra to wear under this dress, so I left it closed and used the matching sleeves and front panel to simulate the look of a separate under-dress.  I'm not a huge believer in the "10 foot rule", but it passes the 10' rule, and it looks cool, even if someone who really knows their Italian stuff would know right off the bat that this isn't right.  It bugs me, but it's what I've got.  I guess for making something old wearable again, I didn't do a half bad job.    

So now I'm all set for Baronial in October! At least, as far as things to wear goes.  I've been designated site decorator for the event, so I have a lot of work ahead of me making loads of flags and pennants and signs and ribbons and who knows what all.  I'll be busy with that for the next month and a half.  Meanwhile, I might even figure out what to do with my hair for the event.  And before Baronial, the annual fall Bjornsborg event is coming up early in October, so there's that to prepare for, too!  October is going to be busy.  


11 September 2022

SCA: 1520s Venetian - Black Dress

 After completing the wine-colored linen Venetian dress, I set about making the same changes to my black silk Florentine dress


Once again, the silk fabric was badly faded, and needed a refresh.  I over-dyed the whole thing with Rit's black dye. 


I created some new bag sleeves for it, just like I did with the wine dress, cut from the skirt of an old sideless surcote that had seen better days, and dyed them at the same time as the dress so the black tones would match.  This fabric is linen, with a woven stripe pattern, which I find just neat as hell. 


There's two old 1490s Florentine dresses turned into 1520s Venetians for the price of a couple of bottles of fabric dye. Yay! 


The only thing I'm not sure of at this point is what to do with my head.  My hair is very short these days (I cut off like two feet of hair in May and am growing out my gray), and I prefer to keep it covered in the SCA.  With Viking all I have to do is throw on a kerchief or a Jorvik hood and I'm good to go.  But what will I do with these Venetian dresses?  I suppose I could just pop on a snood, but I want to do more than that.  Hmm.  Maybe some more research is in order.  

SCA: 1520s Venetian - Brown Dress

So, I'm a Viking pretty much full-time, but we have an Italian-themed event coming up in October, so I thought I'd drag out my old Florentine wardrobe and see if it still fit.  

Reader, it did not.  I'm a bit larger than I was when I made these outfits - ten years ago!  The corset, first of all, rides up over my belly into my armpits, so it's not workable at all. Thankfully, the two dresses fit well enough if I lace them wide open (they used to close in the front), and can be laced tightly enough that they're supportive, so I don't need the corset. All of my old sleeves are also too tight.  I wanted to replace them with bag sleeves, but between that idea and the fronts being laced wide, I was getting pretty far away from the 1490s Florentine style that these dresses were originally supposed to be. 

Enter Palma Vecchio and his contemporaries.  I found the following paintings online, from 1510s-1520s Venice: 


Cariani, 1520


Unknown, 1520s


These Venetian dresses are laced wide (tied, actually), and shown with baggy oversleeves.  That's exactly what I wanted!  Now I know it's actually a thing.  (Mind you, I have no actual research to back this up, just a few paintings to go off of). 


The first thing I did was to dye my old brown dress.  It was badly faded after all this time, and needed the color refreshed.  Rather than overdye it with brown (I hate Rit's browns), I combined a wine color with an eggplant color, just like I did with the cotehardie I dyed two years ago, and it came out beautifully: 


Then I created some bag sleeves for it out of a blue linen, dyed to match (eh, they mostly match. They’re a little lighter, but then the original color was very pale).  I had to improvise the pattern:  all I had to go on was a pin from Pinterest with a broken link; I couldn't find any 1520s Venetian sleeve patterns anywhere else.  I copied the shape as best I could, and the sleeves came out just fine. 


my version


The only problem I had with dyeing this dress is that for some reason I originally attached the skirt with dark gray thread. It didn’t show much against the brown linen, but now that it’s red, it stuck out like a sore thumb.  So, I took the skirt off and put it back on with thread that matches.  Not a huge deal, but kind of a pain in the butt. 

So now I have a new dress to wear to the event. I have a black one to re-work as well, and a court gown to fix up. I’ll show you those soon. 


05 September 2022

SCA: Venetian Fan Makeover

Approximately 2 billion years ago, I made myself a little paper hand fan/face screen to go with my Italian outfits. I loved it…but it got loved to pieces. 


The paper is bent, tearing, fuzzy around the edges. The design, drawn in sharpie marker, is faded and crappy looking. The stick - a dowel with hot glue wrapped around it to simulate a turned piece of wood - was chipping off paint. Time to redo this thing. 


I spray painted the stick black, and then dry brushed on a couple of coats of brown and tan, to recreate the wood look. I sprayed it with Polycrylic after that, to protect the finish. 

For the flag, I cut a couple of pieces of damask-print scrapbook paper and glued them together back to back. Then I painted the edges and over some of the detail in the print with gold leaf paint, and attached the fan to the stick with embroidery floss coated in Mod Podge, like I did the first time. 


Brand new fan!  It matches exactly nothing I’m going to be wearing at Baronial, but I don’t care. All my other stuff is blue, this can be blue, too. 

Inspiration pics: 

Italian fans, 1500s


French face screen, 1600s


Woman In White, Titian, 1561


01 September 2022

SCA: Three Jorvik Hoods

 In May, I cut off over two feet of hair and started growing out my gray. I’d dyed it for years, and it was looking pretty dry and worn. It’s healthy now, and a great shade of silver - but it’s too short for all the cool braids and updos I used to do to go with my costumes. 

So this week I made a trio of Jorvik* hoods to cover my short hair at events where I’m dressed as a Viking. I used scraps of old linen from past Viking projects, so the hoods will coordinate with whatever I’m wearing (my entire Viking wardrobe is in shades of blue so that I can mix and match and it will all coordinate).  

*The Jorvik hood is rounded at the top back and comes down past the chin; the Dublin hood is pointed and shorter. I had that backwards at first, until I looked it up this week.  


All are machine sewn with a French seam up the back/top. The hoods we’ve found in gravesites use the selvage edge as the front opening of the hood, but I didn’t have scrap pieces big enough to do that, so they’re hemmed by hand. The ties are fabric, instead of woven or braided cord. These took me about an hour each.  

Viking hair:  handled.